I saw this recipe demonstrated on Ina's show Barefoot Contessa, and I knew I had to work it into my menu right away. I decided to skip the original side dish I had planned with my Salmon Burgers (see previous post) and try this instead. It looks super-simple with very few ingredients. With all the yummy, buttery, dill goodness, I think these potatoes will be a perfect accompaniment. I adore Ina, and her food is always top notch! I know these potatoes will deliver on flavor.
Dill Fingerling Potatoes
2009, Ina Garten, All Rights Reserved/foodnetwork.com
Serves 3
Ingredients:
2 tablespoons butter
1 1/4 pounds fingerling potatoes, rinsed but not peeled
1 teaspoon kosher salt
1/4 teaspoon freshly ground black pepper
1 1/2 tablespoons chopped fresh dill
Directions:
Melt the butter in a Dutch oven or large heavy-bottomed pot. Add the whole potatoes, salt, and pepper, and toss well. Cover the pot tightly and cook over low heat for 20 to 30 minutes, until the potatoes are just tender when tested with a small knife. From time to time, shake the pot without removing the lid to prevent the bottom potatoes from burning. Turn off the heat and allow the potatoes to steam for another 5 minutes. Don't overcook. Toss with the dill, and serve hot.
The Result:
These potatoes were another winning recipe last night! Really, we had a great dinner...and these potatoes were an extra little touch that made it so. They were really easy to prepare, and they turned out perfectly seasoned and cooked; just as Ina promised. I think you could probably try the same technique with small red potatoes...which I may try next time if I can't find fingerling potatoes. Overall, we will totally make these potatoes again. They were delicious!!!
March 31, 2009
Salmon Burgers with Scallion Cream Cheese
I was drooling when I saw these burgers on a blog I follow called Meal Planning 101. I am always trying to work more fish into our diet; so when I see a yummy fish recipe, I pounce on it! Salmon is one of our favorite seafood choices, and I love salmon burgers. Usually, if I see a salmon burger on a menu I will order it. Needless to say, I haven't had one of these babies in quite a while since we rarely eat dinner out. It is kinda strange that it never occurred to me to make a salmon burger from scratch myself. This recipe looks darn tasty and pretty easy to put together. I think this will be a good way to ease myself into the realm of making salmon burgers at home. Here is the link to the recipe on the Meal Planning 101 blog:
Salmon Burgers with Scallion Cream Cheese
I think I will serve these beauties on my Whole Wheat Hamburger Buns. I just need to defrost a few of them by the time dinner time rolls around. Also, I am going to pair this with a new potato recipe from the Barefoot Contessa (see separate post), and some steamed green beans. I am really excited to try this recipe! I will let you know how it all turns out.

The Result:
These were amazing. The scallion cream cheese totally rocked, and the burgers turned out perfect! So totally delicious. The burgers were so tall they were kinda hard to eat (and photograph), but it was totally worth it. I really piled on the lettuce, tomato, onions, and sauce. The recipe actually made 6 burgers total, so I have plenty leftover for lunch. Hooray! This recipe is a total keeper!!!! We loved it!
Salmon Burgers with Scallion Cream Cheese
I think I will serve these beauties on my Whole Wheat Hamburger Buns. I just need to defrost a few of them by the time dinner time rolls around. Also, I am going to pair this with a new potato recipe from the Barefoot Contessa (see separate post), and some steamed green beans. I am really excited to try this recipe! I will let you know how it all turns out.
The Result:
These were amazing. The scallion cream cheese totally rocked, and the burgers turned out perfect! So totally delicious. The burgers were so tall they were kinda hard to eat (and photograph), but it was totally worth it. I really piled on the lettuce, tomato, onions, and sauce. The recipe actually made 6 burgers total, so I have plenty leftover for lunch. Hooray! This recipe is a total keeper!!!! We loved it!
March 30, 2009
Jen's Cheddar Broccoli Chicken and Homemade Salad Dressing
This recipe is really not that much of a recipe...but really, a trick that I learned from my mother in law. When I was pregnant with my son I decided that I wanted to start making some of the meals that my husband grew up having for dinner. A lot of the meals that I love come from old family recipes, and I wanted our son to grow up having favorites from both sides of the family. I asked my mother in law to show me how to prepare some of the traditional dishes that they all loved to eat. She was always a busy, working mom so she told me that her main priority was getting dinner on the table fast. This was one of the first meals that she taught me, and it conforms to her philosophy. It could not be any easier. (I think she was trying to size up my prowess in the kitchen, because she later moved on to more difficult recipes.) By now, it has turned into comfort food at our house and we all love this dish.
I should also mention that I have a weird love/hate relationship with condensed canned soups, and this recipe totally feeds into my psychosis. I love that they are so easy to use and to cook with, but I hate the fact that they are so unhealthy. Every time I use them in one of my recipes I am plagued with all sorts of conflicting feelings-pleasure, guilt, despair, euphoria, heartburn-you get the idea. I always promise myself that if I use canned soup in a recipe, I will try and make the rest of the meal as healthy as possible. Tonight, I am going to pair this dish with some brown rice and some steamed broccoli. I may even throw in a side salad with a homemade vinaigrette for good measure. Those healthy side items should allow me to enjoy my dinner guilt-free.
Jen's Cheddar Broccoli Chicken
Ingredients:
3 or 4 Boneless skinless chicken breasts
1 (15 oz.) can of condensed broccoli cheddar cheese soup, undiluted
salt and pepper to taste
cooking spray
Directions:
Spray a 8 x 8 glass casserole dish with cooking spray. Place chicken in the dish and season with salt and pepper. Pour a can of broccoli cheddar cheese soup on top of the chicken breasts. Using the back of a spoon, spread the undiluted soup in an even layer over all of the chicken. Bake at 375 degrees for approximately 30-40 minutes (or until chicken is cooked and juices run clear when pierced).

The Result:
I always forget how much I love this dinner, until I have it again. This meal was so satisfying and yummy! Perfect!!! This will remain a family favorite for a long, long time.
I also took a picture of our salad, because I don't think I have ever posted my recipe for salad dressing. I never buy bottled salad dressing, because I am super-picky and I can never find a variety that I like. Instead, I just make a quick vinaigrette that takes less than 5 minutes to put together. It always turns out way better than bottled dressing and it is always made with stuff that I have on hand. I make small quantities and store what I don't use right away in the fridge. Typically I save mine in a plastic container and it will stay fresh for about a week (it always gets eaten quickly, so it is never around for very long). Before serving, I just give the whole container a quick shake to re-combine everything, and it is as good as new!
Jen's Homemade Salad Dressing
Ingredients:
1/4 cup of walnut oil to taste, drizzled into mixture (use more if needed)
2 Tablespoons of white wine vinegar (use more if needed)
1/2 teaspoon of Dijon mustard
1/2 teaspoon of Whole Grain mustard
1 1/2 teaspoons of honey
Salt and pepper to taste
Directions:
In a small bowl combine the honey, salt, pepper, white wine vinegar, Dijon mustard, whole grain mustard. Whisk to combine. Keep whisking vigorously, while drizzling in a thin, continuous stream of oil; until all the oil has been used. Store in a plastic container, and use as needed.
Alternate method:
Combine all ingredients, except for oil, in a food processor or blender. Pulse to combine. Take lid insert out while blender or food processor is still running and drizzle in oil (in a thin continuous stream) until well combined. Store in a plastic container, and use as needed.
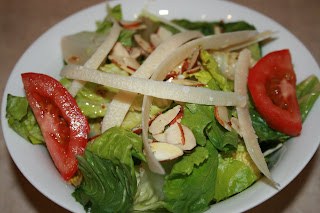
My favorite weeknight salad is just romaine lettuce, Parmigiano-Reggiano cheese shavings, sliced tomato wedges, and sliced almonds, topped off with my salad dressing. Yum!!!
I should also mention that I have a weird love/hate relationship with condensed canned soups, and this recipe totally feeds into my psychosis. I love that they are so easy to use and to cook with, but I hate the fact that they are so unhealthy. Every time I use them in one of my recipes I am plagued with all sorts of conflicting feelings-pleasure, guilt, despair, euphoria, heartburn-you get the idea. I always promise myself that if I use canned soup in a recipe, I will try and make the rest of the meal as healthy as possible. Tonight, I am going to pair this dish with some brown rice and some steamed broccoli. I may even throw in a side salad with a homemade vinaigrette for good measure. Those healthy side items should allow me to enjoy my dinner guilt-free.
Jen's Cheddar Broccoli Chicken
Ingredients:
3 or 4 Boneless skinless chicken breasts
1 (15 oz.) can of condensed broccoli cheddar cheese soup, undiluted
salt and pepper to taste
cooking spray
Directions:
Spray a 8 x 8 glass casserole dish with cooking spray. Place chicken in the dish and season with salt and pepper. Pour a can of broccoli cheddar cheese soup on top of the chicken breasts. Using the back of a spoon, spread the undiluted soup in an even layer over all of the chicken. Bake at 375 degrees for approximately 30-40 minutes (or until chicken is cooked and juices run clear when pierced).
The Result:
I always forget how much I love this dinner, until I have it again. This meal was so satisfying and yummy! Perfect!!! This will remain a family favorite for a long, long time.
I also took a picture of our salad, because I don't think I have ever posted my recipe for salad dressing. I never buy bottled salad dressing, because I am super-picky and I can never find a variety that I like. Instead, I just make a quick vinaigrette that takes less than 5 minutes to put together. It always turns out way better than bottled dressing and it is always made with stuff that I have on hand. I make small quantities and store what I don't use right away in the fridge. Typically I save mine in a plastic container and it will stay fresh for about a week (it always gets eaten quickly, so it is never around for very long). Before serving, I just give the whole container a quick shake to re-combine everything, and it is as good as new!
Jen's Homemade Salad Dressing
Ingredients:
1/4 cup of walnut oil to taste, drizzled into mixture (use more if needed)
2 Tablespoons of white wine vinegar (use more if needed)
1/2 teaspoon of Dijon mustard
1/2 teaspoon of Whole Grain mustard
1 1/2 teaspoons of honey
Salt and pepper to taste
Directions:
In a small bowl combine the honey, salt, pepper, white wine vinegar, Dijon mustard, whole grain mustard. Whisk to combine. Keep whisking vigorously, while drizzling in a thin, continuous stream of oil; until all the oil has been used. Store in a plastic container, and use as needed.
Alternate method:
Combine all ingredients, except for oil, in a food processor or blender. Pulse to combine. Take lid insert out while blender or food processor is still running and drizzle in oil (in a thin continuous stream) until well combined. Store in a plastic container, and use as needed.
My favorite weeknight salad is just romaine lettuce, Parmigiano-Reggiano cheese shavings, sliced tomato wedges, and sliced almonds, topped off with my salad dressing. Yum!!!
March 29, 2009
Grilled Red Pepper Relish and Goat Cheese Sandwiches, Easy Yellow Rice and Black Beans
This is one of my favorite easy dinners. There is no cooking involved for the sandwiches themselves, only grilling (or toasting) of the bread. I usually like to make these babies in the summertime, since the red pepper relish and goat cheese combo is actually very refreshing. We haven't had these for a few months, so I thought tonight would be a good time to serve them again. We have a late afternoon errand to run, so I need something fast and no-fuss. Also, I like to start the week with a vegetarian offering. It just makes fitting in two other vegetarian meals later in the week a lot easier. I think I will serve these sandwiches with a saffron yellow rice and black bean dish. My friend, Claire turned me on to the saffron yellow rice and black beans, with chicken added in. Since I am keeping tonight's meal vegetarian, I think I will just make the rice and black beans, sans chicken. Super simple and darn tasty! The yellow rice isn't the healthiest (it has MSG in it) but I love it anyway. When black beans are added, at least the nutrition level is bumped up a notch. I think that is gonna do it for our dinner. It is just what I need...simple, fast, and yummy!
Grilled Red Pepper Relish and Goat Cheese Sandwiches
Here is what I am doing for the yellow rice side dish...
Easy Yellow Rice and Black Beans
Ingredients:
1 package of saffron yellow rice mix (I use Mahatma brand)
1 (15 ounce) can of black beans, rinsed and drained
Salt and pepper to taste
Creole seasoning to taste (optional)
Directions:
Make rice according to package directions. Stir in black beans and heat through. Season with salt, pepper, and Creole seasoning and mix thoroughly. Serve immediately.
March 28, 2009
Bobby's Baked Lime Tilapia
Wasn't I just lamenting the fact that I really did not have any "new" recipes planned???? I totally forgot that tonight I had this new recipe planned!
Awhile ago, I had seen an episode of Paula's Best Dishes on the Food Network. Typically, I am not a huge Paula Deen fan, so I don't regularly watch her show. I just happened to catch this episode where her son, Bobby, was making this tilapia recipe. From the demonstration, it looked really good and fairly easy. There are only a few ingredients, which I thought was a bonus. So, I put it on the menu and then promptly forgot about it completely. That was probably about two weeks ago. This morning I pulled out my meal plan and realized that this tilapia dish was slotted for our evening meal. Thankfully, I still have the all the ingredients for it.
There is one thing that I found to be a little questionable about this dish. The recipe directions indicate that the fish should be baked on a cast iron pan (sheet pan). I don't have a cast iron baking sheet; and I don't know many people who do. Really, is a cast iron baking sheet needed???? I know cast iron gets hotter than most other pans, but I am wondering why you would need it for this tilapia recipe???? I am not sure. For my first attempt at this dish, I think I will try it in a large cast iron skillet...just to be on the safe side. I am a little skeptical. I will let you know my opinion on whether the cast iron pan is necessary or not.
I am not sure what I am going to do for a side dish. The episode showed the fish paired with a brown almond rice pilaf. While that does sound good, I may go with cheesy potatoes instead. I am a little low on brown rice, and we haven't had cheesy potatoes in quite some time. Also, I think I will steam some broccoli to go with it. I love the combo of broccoli and any kind of fish...it just seems to be the perfect veggie side dish to go with seafood. I will let you know how it all turns out.
Bobby's Baked Lime Tilapia
adapted from foodnetwork.com
Ingredients:
Cooking spray
4 (6 to 8-ounce) tilapia fillets
Salt and black pepper to taste
1-2 limes, finely grated zest
Juice of 1-2 limes
2 Tablespoons of butter
Directions:
Preheat oven to 375 degrees F. Coat a large cast iron pan with cooking spray.
Rinse fish and pat dry; place on the prepared baking sheet. Season each fillet with salt, cracked pepper, lime zest and lime juice. Add fish to the pan. Place a pat of butter on each fillet and cook in the oven for 8 to 12 minutes. Serve immediately.
Here is the link to my cheesy potatoes side dish...
Jen's Top Secret Cheesy Potatoes
If you love cheese like we do; you will love these potatoes!

The Result:
The husband and I had differing opinions about this dish. I thought it was boring and just okay, but he really liked it. For me, it tasted exactly how it sounds...fish with lots of lime juice flavor (almost overpowering). It was okay...but nothing special. My husband really liked it, because it was very citrus-y. Also, I don't think the cast iron pan made one bit of a difference. There was no special cast iron flavor or anything. Overall, I don't know if I will make this recipe again. It just wasn't fantastic, and I have had better tilapia recipes. It did not blow my socks off. I guess if the husband makes a special request for this dish, I would accommodate him...but otherwise this is really not a keeper for me. Back to the drawing board for some new recipes...
Awhile ago, I had seen an episode of Paula's Best Dishes on the Food Network. Typically, I am not a huge Paula Deen fan, so I don't regularly watch her show. I just happened to catch this episode where her son, Bobby, was making this tilapia recipe. From the demonstration, it looked really good and fairly easy. There are only a few ingredients, which I thought was a bonus. So, I put it on the menu and then promptly forgot about it completely. That was probably about two weeks ago. This morning I pulled out my meal plan and realized that this tilapia dish was slotted for our evening meal. Thankfully, I still have the all the ingredients for it.
There is one thing that I found to be a little questionable about this dish. The recipe directions indicate that the fish should be baked on a cast iron pan (sheet pan). I don't have a cast iron baking sheet; and I don't know many people who do. Really, is a cast iron baking sheet needed???? I know cast iron gets hotter than most other pans, but I am wondering why you would need it for this tilapia recipe???? I am not sure. For my first attempt at this dish, I think I will try it in a large cast iron skillet...just to be on the safe side. I am a little skeptical. I will let you know my opinion on whether the cast iron pan is necessary or not.
I am not sure what I am going to do for a side dish. The episode showed the fish paired with a brown almond rice pilaf. While that does sound good, I may go with cheesy potatoes instead. I am a little low on brown rice, and we haven't had cheesy potatoes in quite some time. Also, I think I will steam some broccoli to go with it. I love the combo of broccoli and any kind of fish...it just seems to be the perfect veggie side dish to go with seafood. I will let you know how it all turns out.
Bobby's Baked Lime Tilapia
adapted from foodnetwork.com
Ingredients:
Cooking spray
4 (6 to 8-ounce) tilapia fillets
Salt and black pepper to taste
1-2 limes, finely grated zest
Juice of 1-2 limes
2 Tablespoons of butter
Directions:
Preheat oven to 375 degrees F. Coat a large cast iron pan with cooking spray.
Rinse fish and pat dry; place on the prepared baking sheet. Season each fillet with salt, cracked pepper, lime zest and lime juice. Add fish to the pan. Place a pat of butter on each fillet and cook in the oven for 8 to 12 minutes. Serve immediately.
Here is the link to my cheesy potatoes side dish...
Jen's Top Secret Cheesy Potatoes
If you love cheese like we do; you will love these potatoes!
The Result:
The husband and I had differing opinions about this dish. I thought it was boring and just okay, but he really liked it. For me, it tasted exactly how it sounds...fish with lots of lime juice flavor (almost overpowering). It was okay...but nothing special. My husband really liked it, because it was very citrus-y. Also, I don't think the cast iron pan made one bit of a difference. There was no special cast iron flavor or anything. Overall, I don't know if I will make this recipe again. It just wasn't fantastic, and I have had better tilapia recipes. It did not blow my socks off. I guess if the husband makes a special request for this dish, I would accommodate him...but otherwise this is really not a keeper for me. Back to the drawing board for some new recipes...
March 27, 2009
Quick Homemade Pizza
I have had a lot of "repeat" recipes lately (i.e. recipes that I have tried and blogged about previously). All I can say is that I am in somewhat of a rut. I don't really feel like experimenting with new recipes very much, since some of the new meals I have tried have been a little disappointing. Instead, I am opting for easy and familiar. I think my recent funk also has to do with our crazy schedule, and the illness that is sweeping through our house (my son is now officially sick).
I have already crafted my menu plan for next week and I only have 2 new recipes planned, with the rest being previous dinner ideas. I really want to stay within our budget, so a lot of my planned meals can be made out of my stash. Hopefully, I will get back to trying some new dishes the week after next. For now, it is "been there/done that" for the next week or so. I honestly don't mind it too much. I am okay with easy and familiar for now. Also, it is much easier to link back to a previous post on my blog, then to craft a whole new one with photos and a review. Yes, I know what you are thinking...and you are right...laziness is totally winning out. Again, I am okay with that. Also, sometimes recipes get buried in the past posts, so this gives me a chance to trot out our favorites. Tonight's meal is a perfect example of that idea.
I usually like to make something kinda fun for Friday night dinner. I think that Friday night is the best night of the week, since you have the promise of the whole weekend stretched out in front of you. It just begs for an easy and fun dinner. I love this easy and quick homemade pizza recipe. We are short on vegetarian meals this week, so this is fills both my requirements for fun and vegetarian. Pizza is always a hit at our house, so I know we will all enjoy this dinner.
Quick Homemade Pizza
Friday night pizza! Hooray!!!!
March 26, 2009
Claire's Pot Roast
My friend Claire is soaking up sun and sand in Myrtle Beach, and I must confess, my co-dependency is kicking in. I miss my buddy! I thought a good way to miss her less would be through making her pot roast recipe. Really, what says "I miss you, friend" better than a hunk o' beef. Sigh. I know she is having a great family vacations, but for selfish reasons, I want her to come home. The husband just doesn't get excited about cooking gadgets, gossip, and my day-to-day trivial observations like Claire does...it is just not the same.
Oh well. I am seeking comfort with my other friends. My mom and I had a busy morning at the zoo with some of my other cohorts today. It was nice to get out of the house and into the sunshine and fantastic weather. Then, after nap time today, we are off and running again to a MOMS Club meeting. Since I kinda had a full agenda today, I really needed an easy slow cooker meal to just throw in and forget about. (Okay...so maybe I am making this recipe for other reasons, too....not just because I miss Claire.) This pot roast recipe is super-easy and very delicious. I love that the meat juices and soup(s) make their own gravy, without any work on my part. All I have to do is make a couple of side dishes to finish the meal off. I think I will steam some brussel sprouts (ew!...not my favorite, but the hubby l-o-v-e-s them) and make either rice or potatoes to go with our roast. I need a starchy side that will soak up the yummy gravy, but I am totally not settled on what exactly I am going to make yet. I think it will all depend on what time I get back from my meeting this afternoon. Here is the link my previous post about Claire's pot roast. It smells so good, I cannot wait to have dinner.
Claire's Pot Roast
See!!!! Good and easy!!!! I heart this roast very much.
March 25, 2009
PW's Ranch Chicken
My mom is in town for a couple days, so I thought I would make one of our favorite meals for her. This chicken recipe is so freakin' delicious. Hopefully, she will be dazzled.
I think we will serve this chicken with some baked potatoes, glazed carrots, and a salad. Yeah....that is all I have to say about that. I am not feeling very verbose today, so I think I will keep my commentary short and sweet. UMMMMM....I can't wait for dinner!
PW's Ranch Chicken
Seriously, try this chicken. I am telling you....you will thank me (and Pioneer Woman, of course).
March 24, 2009
Ginger Grilled Salmon
I am a little late posting today, because I have been doing laundry all morning (in between naps...yes, I am still sick). My new washer and dryer arrived safe and sound, and I have been catching up on all the clothes-cleaning that I refused to do while I still had my old set. Actually, I couldn't use my old ones. We pulled that set out of the house and stored them in our garage, when we discovered the mold problem. Any-who... I am very much in the honeymoon-phase with my new appliances. I promise I will stop talking about them soon. Really, you only probably have a day or two more of me going on and on about my washer and dryer. Maybe. Okay...I am just kidding. I will stop. I think.
Soooooo.....dinner. I returned The Red Hat Society Cookbook back to the library promptly after having that last disastrous meal. However, I had already copied this recipe down and put it on my menu plan for the week. I thought about skipping it or finding something else to do with my salmon, but I decided to just stick with it. Hopefully, this recipe will be much better than that last horrid dish I tried from that book. It sounds reasonably good, but I am very skeptical. That last recipe was so terrible, it tainted all the other recipes in that cookbook...just by association! I really don't like taking chances with salmon, since it is a little pricey. Sigh. I will be brave and just try it. Hopefully, it will be hard to goof up grilled salmon. It really all comes down to the sauce; and the ingredients sound normal. At least we have plenty of leftovers from the last two nights to piece together another meal; if this recipe does happen to go south. Can you tell I am really confident???? You see, it is that darn cookbook bringing me down! It's the whole "one bad apple theory".
I think I will serve this with some soba noodles and some steamed broccoli. I think we have enough romaine for a salad, too. Please just keep your fingers crossed for me. Sigh. Here we go...
Ginger Grilled Salmon
Ingredients:
1 1/2 Tablespoons of butter
3 shallots, minced
6 Tablespoons fresh lemon juice
5 Tablespoons of brown sugar
1/2 teaspoon Tabasco
3 Tablespoons of fresh, peeled ginger; minced
1/4 cup of red wine vinegar
3 teaspoons of soy sauce
3 teaspoons of finely chopped cilantro
4 (6-8 ounce) salmon fillets
parsley for garnish
Directions:
Melt butter in sauce pan over medium heat. Add shallots and saute until soft. Add lemon juice, brown sugar, Tabasco, ginger, vinegar, and soy sauce; stir until well combined. Remove from heat and add cilantro. Baste salmon liberally with sauce and grill 3 inches from flame (7-10 minutes per side, depending on thickness). Baste frequently while cooking. Remove from grill and serve. Garnish with parsley and serve with remaining sauce on the side.
Jen's Notes:
Yikes!!! 7-10 minutes per side seems excessive for salmon, doesn't it??? I don't know about the cook time on this one. I would say use your best judgement for the actual cook time, depending on your grill and your fish. I think 7-10 minutes per side may turn the fish into charcoal...but that is just my opinion. I will let you know how long ours actually cooks in my 'results' post.

The Result:
This was just okay. The husband really liked it, but I found it to be a little bland. I ended up putting some hoisin sauce on my fish to dress it up a bit. I don't think I will make this again, because there are a lot more salmon recipes out there, with a lot more flavor. Like I said...it was decent; but not anything that blew my socks off.
I used an indoor grill pan and the fish only took about 4 minutes per side (not 7-10 as recommended in the recipe). Again, I am really not impressed with this recipe or this cookbook. I am glad that I returned it to the library, and did not purchase it for part of my collection.
Soooooo.....dinner. I returned The Red Hat Society Cookbook back to the library promptly after having that last disastrous meal. However, I had already copied this recipe down and put it on my menu plan for the week. I thought about skipping it or finding something else to do with my salmon, but I decided to just stick with it. Hopefully, this recipe will be much better than that last horrid dish I tried from that book. It sounds reasonably good, but I am very skeptical. That last recipe was so terrible, it tainted all the other recipes in that cookbook...just by association! I really don't like taking chances with salmon, since it is a little pricey. Sigh. I will be brave and just try it. Hopefully, it will be hard to goof up grilled salmon. It really all comes down to the sauce; and the ingredients sound normal. At least we have plenty of leftovers from the last two nights to piece together another meal; if this recipe does happen to go south. Can you tell I am really confident???? You see, it is that darn cookbook bringing me down! It's the whole "one bad apple theory".
I think I will serve this with some soba noodles and some steamed broccoli. I think we have enough romaine for a salad, too. Please just keep your fingers crossed for me. Sigh. Here we go...
Ginger Grilled Salmon
Ingredients:
1 1/2 Tablespoons of butter
3 shallots, minced
6 Tablespoons fresh lemon juice
5 Tablespoons of brown sugar
1/2 teaspoon Tabasco
3 Tablespoons of fresh, peeled ginger; minced
1/4 cup of red wine vinegar
3 teaspoons of soy sauce
3 teaspoons of finely chopped cilantro
4 (6-8 ounce) salmon fillets
parsley for garnish
Directions:
Melt butter in sauce pan over medium heat. Add shallots and saute until soft. Add lemon juice, brown sugar, Tabasco, ginger, vinegar, and soy sauce; stir until well combined. Remove from heat and add cilantro. Baste salmon liberally with sauce and grill 3 inches from flame (7-10 minutes per side, depending on thickness). Baste frequently while cooking. Remove from grill and serve. Garnish with parsley and serve with remaining sauce on the side.
Jen's Notes:
Yikes!!! 7-10 minutes per side seems excessive for salmon, doesn't it??? I don't know about the cook time on this one. I would say use your best judgement for the actual cook time, depending on your grill and your fish. I think 7-10 minutes per side may turn the fish into charcoal...but that is just my opinion. I will let you know how long ours actually cooks in my 'results' post.
The Result:
This was just okay. The husband really liked it, but I found it to be a little bland. I ended up putting some hoisin sauce on my fish to dress it up a bit. I don't think I will make this again, because there are a lot more salmon recipes out there, with a lot more flavor. Like I said...it was decent; but not anything that blew my socks off.
I used an indoor grill pan and the fish only took about 4 minutes per side (not 7-10 as recommended in the recipe). Again, I am really not impressed with this recipe or this cookbook. I am glad that I returned it to the library, and did not purchase it for part of my collection.
March 23, 2009
Copycat Carrabba's Pappardelle Campagnolo
I am feeling a bit better today; more like myself. I still have coughy, sneezy, congestion going on...but it is not as bad as it has been the past few days. I actually feel like doing stuff. I took my son to the park this morning for a couple of hours, and I plan to fritter away the rest of the afternoon getting the house back on track (i.e. organized). I have a ton of laundry to do; and luckily, my new washer and dryer will be here some time tomorrow. Hopefully, it will be a early delivery so I can tackle the laundry as soon as they get hooked up. I am so darn excited!!! Anyway, enough recounting my household chores and fantasizing about my new appliances...let's move on to dinner.
I found this recipe a month or so ago on recipezaar.com (no surprises there). I have been chomping at the bit to try it out, since the other Carrabba's copycat recipe I made from that site turned out to be completely delicious. I love the concept of restaurant-quality food that you can easily make at home. Let's face it, going out to dinner is hard on the ol' pocketbook. Add a feisty three year old to the mix, and it makes the whole experience less than enjoyable. I would rather save our money and just eat quality food at home...without all the hassle.
This dish seems like it will deliver the concept of restaurant-quality at home. Tomato sauce and goat cheese is one of my favorite pairings, so this recipe shouldn't disappoint. Yum! I have some spicy Italian Parmesan chicken sausage that I squirreled away in my freezer, which should be perfect in this dish. For the most part, I am going to stick to the recipe as-is, with one exception. I need to substitute whole wheat linguine in for the pappardelle, but that should be it for my changes (my adapted version is written below). I think for my side dish I am just going to serve this with a romaine salad. I always love adding a tasty pasta dish to my dinner repertoire, so I am curious to see how this turns out.
Copycat Carrabba's Pappardelle Campagnolo
Adapted from recipezaar.com recipe #38436(by PanNan)
Ingredients:
1/4 cup extra virgin olive oil
3 links of spicy Italian Parmesan chicken sausage
1/2 cup finely chopped yellow onion
2 cloves garlic, finely chopped
1 medium jarred red bell pepper, 1/4 inch julienne
1/4 cup dry white wine
4 cups whole canned tomatoes (with juice, finely chopped)
salt and pepper to taste
1 pinch crushed red pepper flakes
2 tablespoons freshly torn basil leaves
1/4 cup freshly grated pecorino romano cheese
4 ounces goat cheese (crumbled)
1 lb pasta noodles (pappardelle recommended, but I am using whole wheat linguine)
Directions:
Remove sausage from the casing and break into coarse pieces (about 5-6 pieces per link). Pour olive oil in a large skillet over medium heat. Add sausage and cook until the sausage has browned slightly. Add onion and red bell pepper and cook until soft and onion turns a rich golden color. Add the wine and let evaporate for 3 minutes. Add garlic, and cook 1 minute more. Add the tomatoes and season lightly with salt and pepper and crushed red pepper flakes. Raise heat and bring sauce to a boil, stirring frequently. Reduce heat and let simmer until the sauce has thickened. Stir in basil and set sauce aside.
Meanwhile bring 4 quarts water to a boil in a large pot, add 1 tbsp salt and drop in the pasta all at once, stirring well. When the pasta is almost done, return the skillet with the sauce to a medium heat. When the pasta is al dente, drain it and toss it with the sauce, adding the grated cheese and tossing again. Place the pasta in a serving platter and top with the crumbled goat cheese. Serves 6-8.

The Result:
This was awesome! Really good! Since we did not have the proper noodles (pappardelle), and used spaghetti instead, it was a bit like a riff of spaghetti and meat sauce. However, if the proper noodles were used, it would make the dish more unique. Even with boring spaghetti noodles, it was still fantastic and really easy to put together. Again, I loved the goat cheese. It melted into the sauce, creating a creamy/slightly tangy mixture that was sooooooooo yummy! This dish is definitely a keeper!!!! We all loved it, including my son. Hooray for recipezaar.com once again.
I found this recipe a month or so ago on recipezaar.com (no surprises there). I have been chomping at the bit to try it out, since the other Carrabba's copycat recipe I made from that site turned out to be completely delicious. I love the concept of restaurant-quality food that you can easily make at home. Let's face it, going out to dinner is hard on the ol' pocketbook. Add a feisty three year old to the mix, and it makes the whole experience less than enjoyable. I would rather save our money and just eat quality food at home...without all the hassle.
This dish seems like it will deliver the concept of restaurant-quality at home. Tomato sauce and goat cheese is one of my favorite pairings, so this recipe shouldn't disappoint. Yum! I have some spicy Italian Parmesan chicken sausage that I squirreled away in my freezer, which should be perfect in this dish. For the most part, I am going to stick to the recipe as-is, with one exception. I need to substitute whole wheat linguine in for the pappardelle, but that should be it for my changes (my adapted version is written below). I think for my side dish I am just going to serve this with a romaine salad. I always love adding a tasty pasta dish to my dinner repertoire, so I am curious to see how this turns out.
Copycat Carrabba's Pappardelle Campagnolo
Adapted from recipezaar.com recipe #38436(by PanNan)
Ingredients:
1/4 cup extra virgin olive oil
3 links of spicy Italian Parmesan chicken sausage
1/2 cup finely chopped yellow onion
2 cloves garlic, finely chopped
1 medium jarred red bell pepper, 1/4 inch julienne
1/4 cup dry white wine
4 cups whole canned tomatoes (with juice, finely chopped)
salt and pepper to taste
1 pinch crushed red pepper flakes
2 tablespoons freshly torn basil leaves
1/4 cup freshly grated pecorino romano cheese
4 ounces goat cheese (crumbled)
1 lb pasta noodles (pappardelle recommended, but I am using whole wheat linguine)
Directions:
Remove sausage from the casing and break into coarse pieces (about 5-6 pieces per link). Pour olive oil in a large skillet over medium heat. Add sausage and cook until the sausage has browned slightly. Add onion and red bell pepper and cook until soft and onion turns a rich golden color. Add the wine and let evaporate for 3 minutes. Add garlic, and cook 1 minute more. Add the tomatoes and season lightly with salt and pepper and crushed red pepper flakes. Raise heat and bring sauce to a boil, stirring frequently. Reduce heat and let simmer until the sauce has thickened. Stir in basil and set sauce aside.
Meanwhile bring 4 quarts water to a boil in a large pot, add 1 tbsp salt and drop in the pasta all at once, stirring well. When the pasta is almost done, return the skillet with the sauce to a medium heat. When the pasta is al dente, drain it and toss it with the sauce, adding the grated cheese and tossing again. Place the pasta in a serving platter and top with the crumbled goat cheese. Serves 6-8.
The Result:
This was awesome! Really good! Since we did not have the proper noodles (pappardelle), and used spaghetti instead, it was a bit like a riff of spaghetti and meat sauce. However, if the proper noodles were used, it would make the dish more unique. Even with boring spaghetti noodles, it was still fantastic and really easy to put together. Again, I loved the goat cheese. It melted into the sauce, creating a creamy/slightly tangy mixture that was sooooooooo yummy! This dish is definitely a keeper!!!! We all loved it, including my son. Hooray for recipezaar.com once again.
March 22, 2009
Falafel Pitas, Jen's Hummus, and Baked Potatoes
Well, we are on day three of me feeling kinda rotten. That means day three of easy dinners. I did feel okay enough to make a batch of hummus this afternoon, so I think that I am on the mend. Other than that, I really have not ventured far from my couch.
Needless to say, there were no surprises for our family meal this evening...just our standard falafel pitas and baked (microwaved) potatoes. They were yummy as usual, and best of all, not very challenging to put together. Here is the link below for both recipes (pitas and hummus). Tomorrow is Monday and the husband goes back to work. I cringe at the thought of being left alone with a active three year old and not feeling good. I am really keeping my fingers crossed that I will wake up in the morning feeling like my normal self, and back to my usual antics. As soon as that happens, I will be back in my kitchen with some new recipes to share!
Falafel Pitas and Jen's Hummus
This meal is so easy, fast and delicious. No wonder why it is one of our favorites!
March 21, 2009
Polish Sausage on Whole Wheat Buns, Asparagus, & Tater Tots
I am still not feeling all that great, so tonight is another no-brainer dinner. Darn cough and chest congestion!!! We are just re-heating some of the Polish Sausage we made and froze at Christmastime, baking some tater tots, and roasting the remaining few spears of asparagus. Really just heating/re-heating, and nothing truly noteworthy (or should I say, blog-worthy). I have a new recipe planned for tomorrow, so hopefully I will be back in the swing of things.
March 20, 2009
Breakfast for Dinner
I am feeling a bit under the weather today, so the husband is cooking breakfast for dinner. Hopefully, I will be back tomorrow on our regular meal schedule.
March 19, 2009
Chilaquiles
In light of yesterday's dinner disaster, I wanted something that I know to be a surefire hit for tonight's family meal. I feel as though I need to make amends for that awful recipe that I subjected my husband and son to last night. I know that this dish will allow me to totally redeem myself. I know Chilaquiles is a winner at my house; so I should hear lots of cheers (and no booing) from around my table. To put it quite simply...we all love this dish!
This is easily my favorite vegetarian meal, hands down. It is so delicious and satisfying. I would call it comfort food at it's best! Also, it is designed to use up what you already have on hand. My dinner is already half finished without me having to lift a finger. I already have a bunch of leftover refried beans from the burritos I made a few days ago. What better way to use them than to make Chilaquiles!?!?! I don't think I have any major changes for this recipe, either. I really loved it-just the way it was-when I made it the first time. The only addition will be the egg that I forgot during the last go-round.
UMMMMMM.... I am so looking forward to our dinner tonight!
Chilaquiles
Oh, man! Six o'clock cannot get here soon enough!

The Result:
Oh man! This was better even than I remembered it! I didn't think it could get any better, but the poached egg (it kinda looks like a big blob of sour cream on top...but it's not...it's egg) made it so much more decadent. It was fan-freakin'-tastic! This dish is a little time consuming, but well worth every second. Really, really awesome. Yum! I stand by my original statement...this is my favorite vegetarian/Mexican meal, hands down.
This is easily my favorite vegetarian meal, hands down. It is so delicious and satisfying. I would call it comfort food at it's best! Also, it is designed to use up what you already have on hand. My dinner is already half finished without me having to lift a finger. I already have a bunch of leftover refried beans from the burritos I made a few days ago. What better way to use them than to make Chilaquiles!?!?! I don't think I have any major changes for this recipe, either. I really loved it-just the way it was-when I made it the first time. The only addition will be the egg that I forgot during the last go-round.
UMMMMMM.... I am so looking forward to our dinner tonight!
Chilaquiles
Oh, man! Six o'clock cannot get here soon enough!
The Result:
Oh man! This was better even than I remembered it! I didn't think it could get any better, but the poached egg (it kinda looks like a big blob of sour cream on top...but it's not...it's egg) made it so much more decadent. It was fan-freakin'-tastic! This dish is a little time consuming, but well worth every second. Really, really awesome. Yum! I stand by my original statement...this is my favorite vegetarian/Mexican meal, hands down.
March 18, 2009
Slow Cooker Chicken and Corn Bread Dressing
This dish easily qualifies for the most unhealthy recipe of the week. I mean, really, TWO sticks of butter. I would count that as a bit excessive. However, as artery-clogging as this recipe sounded...it still intrigued me. It seems to make a lot of food, and I am hoping to freeze at least half of this dish for another time. The recipe says that it will serve 8 people, so I am hoping that we will have enough for dinner tonight, lunch tomorrow, and still be able to freeze a big portion of it. I think what ultimately made me decide to try this recipe was the use of the slow cooker, and how cheap this meal is to put together. Also, this recipe is from The Red Hat Society Cookbook which I have had checked out of the library for a least two months now. It is due to go back soon, so I am going to try more recipes from it, before I am forced to return it. I think I will serve this dish with a side salad and that is about it. I was going to make some glazed carrots, too...but the thought of more butter kinda grosses me out. Salad will have to work on it's own tonight. I am keeping my fingers crossed. This is one of those dishes that I really can't predict the outcome. I have a feeling it is either going to be really good or really bad. Wish me luck!
Slow Cooker Chicken and Corn Bread Dressing
Ingredients:
1 cup (2 sticks) butter
2 cups chopped onions
2 cups chopped celery
1 9 x 13 pan of cornbread
1 (10 3/4 oz) can of golden mushroom soup
1 (10 3/4 oz) can of cream of chicken soup
2 cups chicken broth
1 Tablespoon of poultry seasoning
1 1/2 teaspoons of salt
1 teaspoon black pepper
2 teaspoons of sage
3 cups of cooked chicken
Directions:
Heat the butter in a sauce pan over medium-high heat. Saute the onions and celery in the butter. Crumble the cornbread in the bowl of your slow cooker. Add the sauteed veggies, mushroom soup, cream of chicken soup, chicken broth, poultry seasoning, salt, sage, pepper. Mix well and stir in the chicken. Cook on high for 45 minutes, then turn down to low and cook for an additional 4 hours.
Jen's Notes:
I used canned chicken, rinsed and drained. I also added only 1 teaspoon of salt and then 1/2 teaspoon of Lawry's seasoned salt. I also sprinkled the top with paprika, so it wouldn't look so weird. I am really skeptical of this recipe tonight.

The Result:
This was terrible! We ended up feeding it to our dogs, and getting fast food for dinner. Really, really awful. This is soooooo NOT a keeper. Yuck! It was mushy and weird-flavored. Not good at all! It doesn't even look appetizing in the photo (dog food really is a great description, all the way around). We took two bites and realized how gross it actually was! This recipe should have been printed with a warning label. Ick. I had a gut feeling that this was going to be bad...I should have listened to my insticts. Foul!!! Don't try this at home! Ugh.
Slow Cooker Chicken and Corn Bread Dressing
Ingredients:
1 cup (2 sticks) butter
2 cups chopped onions
2 cups chopped celery
1 9 x 13 pan of cornbread
1 (10 3/4 oz) can of golden mushroom soup
1 (10 3/4 oz) can of cream of chicken soup
2 cups chicken broth
1 Tablespoon of poultry seasoning
1 1/2 teaspoons of salt
1 teaspoon black pepper
2 teaspoons of sage
3 cups of cooked chicken
Directions:
Heat the butter in a sauce pan over medium-high heat. Saute the onions and celery in the butter. Crumble the cornbread in the bowl of your slow cooker. Add the sauteed veggies, mushroom soup, cream of chicken soup, chicken broth, poultry seasoning, salt, sage, pepper. Mix well and stir in the chicken. Cook on high for 45 minutes, then turn down to low and cook for an additional 4 hours.
Jen's Notes:
I used canned chicken, rinsed and drained. I also added only 1 teaspoon of salt and then 1/2 teaspoon of Lawry's seasoned salt. I also sprinkled the top with paprika, so it wouldn't look so weird. I am really skeptical of this recipe tonight.
The Result:
This was terrible! We ended up feeding it to our dogs, and getting fast food for dinner. Really, really awful. This is soooooo NOT a keeper. Yuck! It was mushy and weird-flavored. Not good at all! It doesn't even look appetizing in the photo (dog food really is a great description, all the way around). We took two bites and realized how gross it actually was! This recipe should have been printed with a warning label. Ick. I had a gut feeling that this was going to be bad...I should have listened to my insticts. Foul!!! Don't try this at home! Ugh.
March 17, 2009
Jen's Italian Meatloaf Surprise
I haven't made one of my "surprise" recipes in quite awhile! For those of you just tuning in, let me explain what a "surprise" dish encompasses. You see, I lead a rich fantasy life. Sometimes, I like to play mad scientist in my kitchen. I like to forage in my pantry and freezer and find items that need to be used and/or look interesting. Usually, I am inspired and I can concoct a dinner idea around whatever I find. There is no actual recipe, and I am not sure how it is going to turn out. I have a rough idea of what I want, but I never know how I am going to get there. The fun of a "surprise" recipe is not fully knowing where it is going, even as you start cooking. It is all just beakers, and Bunsen Burners, and smoking vials of formula in my kitchen, until POOF...dinner. Can you hear that???? I am even working on my evil, ghoulish, mad scientist-type laugh....MOOO-WHOOOO HA! HA! HA!
Tonight is such a night where I feel like experimenting on my family. I originally had a salmon recipe slotted for our evening meal, but for some reason, I just don't feel like making it. I switched around my menu plan and went to check out what I have on hand. I settled on a meatloaf of sorts; I thought that Italian meatloaf sounded good. I have a couple standard meatloaf versions that I make regularly, but I wanted something a little different. I actually want this dish to taste more like my stuffed peppers than my regular meatloaf. I am also going to make some roasted potatoes, and roasted asparagus to go with my masterpiece. I will give you a rough blueprint of what I am doing, but I will probably re-write the recipe after dinner (i.e. write down what I actually end up doing). I will make sure to post a review and photo to let you know how it all goes down, too. Wish me luck! MOOO-WHOOOO HA! HA! HA!
Jen's Italian Meatloaf Surprise
Ingredients:
Sauce:
1/2 onion, diced
3-4 cloves garlic, minced
1 green pepper, diced
5 sun dried tomatoes, drained and minced
1 small can of plain tomato sauce (no salt added)
1-2 Tablespoons of tomato paste
salt and pepper to taste
1 tsp. red pepper flakes
1 tsp. dried Italian seasoning
1 tsp. dried oregano
1 tsp. of dried or fresh basil
1 small can of water (just use tomato sauce can)
2 Tablespoons of canola oil
Meat mixture:
1 egg
seasoned bread crumbs, Italian-style
1/2 cup of instant white rice
salt and pepper to taste
dried Italian Seasoning to taste (if needed)
dried oregano to taste (if needed)
1 lb. of ground beef
1/3 cup of Pecorino Romano cheese, grated
1 15 oz. can of drained diced tomatoes (no salt added) for topping
Directions:
Saute onions and green peppers in a skillet with canola oil over medium heat. Add garlic and season with salt, pepper, garlic powder, onion powder, Italian seasoning, and red pepper flakes,sun dried tomatoes, and tomato paste. Add small can of tomato sauce and water. Simmer until water evaporates. Turn off heat and set aside to cool slightly.
Mix all other ingredients (excluding marinara sauce that you just made and can of diced tomatoes)into a large bowl. Using a large spoon, combine 1-2 heaping spoonfuls of marinara sauce into the meat mixture. If meat mixture is too 'wet',add additional bread crumbs or rice as needed. Season mixture with additional spices, salt and pepper if needed.
Form into a loaf shape on a sheet pan. Pour and cover loaf with marinara sauce. Then add whole can of drained diced tomatoes on top of marinara sauce. Cover with foil and bake at 350 degrees for 1/2 hour. Uncover and cook for an additional 1/2 hour.
Jen's Notes:
All quantities are approximate. The roasted potatoes and asparagus will be roasted on a sheet pan in the oven along with the meatloaf. I think I will cook the potatoes and asparagus with some salt, pepper, and olive oil; then roast for the last 1/2 hour of cooking at the same temp as the meatloaf. If they need additional crisping, I will turn probably take the meatloaf out to rest and crank up the oven temp (or broil) for 10-15 minutes to finish the job. After they come out, I will sprinkle it all with some Pecorino Romano cheese and call it good!

The Result:
I am really pleased with how this turned out! This was freakin' awesome. The husband said that this was his new, favorite meatloaf. It was exactly what I wanted...I love it when that happens. I need to start cooking more "off the cuff", because I certainly enjoy it more than following a set recipe. It is just more relaxing. I love being creative and responding to the food as it cooks. I think you can taste the difference, sometimes. That is what home cookin' is all about! I loved this whole meal, so we will certainly put it into rotation. I love it when a surprise dish becomes a family favorite! This is a keeper, for sure.
Tonight is such a night where I feel like experimenting on my family. I originally had a salmon recipe slotted for our evening meal, but for some reason, I just don't feel like making it. I switched around my menu plan and went to check out what I have on hand. I settled on a meatloaf of sorts; I thought that Italian meatloaf sounded good. I have a couple standard meatloaf versions that I make regularly, but I wanted something a little different. I actually want this dish to taste more like my stuffed peppers than my regular meatloaf. I am also going to make some roasted potatoes, and roasted asparagus to go with my masterpiece. I will give you a rough blueprint of what I am doing, but I will probably re-write the recipe after dinner (i.e. write down what I actually end up doing). I will make sure to post a review and photo to let you know how it all goes down, too. Wish me luck! MOOO-WHOOOO HA! HA! HA!
Jen's Italian Meatloaf Surprise
Ingredients:
Sauce:
1/2 onion, diced
3-4 cloves garlic, minced
1 green pepper, diced
5 sun dried tomatoes, drained and minced
1 small can of plain tomato sauce (no salt added)
1-2 Tablespoons of tomato paste
salt and pepper to taste
1 tsp. red pepper flakes
1 tsp. dried Italian seasoning
1 tsp. dried oregano
1 tsp. of dried or fresh basil
1 small can of water (just use tomato sauce can)
2 Tablespoons of canola oil
Meat mixture:
1 egg
seasoned bread crumbs, Italian-style
1/2 cup of instant white rice
salt and pepper to taste
dried Italian Seasoning to taste (if needed)
dried oregano to taste (if needed)
1 lb. of ground beef
1/3 cup of Pecorino Romano cheese, grated
1 15 oz. can of drained diced tomatoes (no salt added) for topping
Directions:
Saute onions and green peppers in a skillet with canola oil over medium heat. Add garlic and season with salt, pepper, garlic powder, onion powder, Italian seasoning, and red pepper flakes,sun dried tomatoes, and tomato paste. Add small can of tomato sauce and water. Simmer until water evaporates. Turn off heat and set aside to cool slightly.
Mix all other ingredients (excluding marinara sauce that you just made and can of diced tomatoes)into a large bowl. Using a large spoon, combine 1-2 heaping spoonfuls of marinara sauce into the meat mixture. If meat mixture is too 'wet',add additional bread crumbs or rice as needed. Season mixture with additional spices, salt and pepper if needed.
Form into a loaf shape on a sheet pan. Pour and cover loaf with marinara sauce. Then add whole can of drained diced tomatoes on top of marinara sauce. Cover with foil and bake at 350 degrees for 1/2 hour. Uncover and cook for an additional 1/2 hour.
Jen's Notes:
All quantities are approximate. The roasted potatoes and asparagus will be roasted on a sheet pan in the oven along with the meatloaf. I think I will cook the potatoes and asparagus with some salt, pepper, and olive oil; then roast for the last 1/2 hour of cooking at the same temp as the meatloaf. If they need additional crisping, I will turn probably take the meatloaf out to rest and crank up the oven temp (or broil) for 10-15 minutes to finish the job. After they come out, I will sprinkle it all with some Pecorino Romano cheese and call it good!
The Result:
I am really pleased with how this turned out! This was freakin' awesome. The husband said that this was his new, favorite meatloaf. It was exactly what I wanted...I love it when that happens. I need to start cooking more "off the cuff", because I certainly enjoy it more than following a set recipe. It is just more relaxing. I love being creative and responding to the food as it cooks. I think you can taste the difference, sometimes. That is what home cookin' is all about! I loved this whole meal, so we will certainly put it into rotation. I love it when a surprise dish becomes a family favorite! This is a keeper, for sure.
Jen's Bean Burritos and Mashed Avocado
This is one of my standard, quick, go-to meal. It is basically cooking, without really having to cook. I needed an easy and fast meal for last night's dinner, because I had an agenda. I just did not have time to go through a long involved meal preparation because of what I had to get done last night. Places to go, things to do....
Okay...let me back up. (I promise this correlates to my dinner last night.) My old washer and dryer has been seriously irritating me for awhile now. It's old, it gets off balance, the door on the dryer frequently pops open and vomits wet clothes onto my laundry room floor in the middle of the dry cycle, and the capacity is way to small. Laundry is a major production in my house since my washer and dryer is mini/apartment-sized. Every week I do at least 6 loads; and that is on a good week where I don't let it pile up! Laundry is a major monkey on my back! I have been petitioning for a new washer and dryer. Since ours was still working, it was really hard to justify the extra expense. Well, yesterday the husband told me that he suspected there was mold growing somewhere in the washer. Mold!!! Sure enough, I checked it out and there is no denying the funky and distinctive smell coming from somewhere inside the washer. (We live in a really dry climate so mildew is not an issue.) I think when the load gets off balance some water pours behind the wash basin...i.e. creating a mold-friendly environment in the bowels of my washer. EW! Once I got wind of a mold issue, I was DONE with our washer and dryer for good. I mean...MOLD. Gross!!! So, we headed to the appliance store and negotiated a pretty good deal on a fancy, new, race-car red, front-loader washer and dryer set. Hooray! I am soooo freakin' excited!!!! Our existing set was used when we got 'em (and free...so not too many complaints from me at the time). As an adult, I have never had a brand new washer and dryer that I picked out all by myself. I never knew I could be so excited about appliances!!! So, the new washer and dryer will be delivered next week, and I am counting the minutes!
Now do you see my need for an easy dinner??? It was due to all that appliance shopping! I had done all my research, so I knew which set I wanted...we just had to go and bite the proverbial bullet. So, I threw together some bean burritos and off we went. Below is the link to my bean burrito recipe. It is pretty easy and it filled one of our 'vegetarian' slots for the week. I will admit, dinner was not the main event yesterday since I was so distracted with laundry issues. Tonight I will be back with a new recipe, since I can now rest easy that my new washer and dryer will be on their way to my house soon!
Jen's Bean Burritos and Mashed Avocado
Ummmm....easy and delicious!
March 15, 2009
Monterey Pepper Jack Chicken
I have been looking forward to making this recipe all week! It is from my new cookbook, Foods and Flavors of San Antonio by Gloria Chadwick. The cookbook has an array of authentic, San Antonio family favorites that capture the flavor and essence of Tex-Mex cuisine. Many of the recipes are easy enough to tackle on a busy weeknight, and most of the ingredients are items that you would already have in your pantry (or could get on a fast trip to almost any grocery store). The book is completely geared toward the home cook, and is full of accessible and yummy-sounding recipes. Each dish features a little bit of the regional sites, tastes, and history of San Antonio. It is almost like going on a little weekend getaway!
Tex-Mex cuisine is one of my favorites, so I knew that this cookbook would be right up my alley. I actually had a really hard time deciding which recipe I would make first, since I have at least a dozen recipes marked with post-its to try out. I ended up narrowing it down to this dish, since I have all the ingredients in my stores. I think I will serve this meal with a side salad and call it good. I will let you know how it all turns out!
Monterey Pepper Jack Chicken
Copyright 2008 by Gloria Chadwick
Ingredients:
2 large eggs
2 T water
1 cup cornmeal
2 T Parmesan cheese
1/2 tsp cumin
1/2 tsp chili powder
1/2 tsp cayenne pepper
4 skinless, boneless chicken breasts
2 cups salsa
1 cup shredded Monterey pepper jack cheese
3 cups cooked white rice, hot
1 (8 oz.) container sour cream, for topping
Directions:
Preheat oven to 425 degrees. Lightly spray a 13x9" baking dish with nonstick cooking spray. Set aside. In a small bowl, whisk the eggs and water until frothy. On a dinner plate, combine the cornmeal, Parmesan cheese, cumin, chili powder and cayenne pepper. Dip the chicken breasts in the egg, then dredge in the cornmeal mixture, coating evenly. Shake off the excess. Place the chicken in the prepared baking dish and cook for 30 to 35 minutes or until the juices run clear when pierced with a sharp knife. Remove the chicken from the oven and pour the salsa over. Sprinkle with the cheese. Return to the oven for 10 minutes or until the cheese melts. Serve over rice with sour cream on the side. Serves 4.
Jen's Notes:
Gloria also has a blog by the same name; Foods and Flavors of San Antonio that I visit on a daily basis. You can purchase a copy of her cookbook through this link to the Pelican Publishing website. I heart this book, and I can't wait to make more recipes from it soon.
A big thank you to both Gloria Chadwick and Pelican Publishing for allowing me to post this recipe!!!


The Result:
Oh man! I think my photos speak for themselves!!! This dish was purely Tex-Mex; that is for sure! The chicken was filling and all the components of the dish melded together nicely. I garnished the chicken with a little chopped cilantro, and some avocado slices that were salted, and then soaked in a lemon-lime juice mixture. I loved the blend of the citrus-flavored avocado slices, with the spicy pepper jack cheese, creamy sour cream, and crunchy cornmeal coating on the chicken. The best part was that my 3 year old ate all of his chicken and rice without much guff. Hooray!
Tex-Mex cuisine is one of my favorites, so I knew that this cookbook would be right up my alley. I actually had a really hard time deciding which recipe I would make first, since I have at least a dozen recipes marked with post-its to try out. I ended up narrowing it down to this dish, since I have all the ingredients in my stores. I think I will serve this meal with a side salad and call it good. I will let you know how it all turns out!
Monterey Pepper Jack Chicken
Copyright 2008 by Gloria Chadwick
Ingredients:
2 large eggs
2 T water
1 cup cornmeal
2 T Parmesan cheese
1/2 tsp cumin
1/2 tsp chili powder
1/2 tsp cayenne pepper
4 skinless, boneless chicken breasts
2 cups salsa
1 cup shredded Monterey pepper jack cheese
3 cups cooked white rice, hot
1 (8 oz.) container sour cream, for topping
Directions:
Preheat oven to 425 degrees. Lightly spray a 13x9" baking dish with nonstick cooking spray. Set aside. In a small bowl, whisk the eggs and water until frothy. On a dinner plate, combine the cornmeal, Parmesan cheese, cumin, chili powder and cayenne pepper. Dip the chicken breasts in the egg, then dredge in the cornmeal mixture, coating evenly. Shake off the excess. Place the chicken in the prepared baking dish and cook for 30 to 35 minutes or until the juices run clear when pierced with a sharp knife. Remove the chicken from the oven and pour the salsa over. Sprinkle with the cheese. Return to the oven for 10 minutes or until the cheese melts. Serve over rice with sour cream on the side. Serves 4.
Jen's Notes:
Gloria also has a blog by the same name; Foods and Flavors of San Antonio that I visit on a daily basis. You can purchase a copy of her cookbook through this link to the Pelican Publishing website. I heart this book, and I can't wait to make more recipes from it soon.
A big thank you to both Gloria Chadwick and Pelican Publishing for allowing me to post this recipe!!!
The Result:
Oh man! I think my photos speak for themselves!!! This dish was purely Tex-Mex; that is for sure! The chicken was filling and all the components of the dish melded together nicely. I garnished the chicken with a little chopped cilantro, and some avocado slices that were salted, and then soaked in a lemon-lime juice mixture. I loved the blend of the citrus-flavored avocado slices, with the spicy pepper jack cheese, creamy sour cream, and crunchy cornmeal coating on the chicken. The best part was that my 3 year old ate all of his chicken and rice without much guff. Hooray!
March 14, 2009
Laura's Sweet and Sour Meatballs
I totally had to switch up my dinner plans at the last minute today. Originally, I had a completely different recipe planned, but then I realized I was missing a few key ingredients. Duh! I had to back-burner my other recipe and do some fast thinking to come up with something else. I remembered my friend, Laura made this good (and easy) Sweet and Sour Meatball dish. I had some frozen meatballs I needed to use up anyway, so I thought this would be a perfect choice. Since the meatballs were really easy to put together, I wanted some quick/easy side dishes, too. I decided to steam some Asian-style veggies in the microwave, and make some instant white rice to complete my no-hassle feast! (I have a love/hate relationship with instant white rice. I love that it is sooooo easy, but I detest that it is nutritionally void!) Overall, this was a yummy, fast-cooking meal!
Laura's Sweet and Sour Meatballs
Ingredients:
Frozen meatballs
1 cup of brown sugar (cut back to 2/3 cup if you want them less sweet)
1/4 cup of white vinegar
1 tsp of yellow mustard
1/4 cup of BBQ sauce
1/2 tsp of Worcestershire sauce
1/2 cup of soy sauce (optional)
Directions:
In a small bowl combine all ingredients except meatballs and mix well. Place meatballs in a glass casserole dish and pour sauce mixture all over, making sure all the meatballs are well coated. Bake at 350 degrees for 1/2 hour. Serve over white or brown rice.
Jen's Notes:
I wanted this to be more Asian-inspired, so I added the soy sauce. Laura's original recipe did not include it. Also, if you want your sauce less sweet and more sour (that is how I prefer it), I would cut back the brown sugar to 2/3 cup. This recipe is pretty versatile, so I think you could add some other ingredients to give it totally different flavor profile. I think garlic powder, onion powder, or even some Sambal Oelek would be really good.

The Result:
This is a great go-to meal. Easy, fast, and yummy!
Laura's Sweet and Sour Meatballs
Ingredients:
Frozen meatballs
1 cup of brown sugar (cut back to 2/3 cup if you want them less sweet)
1/4 cup of white vinegar
1 tsp of yellow mustard
1/4 cup of BBQ sauce
1/2 tsp of Worcestershire sauce
1/2 cup of soy sauce (optional)
Directions:
In a small bowl combine all ingredients except meatballs and mix well. Place meatballs in a glass casserole dish and pour sauce mixture all over, making sure all the meatballs are well coated. Bake at 350 degrees for 1/2 hour. Serve over white or brown rice.
Jen's Notes:
I wanted this to be more Asian-inspired, so I added the soy sauce. Laura's original recipe did not include it. Also, if you want your sauce less sweet and more sour (that is how I prefer it), I would cut back the brown sugar to 2/3 cup. This recipe is pretty versatile, so I think you could add some other ingredients to give it totally different flavor profile. I think garlic powder, onion powder, or even some Sambal Oelek would be really good.
The Result:
This is a great go-to meal. Easy, fast, and yummy!
March 13, 2009
Spinach Ricotta Gnocchi
I am in a terrible mood today, so I think I will keep this short and sweet. I have been furiously trying to get myself organized before the weekend, and I think I am finally at a place where I can say, "Whew!". I am fairly caught up on everything, so I am hoping my icky mood will disappear soon and be replaced by a sense of accomplishment. At least tomorrow is another day!
Okay, on to dinner. Tonight's meal is an offering from the Simply Recipes blog that I love so much. From the post photos, this looks simple and delicious. I am a sucker for gnocchi, but I have never tried to make my own...this is a first! I am really liking that this is going to be a hands-on meal preparation type of night. When I am grouchy, I love to lose myself in cooking. This recipe looks like it will do the trick, since both the pasta and sauce are made from scratch. Below is the link to the original recipe and pics; her blog is awesome, so there is no need for me to tamper with perfection!
Spinach Ricotta Gnocchi
I think this will be it for our meal. Gnocchi is usually very filling, so this should be pretty satisfying on it's own.

The Result:
I know I have been remiss with posting photos with my last couple of posts, but I think I am finally back on track. Hooray! My mood is much improved today, and I am happy that I am getting caught up on the ol' blog.
This was fan-freakin'-tastic! Seriously, delicious!!!! The sauce was drinkable...yet so incredibly simple! The gnocchi was so tasty the husband and I were eating it as it cooked; straight out of the pot of boiling water. This recipe made a lot of gnocchi, but that is a good thing. My friend, Claire had the brilliant idea of freezing them on a cookie sheet and then vacuum sealing for another day. It worked like a charm!!! The gnocchi were perfectly, individually frozen for later use. Excellent!
My only criticism of this dish is that the gnocchi was labor-intensive. It was kind of a pain to make, but I must admit...totally worth it. For some reason, my dough was really wet and sticky, at first. I thought I drained the ricotta enough, but maybe I didn't??? I am not sure. Anyway, I ended up adding a full extra cup of flour to get it to proper dough consistency. The gnocchi was still yummy, and not too heavy or too tough; so it still turned out really good. This must be a pretty forgiving recipe, since I was able to amend the amount of flour so much. Also, I could not get the fork-roll-over-the-tines right. I gave up and just rolled them into shape by hand, without the fork. I will have to practice my gnocchi-shaping skills, that is for sure! Overall, this is a keeper. However, it will only be a 'once in awhile' dish, since the gnocchi take a little bit more time and effort than usual.
Okay, on to dinner. Tonight's meal is an offering from the Simply Recipes blog that I love so much. From the post photos, this looks simple and delicious. I am a sucker for gnocchi, but I have never tried to make my own...this is a first! I am really liking that this is going to be a hands-on meal preparation type of night. When I am grouchy, I love to lose myself in cooking. This recipe looks like it will do the trick, since both the pasta and sauce are made from scratch. Below is the link to the original recipe and pics; her blog is awesome, so there is no need for me to tamper with perfection!
Spinach Ricotta Gnocchi
I think this will be it for our meal. Gnocchi is usually very filling, so this should be pretty satisfying on it's own.
The Result:
I know I have been remiss with posting photos with my last couple of posts, but I think I am finally back on track. Hooray! My mood is much improved today, and I am happy that I am getting caught up on the ol' blog.
This was fan-freakin'-tastic! Seriously, delicious!!!! The sauce was drinkable...yet so incredibly simple! The gnocchi was so tasty the husband and I were eating it as it cooked; straight out of the pot of boiling water. This recipe made a lot of gnocchi, but that is a good thing. My friend, Claire had the brilliant idea of freezing them on a cookie sheet and then vacuum sealing for another day. It worked like a charm!!! The gnocchi were perfectly, individually frozen for later use. Excellent!
My only criticism of this dish is that the gnocchi was labor-intensive. It was kind of a pain to make, but I must admit...totally worth it. For some reason, my dough was really wet and sticky, at first. I thought I drained the ricotta enough, but maybe I didn't??? I am not sure. Anyway, I ended up adding a full extra cup of flour to get it to proper dough consistency. The gnocchi was still yummy, and not too heavy or too tough; so it still turned out really good. This must be a pretty forgiving recipe, since I was able to amend the amount of flour so much. Also, I could not get the fork-roll-over-the-tines right. I gave up and just rolled them into shape by hand, without the fork. I will have to practice my gnocchi-shaping skills, that is for sure! Overall, this is a keeper. However, it will only be a 'once in awhile' dish, since the gnocchi take a little bit more time and effort than usual.
March 12, 2009
Taco Crescent Bake
Today, the boy and I are having a relaxing day at home. I decided to get caught up on laundry, my least favorite chore, and goof around the house. This is one of our favorite casseroles, so the thought of a good dinner is making the task of icky laundry less daunting. Also, we have been having some dinner time struggles with my son. I decided to do a behavior chart with sticker incentives; to encourage a better dinner time experience for us all. I figure that Taco Crescent Bake will help, since I usually don't have to fight with him to eat it. He really likes it, so that means less coaxing to "sit down and eat" on my part. The husband will be pleased that we are having a meal with ground beef as an ingredient. As much as he approves of my vegetarian meal choices, he starts balking when I have more than two in a row. I need a dish with some beef in it to soothe him back into submission...just kidding, honey!!! This is a great all in one dish. I think I will serve it with our usual veggie and maybe a side salad. I have a surplus of romaine that I am trying to use up, so salad has been a prominent feature at our house lately.
Taco Crescent Bake
I noticed that the last time I made this was back in October, so it has certainly been awhile since we have had this dish. I am excited to have it again tonight!!!
Taco Crescent Bake
I noticed that the last time I made this was back in October, so it has certainly been awhile since we have had this dish. I am excited to have it again tonight!!!
March 11, 2009
Jen's Glazed Carrots
Here is my Glazed Carrots recipe again. I needed to separate it out from a previous post, so it is easier to link back to in the future. I love these carrots!
Jen's Glazed Carrots
Ingredients:
whole, peeled, fresh carrots: diced into coins (make sure they are all the same size)
pinch of salt
pinch of sugar
1 Tablespoon of butter
Steamer basket insert
Directions:
Place an inch to an inch and a half of water into the bottom of a sauce pan. Place steamer basket into water-filled sauce pan. Place raw carrot coins into steamer basket insert with lid partially (cracked) open. Steam raw carrots until soft and tender, generally about 15-20 minutes (maybe a little longer, depending on if you have a lot of carrots to cook). Test for doneness by piercing carrot coins with a fork to see if they are soft/cooked through. Remove carrots to a bowl and toss with sugar, salt, and butter. Serve immediately.
Veggie Cheeseburgers on Whole Wheat Buns
My husband took the day off so we could take our little guy on a family outing. We ended up going to the Phoenix Children's Museum, which is my son's version of utopia. It is a 3 year olds' paradise! My son hit all the exhibits and then we had a family picnic lunch in their grassy, outdoor area right before we headed home. All in all, it was a really fun morning.
Since today is a "family fun" day, I decided that dinner would be fun and easy, too. I know, big surprise!!!! Easy has been my focus for the last couple of weeks. I bought some pre-made veggie burgers at Costco, so I think we will cook those up and top 'em with cheese. I still have a few homemade whole wheat buns leftover to go with them, and I think I will make the salad I was supposed to make yesterday,too. Glazed carrots (see next post) and baked (microwaved) potatoes will round out our meal. This is really not a very exciting dinner (I don't even want to bore you with a photo and/or results), but it should be quick to prepare and fairly yummy!
Veggie Cheeseburgers on Whole Wheat Buns
Ingredients:
3-4 pre-made veggie burgers (I use Don Lee Farms Veggie Patties)
sliced cheese of your choice
3-4 whole wheat buns
diced onions
yellow mustard
dill pickle relish
Directions:
Cook veggie burgers according to package directions. Melt cheese slices over top. Place on buns and top with mustard, onions, and pickle relish. Serve immediately.
March 10, 2009
Slow Cooker Hoppin' John
We had a little luncheon/birthday party for my friend, Claire at my house earlier today (Happy Birthday, Claire!!!!). The weather is beautiful right now, so my mom friends and I spent most of our time on the back patio in the shade, while our kids played in my backyard. We had a total of eight moms, and more kids than I can count, running around all willy-nilly. We all pitched in and brought either a side dish, dessert, drinks, or chipped in money for pizzas. The food was yummy and I had a great time chatting with my buddies while the kids played. It was a little hectic, but overall, it was a great way to spend the early part of the afternoon. My son certainly had a lot of fun. After everyone left, he went straight to his room and passed out! In fact, I can hear him snoring softly over the monitor. I love it when he plays really hard and then conks out for a good nap! The best part is that my house is clean, and I already have dinner going in the slow cooker; that means his nap time is now my relax time!!! Hooray!!!
So, since I knew that I would need to get my house ready for Claire's party, I decided to do a slow cooker dinner. I have had this meal marked for a few months, but I never quite get around to making it. I think it is because I am skeptical of black eyed peas. No, not the funky, musical group...real black eyed peas...you know, the legumes. (Although, as I type this all I can think of is the lyrics to My Humps..."whatcha gon' do wit' all dat junk? all dat junk inside yo trunk?...." you get the picture.) (See! Now you will have that song stuck in your head, too!!!!) Anyway, I have never really tried black eyed peas before, so I am not sure what to expect. I found this recipe in my Cooking Light Slow Cooker cookbook. It is my favorite go-to, healthy slow cooker resource. Every dish I have tried out of this book turns out great! To keep it simple, I think I will just serve this dish with a side salad and call it a night. As it seems a lot lately, I am all about the easy dinner!
Slow Cooker Hoppin' John
Ingredients:
2 (16 ounce) packages of frozen black eyed peas
2 cups of hot water
3/4 cup of sliced green onions
3/4 cup of chopped red bell pepper
2 Tablespoons of minced jalapeno, seeded
2 teaspoons hot sauce
1/2 teaspoon of salt
1/4 teaspoon of black pepper
1 vegetable-flavored bouillon cube
1 (14.5 ounce) can of Cajun-style stewed tomatoes with garlic, pepper,and Cajun spices; undrained
2/3 cup of uncooked converted rice
1/2 cup of sliced green onions
Directions:
Combine first nine ingredients in slow cooker and cook on high for 4 hours. Stir in tomatoes and rice, and cover and cook 1 additional hour (or until both peas and rice are tender). Stir in green onions. Serve.
Yield: 6 servings; serving size 1 2/3 cups.
Jen's Notes:
I am debating if I also want to make a quick batch of corn bread. The photo in the book shows a bowl full of Hoppin' John with a hunk of corn bread beside it. It looks pretty tasty, and I do have a box of corn bread mix in the pantry. HMMMM???? I am not sure...I think I will wait and ask the husband if he feels like some cornbread, too. This dish sure smells good, so I have high hopes!

The Result:
This can best be described as disappointing. The whole dish was reminiscent of a rice and beans side dish...and that is about it. The rice turned out really gummy. I did not end up making corn bread or salad, since I really did not have time. I was afraid if I left this dish sit for too long the rice mixture would have turned into concrete. (I was wondering how the rice would work in the slow cooker...now I know.) The flavors were "eh"...pretty boring actually. It was fairly spicy, so we topped it with some light sour cream to try and make it more palatable. My Slow Cooker Red Beans and Rice recipe is a much better dish of basically the same concept. I would be open to trying Hoppin' John again...just not this recipe.
So, since I knew that I would need to get my house ready for Claire's party, I decided to do a slow cooker dinner. I have had this meal marked for a few months, but I never quite get around to making it. I think it is because I am skeptical of black eyed peas. No, not the funky, musical group...real black eyed peas...you know, the legumes. (Although, as I type this all I can think of is the lyrics to My Humps..."whatcha gon' do wit' all dat junk? all dat junk inside yo trunk?...." you get the picture.) (See! Now you will have that song stuck in your head, too!!!!) Anyway, I have never really tried black eyed peas before, so I am not sure what to expect. I found this recipe in my Cooking Light Slow Cooker cookbook. It is my favorite go-to, healthy slow cooker resource. Every dish I have tried out of this book turns out great! To keep it simple, I think I will just serve this dish with a side salad and call it a night. As it seems a lot lately, I am all about the easy dinner!
Slow Cooker Hoppin' John
Ingredients:
2 (16 ounce) packages of frozen black eyed peas
2 cups of hot water
3/4 cup of sliced green onions
3/4 cup of chopped red bell pepper
2 Tablespoons of minced jalapeno, seeded
2 teaspoons hot sauce
1/2 teaspoon of salt
1/4 teaspoon of black pepper
1 vegetable-flavored bouillon cube
1 (14.5 ounce) can of Cajun-style stewed tomatoes with garlic, pepper,and Cajun spices; undrained
2/3 cup of uncooked converted rice
1/2 cup of sliced green onions
Directions:
Combine first nine ingredients in slow cooker and cook on high for 4 hours. Stir in tomatoes and rice, and cover and cook 1 additional hour (or until both peas and rice are tender). Stir in green onions. Serve.
Yield: 6 servings; serving size 1 2/3 cups.
Jen's Notes:
I am debating if I also want to make a quick batch of corn bread. The photo in the book shows a bowl full of Hoppin' John with a hunk of corn bread beside it. It looks pretty tasty, and I do have a box of corn bread mix in the pantry. HMMMM???? I am not sure...I think I will wait and ask the husband if he feels like some cornbread, too. This dish sure smells good, so I have high hopes!
The Result:
This can best be described as disappointing. The whole dish was reminiscent of a rice and beans side dish...and that is about it. The rice turned out really gummy. I did not end up making corn bread or salad, since I really did not have time. I was afraid if I left this dish sit for too long the rice mixture would have turned into concrete. (I was wondering how the rice would work in the slow cooker...now I know.) The flavors were "eh"...pretty boring actually. It was fairly spicy, so we topped it with some light sour cream to try and make it more palatable. My Slow Cooker Red Beans and Rice recipe is a much better dish of basically the same concept. I would be open to trying Hoppin' John again...just not this recipe.
March 9, 2009
Pork Loin Roast with Raspberry Chipotle Glaze
I am running behind again. Despite the fact that I did not get the ol' blog updated in a timely manner...I did get a lot of other stuff done today. Whew! The biggest task was getting my son's third birthday invites out in the mail. Now that little nugget of fun is behind me (I hate addressing envelopes), I can focus on dinner.
This is going to be a thrown together meal. Easy and fast is my goal for this evening. I think I am going to roast the other half of the pork loin that I cut up yesterday. I am going to put a simple seasoning on it, and just let it cook in the oven. The sauce I am using is a bottled Raspberry Chipotle Sauce, which I have never tried before. I am interested to see how it tastes. I think my side items will be quinoa and a side salad. That should be simple enough, since quinoa is quick cooking and not very labor-intensive. I will let you know how it all works out.
Pork Loin with Raspberry Chipotle Glaze
Ingredients:
1/2 of a pork loin roast (about 2 lbs)
salt and pepper to taste
canola oil
Raspberry Chipotle Sauce (I used D.L. Jardine's Buckin' Berry)
Directions:
Rub oil, salt, and pepper on all sides of roast. Place roast fat side up on a baking sheet with a rack to elevate the meat. Slather top and sides of roast with Raspberry Chipotle sauce and cover with foil. Roast in the over at 475 degrees for 20 minutes (covered). Then,uncover and turn oven down to 425 degrees and cook for an additional 30-40 minutes OR until internal temperature reaches 155 degrees. Let roast rest for approximately 20 minutes before cutting. NOTE: If roast gets too dark while uncovered, save foil and re-cover it for the remaining cook time.

The Result:
This turned out really yummy! I did have to cover it back up while cooking, since it started to brown a little too much. All the sugar in the sauce is prone to burning, so I also had to have my windows open and my vent hood on high. The roast was not charred, but the dripping on the bottom of the sheet pan were charcoal. I heated up a little sauce in the microwave right before serving and spooned it over the pork. It was awesome! I loved the sweet/spicy contrast...there is something about it that is always so pleasantly unexpected!
The quinoa I cooked fairly plain to start out, then I added some fun stuff as I went along. I used the basic cooking method of water,a little salt, and the grain itself. Then, I sauteed some green chiles, onion, and garlic and tossed it it. Right before it was finished cooking, I seasoned it with salt and pepper, some hot sauce (Tamazula Mexican Hot Sauce brand), and Adobo seasoning. The result was probably my favorite version on quinoa so far. It was very yummy!
This is going to be a thrown together meal. Easy and fast is my goal for this evening. I think I am going to roast the other half of the pork loin that I cut up yesterday. I am going to put a simple seasoning on it, and just let it cook in the oven. The sauce I am using is a bottled Raspberry Chipotle Sauce, which I have never tried before. I am interested to see how it tastes. I think my side items will be quinoa and a side salad. That should be simple enough, since quinoa is quick cooking and not very labor-intensive. I will let you know how it all works out.
Pork Loin with Raspberry Chipotle Glaze
Ingredients:
1/2 of a pork loin roast (about 2 lbs)
salt and pepper to taste
canola oil
Raspberry Chipotle Sauce (I used D.L. Jardine's Buckin' Berry)
Directions:
Rub oil, salt, and pepper on all sides of roast. Place roast fat side up on a baking sheet with a rack to elevate the meat. Slather top and sides of roast with Raspberry Chipotle sauce and cover with foil. Roast in the over at 475 degrees for 20 minutes (covered). Then,uncover and turn oven down to 425 degrees and cook for an additional 30-40 minutes OR until internal temperature reaches 155 degrees. Let roast rest for approximately 20 minutes before cutting. NOTE: If roast gets too dark while uncovered, save foil and re-cover it for the remaining cook time.
The Result:
This turned out really yummy! I did have to cover it back up while cooking, since it started to brown a little too much. All the sugar in the sauce is prone to burning, so I also had to have my windows open and my vent hood on high. The roast was not charred, but the dripping on the bottom of the sheet pan were charcoal. I heated up a little sauce in the microwave right before serving and spooned it over the pork. It was awesome! I loved the sweet/spicy contrast...there is something about it that is always so pleasantly unexpected!
The quinoa I cooked fairly plain to start out, then I added some fun stuff as I went along. I used the basic cooking method of water,a little salt, and the grain itself. Then, I sauteed some green chiles, onion, and garlic and tossed it it. Right before it was finished cooking, I seasoned it with salt and pepper, some hot sauce (Tamazula Mexican Hot Sauce brand), and Adobo seasoning. The result was probably my favorite version on quinoa so far. It was very yummy!
March 8, 2009
Broccoli-Cauliflower Casserole
Last time I made this recipe, I combined it with another dish in my post. I wanted to separate it out, so it is easier to link back to in the future. This is the side dish we are having with our Pork Schnitzel. I am hoping that it pairs well with the flavors of the pork. I love that this dish is a all-in-one starch/vegetable combo. That means I only have to make one side items to fill both requirements, instead of two!
Broccoli-Cauliflower Casserole
Ingredients:
* 1 head cauliflower, cut into florets
* 1 head broccoli, cut into florets
* 2 eggs
* 1 large onion, peeled and coarsely chopped
* 1 can (10.75 ounces) condensed cream of mushroom soup
* 1/2 cup light mayonnaise
* 2 cups shredded sharp Cheddar cheese
* 1 box (6 ounces) chicken-flavored stuffing mix
* 4 tablespoons unsalted butter
Directions:
1. Heat oven to 350°F.
2. In a large pot, steam cauliflower for 7 to 8 minutes and broccoli for 5 minutes, or until fork-tender. Set aside.
3. In a food processor or blender, mix together eggs, onion, soup and mayonnaise until smooth.
4. In a 13 x 9 x 2-inch baking dish, spread cauliflower in an even layer. Sprinkle with half the cheese and top with half of the soup mixture. Repeat layering with broccoli and remaining cheese and soup mixture.
5. Prepare stuffing mix following package directions. Spoon stuffing over top of casserole. Bake at 350°F for 45 minutes. Serve warm.
The Result:
Did you see the photo below???? This looked good, didn't it??? Let me assure you, it tasted good, too! I really like this dish. It went nicely with our pork, so I am finding that it is pretty versatile. It goes well with a variety of main courses, and I still think it could be a stand-alone vegetarian meal all by itself. I will certainly be turning to this casserole recipe whenever I find fresh broccoli and cauliflower for a good price. It is both easy and yummy!
Pork Schnitzel
I finally got my game plan together for our meals this week. Due to my little shopping spree yesterday, I need to take it easy on the ol' food budget this week. I was able to craft a menu plan that allows me to stick with what I already have in my stores and skip a big grocery shop this week. My wallet thanks me, since it is still smokin' from being over-used at Le Creuset.
I saw this recipe on a blog I read called Simply Recipes. The author always features really accessible recipes and yummy looking food photos. She includes a lot of her personal favorites-usually passed along from family and friends-which I love about her posts. Almost every dish has a neat little story, and I drool over her recipes on a daily basis. This recipe for Pork Schnitzel caught my eye, as it looks to be a great variation on the veal classic. I think I will serve this with a side dish of Broccoli Cauliflower Casserole. I can't wait to eat!!!
Pork Schnitzel
adapted from Simply Recipes; serves 4
Ingredients:
4 boneless pork chops (1 pound total), 1/2 inch thick
1/4 cup flour
1 teaspoon Lawry's seasoned salt
1/4 teaspoon freshly ground black pepper
1 egg, beaten
2 Tbsp milk
3/4 cup fine dry bread crumbs or panko
1 teaspoon paprika
3 Tbsp canola oil /
3/4 cup chicken stock
1/2 teaspoon dried dill
1/2 teaspoon salt
1/2 cup of sour cream or plain yogurt
Lemon wedges or some lemon juice (optional)
Directions:
1 Use a meat hammer to pound the pork cutlets to 1/4-1/8 inch thickness. Cut small slits around the edges of the cutlets to prevent curling.
2 Set out 3 shallow bowls. One with a mixture of the flour, seasoned salt, and pepper. The second with the egg and milk whisked together. The third with a mixture of the bread crumbs (or panko) and paprika.
3 Heat the oil in a large skillet on medium high heat. Dredge the cutlets first in the seasoned flour, then dip the cutlets in the egg mixture, and then into the mixture of bread crumbs and paprika.
4 Working in batches, sauté the cutlets for 3-4 minutes on each side. Remove the cutlets from the skillet and cover with foil or place in a warm oven to keep warm.
5 Add the chicken stock into the skillet to deglaze the pan, scraping the bottom of the pan to loosen the brown bits. In a small bowl mix the dill and salt into the sour cream. Stir the sour cream mixture into the chicken stock. Heat and stir until mixture thickens (do not let boil).
Serve the cutlets with the sauce, and a squeeze of lemon (or sprinkle of lemon juice) if needed.
Jen's Notes:
I don't have boneless pork chops, so I am going to cut up a whole pork loin, and use half for this recipe and half on another night. Really, boneless pork chops usually come from the loin anyway...so no big deal. I need to substitute plain yogurt for sour cream, and lemon juice for the lemon wedges. I strained my plain yogurt earlier today, so the consistency would be more like sour cream. I just put it in a fine mesh colander, wrapped in cheese cloth, over a bowl. I let it sit in my fridge to drain all the excess water out to thicken it up. (Really this is closer to "Greek" style yogurt.) Hopefully, the sauce will still work okay with the yogurt. I will post the casserole recipe in a separate post.

The Result:
This was very good. The pork was tasty and crispy, and the sauce was a nice creamy contrast. I love dill, so I really appreciated the slightly pickled taste that the dried dill lent to the dish. Also, the squeeze of lemon did give all the flavors a bright little pick-me-up. We really liked this recipe!
I did have some issues while preparing the sauce. I could not get it to thicken appropriately. I ended up adding a small amount of butter/flour roux to fix it. Otherwise, it would have been way too watery. Also, I think the pork and the sauce could have both used a sprinkle of salt and pepper. I usually season as I go, but for some reason, I did not do it on this dish...and I missed it. The flour mixture indicates adding salt and pepper, but I don't think I added enough. Totally my fault! I don't like to season my food once it is served, but that is a personal preference. It was a super-easy fix to adjust the seasoning; I had to break down and bring salt and pepper to the table. Once it was seasoned properly, it was delicious!
Also, the pork did not cook all the way through on the stovetop. The browned bits were burning (I think my pan was too hot)(I think this was another reason I had sauce issues; I had to wipe out the charred bits in the pan before making the sauce), so I moved the cutlets to a baking sheet with a rack and threw them in the oven with the casserole. I like cooking breaded meats on a rack, so they stay nice and crispy...no soggy-bottoms. I think the cook time ended up being about 10 minutes at 350 degrees. I am glad I finished the pork in the oven, because it turned out perfectly cooked.
This is a total keeper meal, I just need to tweak it a bit more to my liking.
I saw this recipe on a blog I read called Simply Recipes. The author always features really accessible recipes and yummy looking food photos. She includes a lot of her personal favorites-usually passed along from family and friends-which I love about her posts. Almost every dish has a neat little story, and I drool over her recipes on a daily basis. This recipe for Pork Schnitzel caught my eye, as it looks to be a great variation on the veal classic. I think I will serve this with a side dish of Broccoli Cauliflower Casserole. I can't wait to eat!!!
Pork Schnitzel
adapted from Simply Recipes; serves 4
Ingredients:
4 boneless pork chops (1 pound total), 1/2 inch thick
1/4 cup flour
1 teaspoon Lawry's seasoned salt
1/4 teaspoon freshly ground black pepper
1 egg, beaten
2 Tbsp milk
3/4 cup fine dry bread crumbs or panko
1 teaspoon paprika
3 Tbsp canola oil /
3/4 cup chicken stock
1/2 teaspoon dried dill
1/2 teaspoon salt
1/2 cup of sour cream or plain yogurt
Lemon wedges or some lemon juice (optional)
Directions:
1 Use a meat hammer to pound the pork cutlets to 1/4-1/8 inch thickness. Cut small slits around the edges of the cutlets to prevent curling.
2 Set out 3 shallow bowls. One with a mixture of the flour, seasoned salt, and pepper. The second with the egg and milk whisked together. The third with a mixture of the bread crumbs (or panko) and paprika.
3 Heat the oil in a large skillet on medium high heat. Dredge the cutlets first in the seasoned flour, then dip the cutlets in the egg mixture, and then into the mixture of bread crumbs and paprika.
4 Working in batches, sauté the cutlets for 3-4 minutes on each side. Remove the cutlets from the skillet and cover with foil or place in a warm oven to keep warm.
5 Add the chicken stock into the skillet to deglaze the pan, scraping the bottom of the pan to loosen the brown bits. In a small bowl mix the dill and salt into the sour cream. Stir the sour cream mixture into the chicken stock. Heat and stir until mixture thickens (do not let boil).
Serve the cutlets with the sauce, and a squeeze of lemon (or sprinkle of lemon juice) if needed.
Jen's Notes:
I don't have boneless pork chops, so I am going to cut up a whole pork loin, and use half for this recipe and half on another night. Really, boneless pork chops usually come from the loin anyway...so no big deal. I need to substitute plain yogurt for sour cream, and lemon juice for the lemon wedges. I strained my plain yogurt earlier today, so the consistency would be more like sour cream. I just put it in a fine mesh colander, wrapped in cheese cloth, over a bowl. I let it sit in my fridge to drain all the excess water out to thicken it up. (Really this is closer to "Greek" style yogurt.) Hopefully, the sauce will still work okay with the yogurt. I will post the casserole recipe in a separate post.
The Result:
This was very good. The pork was tasty and crispy, and the sauce was a nice creamy contrast. I love dill, so I really appreciated the slightly pickled taste that the dried dill lent to the dish. Also, the squeeze of lemon did give all the flavors a bright little pick-me-up. We really liked this recipe!
I did have some issues while preparing the sauce. I could not get it to thicken appropriately. I ended up adding a small amount of butter/flour roux to fix it. Otherwise, it would have been way too watery. Also, I think the pork and the sauce could have both used a sprinkle of salt and pepper. I usually season as I go, but for some reason, I did not do it on this dish...and I missed it. The flour mixture indicates adding salt and pepper, but I don't think I added enough. Totally my fault! I don't like to season my food once it is served, but that is a personal preference. It was a super-easy fix to adjust the seasoning; I had to break down and bring salt and pepper to the table. Once it was seasoned properly, it was delicious!
Also, the pork did not cook all the way through on the stovetop. The browned bits were burning (I think my pan was too hot)(I think this was another reason I had sauce issues; I had to wipe out the charred bits in the pan before making the sauce), so I moved the cutlets to a baking sheet with a rack and threw them in the oven with the casserole. I like cooking breaded meats on a rack, so they stay nice and crispy...no soggy-bottoms. I think the cook time ended up being about 10 minutes at 350 degrees. I am glad I finished the pork in the oven, because it turned out perfectly cooked.
This is a total keeper meal, I just need to tweak it a bit more to my liking.
Dinner Out
I am a little behind on posting, since I had a really busy day yesterday. My friend Claire and I got to go shopping, sans preschoolers. It was very relaxing!!! We usually have to tote our kids along when we go on an outing, and mayhem typically ensues. This time, we only had to bring her sweet, little, smiley 4 month old baby...no 3 year olds. The best part was that we cleaned out the Le Creuset outlet store. They were having a sale, and we both found some great deals on our favorite cookware. It was very exciting! We stopped for a late lunch and cocktails before we came home, which we really enjoyed. When I did get home, the husband, boy and I had to turn around and immediately leave for my cousin's house. We had a yummy dinner and a lot of laughs over at her new place, so a good time was had by all. It was a little hectic, but a really good day, nonetheless. Tonight I will be back to my normal routine, although I am not sure what I will be making for dinner yet. I need to get my menu plan and grocery list together for the week. I will be back a little later to share what I will be cooking tonight.
March 6, 2009
Italian Stuffed Acorn Squash
I have been having a serious relationship with RecipeZaar lately. I think it's because it is largely uncharted territory for me, as I have only recently discovered it. I know I have recounted all the wonderful features of recipezaar.com in previous posts, so I will spare you yet another retelling of all the reasons why I love it. Just know that I think it is the bee's knees. (Assuming that bees actually have knees. If they do, I am sure they are spectacular!)
As you may have guessed this is another recipe from the aforementioned website. Ahem. I found this during my 'goat cheese' search, and I thought it was very interesting. I rarely ever have back to back vegetarian meals, but I needed to make an exception tonight. I felt one of my acorn squash specimens and found it to be a little soft. (Notice I used the word "specimens" instead of trying to figure out the plural form of "squash"...is it "squashes"???? "squashi"?? just plain "squash"..like the word "fish" that is the same both singular and plural???...I don't know, it is all very confusing to me.) Anyway...moving on.... I guess I better make my squash tonight.
The original recipe indicates that this is a slow cooker recipe, but I need to adapt it to the oven. I got a later start than planned, and all four of my squash halves do not fit into my crock pot. Ugh. I will have to do some creative cooking and figure out a way for it to bake in a timely manner. I am not really interested in going overboard on side items either, I think I will just make up a romaine salad with some homemade, easy vinaigrette and call it a night. I am looking forward to trying this dish, it sounds pretty interesting. Let's just hope is tastes good, as well!
Italian Stuffed Acorn Squash
Recipe #101585/By: Sharon123 (Oct 8, 2004)
Ingredients:
1 large acorn squash, halved and seeded
olive oil
1 cup water
1/2 cup wild rice
1/4 cup raw pumpkin seeds or pine nuts (I have used sunflower seeds too)
1 tablespoon minced garlic
1 tablespoon tomato paste
1/2 teaspoon salt
1/3 teaspoon pepper
1/2 teaspoon dried basil
1/4 teaspoon dried thyme
1 cup vegetable broth
1/4 cup crumbled goat cheese or feta cheese
Directions:
Cut squash in half and scoop out seeds. Brush squash halves with olive oil and place in slow cooker (slice off bottoms to level, if necessary). Pour 1 cup water into the cooker, around (not into) squash.
In a small bowl, combine wild rice blend, pumpkin seeds or pine nuts, minced garlic, tomato paste, salt, pepper, and spices; stir until well-mixed. Stuff rice mixture into each squash half.
Slowly pour about 1/2 cup vegetable broth into each squash cavity until full (don't let stuffing overflow). Pour any remaining broth around squash. Cover and cook on low for 6-8 hours or on high for 3-4 hours. Just prior to serving, sprinkle with crumbled cheese.
Jen's Notes:
I am doubling this recipe, making 4 halves (or two whole acorn squash). Also, as I mentioned, I need to adapt this recipe to the regular oven. Since I am not sure how that will work, I will need to experiment and then post my results later. This version is the slow cooker version, as originally written. I am not sure what salad dressing I am going to make either. I know Ellie Krieger has one that looked pretty good, so I may go with that. I will post a separate recipe later, depending on which vinaigrette I choose.

The Result:
This was really yummy, and pretty filling. One half per person is plenty! My little boy actually ate 1/4 all by himself. The combination of flavors is really good, and the wild rice texture makes it interesting (in a good way).
I ended up not following the recipe at all, since I totally ran out of time. Here is what I actually did: I roasted the squash in a 425 degree oven for 45 minutes with salt, pepper, and olive oil. Then, I cooked the wild rice separately and just mixed it in with the rest of the ingredients. I stuffed the squash when they came out of the oven and put the dollop of goat cheese on top. The result was super-yummy. The husband-who is not a big squash fan-really liked it and said that this was probably the best squash application that he has liked, so far. I thought that to be a glowing review on his part! I will make this again, since everyone at my house really seemed to like it.
As you may have guessed this is another recipe from the aforementioned website. Ahem. I found this during my 'goat cheese' search, and I thought it was very interesting. I rarely ever have back to back vegetarian meals, but I needed to make an exception tonight. I felt one of my acorn squash specimens and found it to be a little soft. (Notice I used the word "specimens" instead of trying to figure out the plural form of "squash"...is it "squashes"???? "squashi"?? just plain "squash"..like the word "fish" that is the same both singular and plural???...I don't know, it is all very confusing to me.) Anyway...moving on.... I guess I better make my squash tonight.
The original recipe indicates that this is a slow cooker recipe, but I need to adapt it to the oven. I got a later start than planned, and all four of my squash halves do not fit into my crock pot. Ugh. I will have to do some creative cooking and figure out a way for it to bake in a timely manner. I am not really interested in going overboard on side items either, I think I will just make up a romaine salad with some homemade, easy vinaigrette and call it a night. I am looking forward to trying this dish, it sounds pretty interesting. Let's just hope is tastes good, as well!
Italian Stuffed Acorn Squash
Recipe #101585/By: Sharon123 (Oct 8, 2004)
Ingredients:
1 large acorn squash, halved and seeded
olive oil
1 cup water
1/2 cup wild rice
1/4 cup raw pumpkin seeds or pine nuts (I have used sunflower seeds too)
1 tablespoon minced garlic
1 tablespoon tomato paste
1/2 teaspoon salt
1/3 teaspoon pepper
1/2 teaspoon dried basil
1/4 teaspoon dried thyme
1 cup vegetable broth
1/4 cup crumbled goat cheese or feta cheese
Directions:
Cut squash in half and scoop out seeds. Brush squash halves with olive oil and place in slow cooker (slice off bottoms to level, if necessary). Pour 1 cup water into the cooker, around (not into) squash.
In a small bowl, combine wild rice blend, pumpkin seeds or pine nuts, minced garlic, tomato paste, salt, pepper, and spices; stir until well-mixed. Stuff rice mixture into each squash half.
Slowly pour about 1/2 cup vegetable broth into each squash cavity until full (don't let stuffing overflow). Pour any remaining broth around squash. Cover and cook on low for 6-8 hours or on high for 3-4 hours. Just prior to serving, sprinkle with crumbled cheese.
Jen's Notes:
I am doubling this recipe, making 4 halves (or two whole acorn squash). Also, as I mentioned, I need to adapt this recipe to the regular oven. Since I am not sure how that will work, I will need to experiment and then post my results later. This version is the slow cooker version, as originally written. I am not sure what salad dressing I am going to make either. I know Ellie Krieger has one that looked pretty good, so I may go with that. I will post a separate recipe later, depending on which vinaigrette I choose.
The Result:
This was really yummy, and pretty filling. One half per person is plenty! My little boy actually ate 1/4 all by himself. The combination of flavors is really good, and the wild rice texture makes it interesting (in a good way).
I ended up not following the recipe at all, since I totally ran out of time. Here is what I actually did: I roasted the squash in a 425 degree oven for 45 minutes with salt, pepper, and olive oil. Then, I cooked the wild rice separately and just mixed it in with the rest of the ingredients. I stuffed the squash when they came out of the oven and put the dollop of goat cheese on top. The result was super-yummy. The husband-who is not a big squash fan-really liked it and said that this was probably the best squash application that he has liked, so far. I thought that to be a glowing review on his part! I will make this again, since everyone at my house really seemed to like it.
March 5, 2009
Edamame and Mushroom Risotto
I am always on the lookout for interesting vegetarian recipes. I was flipping through one of my magazines, where low and behold, I found this dish. I cut the article out and saved it, but I did not note which magazine it came from. I did a little online investigating and deduced that it came from the April 2009 issue of Family Circle magazine. Whew! I found it!!! Next time, I will just have to pay closer attention to what I am doing.
I love edamame and often buy it to have on hand. I like to steam it in the microwave, then top it with some flaked sea salt, for a healthy, mid-afternoon snack (it helps me keep the cookie cravings at bay). Believe it or not, it is a very satisfying little treat! Anyway, we have been having a lot of heavy meals lately, so I thought this would be a nice break. I am always a sucker for a good risotto!
Edamame and Mushroom Risotto
Ingredients:
2 tablespoons olive oil
8 ounces white button mushrooms, trimmed and sliced
1 pound frozen edamame
1/2 dry white wine
3 cups vegetable broth mixed with 1-1/2 cups water
1 small onion, peeled and finely chopped
1 1/2 cups arborio rice
1/8 teaspoon black pepper
1/2 cup shredded Parmesan cheese
1/4 cup of half and half (optional)
Directions:
1. Heat 1 tablespoon of the olive oil in a large nonstick skillet over medium-high heat. Add mushrooms and cook for 5 minutes, stirring occasionally. Set aside.
2. Cook edamame, about 5 minutes, following package directions. Drain, cool and remove beans from shells. Add beans to mushrooms in skillet. Discard shells.
3. Place broth and water in a medium-size saucepan and bring to a simmer.
4. In a large saucepan, heat remaining tablespoon oil over medium heat. Add onion and cook 5 minutes, stirring occasionally. Add rice and stir until rice is coated with oil. Cook for 1 minute, stirring-. Add wine and cook until wine is absorbed -- about 1 minute
5. Add 1/2 cup of the simmering broth mixture. Cook over medium-low heat, stirring, until broth is absorbed. Add remaining broth mixture, 1/2 cup at a time, cooking in the same manner. This should take about 30 minutes.
6. Gently heat mushrooms and edamame. Stir into rice and remove from heat. Stir in the pepper, half and half, and 1/4 cup of the cheese.
7. Divide among 4 bowls and sprinkle with remaining Parmesan cheese.

The Result:
This was really good. The husband really liked it. He had seconds, which is rare at our house. It was not as rich as most risottos, but still creamy and satisfying. The edamame made it pretty substantial, and gave it a fresh element. I loved the combination of flavors, with the earthy mushrooms and the green edamame. So yummy!
The edamame I used was pre-shelled (found at Fresh and Easy in the frozen section), so it actually saved me a step. I just steam-cooked them in the microwave and then combined them with the mushroom mixture...no shelling involved. The only other changes I made was that I added a couple cloves of minced garlic and some Pecorino Romano cheese; maybe 1/4 of a cup. I mixed the two cheeses together, since I love the slightly pungent sharpness that a little Romano lends. Overall, this is a definite keeper. We are huge risotto fans, and I love having another version of this classic dish in my repertoire.
UPDATE:
I made this risotto again, but changed up some of the base ingredients. Instead of edamame, I substituted peas. Then, I wilted some fresh baby spinach into it for a little nutritional boost. Lastly, I topped it off with some crispy, crumbled bacon as a garnish (I think I only used 4-5 slices total). YUM! I think I like the updated version better than the original recipe. This is a great basic risotto that you can play around with and add/subtract different items of your liking. (PS-Obviously, the bacon negates the "vegetarian" aspect of the dish, but it is a great addition if you are not adverse to a little pork product in your risotto.)
I love edamame and often buy it to have on hand. I like to steam it in the microwave, then top it with some flaked sea salt, for a healthy, mid-afternoon snack (it helps me keep the cookie cravings at bay). Believe it or not, it is a very satisfying little treat! Anyway, we have been having a lot of heavy meals lately, so I thought this would be a nice break. I am always a sucker for a good risotto!
Edamame and Mushroom Risotto
Ingredients:
2 tablespoons olive oil
8 ounces white button mushrooms, trimmed and sliced
1 pound frozen edamame
1/2 dry white wine
3 cups vegetable broth mixed with 1-1/2 cups water
1 small onion, peeled and finely chopped
1 1/2 cups arborio rice
1/8 teaspoon black pepper
1/2 cup shredded Parmesan cheese
1/4 cup of half and half (optional)
Directions:
1. Heat 1 tablespoon of the olive oil in a large nonstick skillet over medium-high heat. Add mushrooms and cook for 5 minutes, stirring occasionally. Set aside.
2. Cook edamame, about 5 minutes, following package directions. Drain, cool and remove beans from shells. Add beans to mushrooms in skillet. Discard shells.
3. Place broth and water in a medium-size saucepan and bring to a simmer.
4. In a large saucepan, heat remaining tablespoon oil over medium heat. Add onion and cook 5 minutes, stirring occasionally. Add rice and stir until rice is coated with oil. Cook for 1 minute, stirring-. Add wine and cook until wine is absorbed -- about 1 minute
5. Add 1/2 cup of the simmering broth mixture. Cook over medium-low heat, stirring, until broth is absorbed. Add remaining broth mixture, 1/2 cup at a time, cooking in the same manner. This should take about 30 minutes.
6. Gently heat mushrooms and edamame. Stir into rice and remove from heat. Stir in the pepper, half and half, and 1/4 cup of the cheese.
7. Divide among 4 bowls and sprinkle with remaining Parmesan cheese.
The Result:
This was really good. The husband really liked it. He had seconds, which is rare at our house. It was not as rich as most risottos, but still creamy and satisfying. The edamame made it pretty substantial, and gave it a fresh element. I loved the combination of flavors, with the earthy mushrooms and the green edamame. So yummy!
The edamame I used was pre-shelled (found at Fresh and Easy in the frozen section), so it actually saved me a step. I just steam-cooked them in the microwave and then combined them with the mushroom mixture...no shelling involved. The only other changes I made was that I added a couple cloves of minced garlic and some Pecorino Romano cheese; maybe 1/4 of a cup. I mixed the two cheeses together, since I love the slightly pungent sharpness that a little Romano lends. Overall, this is a definite keeper. We are huge risotto fans, and I love having another version of this classic dish in my repertoire.
UPDATE:
I made this risotto again, but changed up some of the base ingredients. Instead of edamame, I substituted peas. Then, I wilted some fresh baby spinach into it for a little nutritional boost. Lastly, I topped it off with some crispy, crumbled bacon as a garnish (I think I only used 4-5 slices total). YUM! I think I like the updated version better than the original recipe. This is a great basic risotto that you can play around with and add/subtract different items of your liking. (PS-Obviously, the bacon negates the "vegetarian" aspect of the dish, but it is a great addition if you are not adverse to a little pork product in your risotto.)
Copycat Carrabba's Chicken Bryan
I bought a huge log of goat cheese at Costco, since they had a great price on it. I think I paid $4.99 for a pound of goat cheese. It was a total steal! I love goat cheese, but I must confess, I don't have very many recipes that include it. I did an 'ingredients' search on recipezaar.com and found this dish. Oh, man I am glad I did! I hit the mother-load! Since I now have a bunch of goat cheese on hand, you will probably be seeing a few of my finds in the coming days and weeks.
We don't eat out at restaurants too much, so I was not sure what this dish was supposed to look and taste like...it was a total surprise. Since this was our dinner last night, I will finish my review in my 'result' section below. I chose baked potatoes and broccoli as side items, but my photo does not show the potato. Oops! I forgot to put it on the plate for my pic. I think roasted potatoes would be yummy, too. I am getting ahead of myself again...here is the recipe. I changed some quantities and ingredients, so I will amend the below recipe to include the differences for my version.
Copycat Carrabba's Chicken Bryan
Recipe #64356
By: keen5--Jun 11, 2003/this copycat recipe from Algy's Recipe Exchange
Ingredients:
1 tablespoon minced garlic
1 tablespoon minced yellow onion
2 tablespoons butter
1/2 cup dry white wine
1/4 cup fresh lemon juice
2/3 cup cold butter, sliced
1 cup of chopped sun-dried tomatoes
1/4 cup chopped fresh basil
1/2 teaspoon kosher salt
1/2 teaspoon pepper
6 boneless skinless chicken breast halves
extra virgin olive oil, for brushing
1/2 teaspoon salt
1/2 teaspoon black pepper
6 ounces goat cheese,at room temperature
2 ounces of mascarpone cheese, at room temperature
Directions:
Saute garlic and onion in 2 Tbls. butter in a large skillet over medium heat until tender. Stir wine and lemon juice into skillet, increase heat to medium high, and simmer to reduce by half. Reduce heat to low and stir in cold butter, one slice at a time. Stir in tomatoes, basil, kosher salt, and pepper; remove from heat; set aside.
Brush chicken breasts with olive oil and sprinkle with salt and black pepper.
Grill chicken over hot coals 15-20 minutes, or until cooked through.
In a small bowl, combine goat cheese and mascarpone, mix well, and set aside. A couple of minutes before chicken is done, place equal amounts of cheese mixture on each breast. Spoon prepared sun-dried tomato sauce over chicken.


The Result:
This is my new favorite dinner. It was so decadent! Every bite was awesome. It was rich, but not in an overpowering way. It was buttery, creamy, tangy, and lemony, all at the same time. It was certainly an explosion of flavor. This dish paired nicely with the potato and broccoli, so I will probably keep the same side items when I make this dish again. The best part is that the sauce went with everything perfectly. I just spooned some of the sauce on my plain potato and I was in heaven. It was so good! I will definitely make this dish again.
We don't eat out at restaurants too much, so I was not sure what this dish was supposed to look and taste like...it was a total surprise. Since this was our dinner last night, I will finish my review in my 'result' section below. I chose baked potatoes and broccoli as side items, but my photo does not show the potato. Oops! I forgot to put it on the plate for my pic. I think roasted potatoes would be yummy, too. I am getting ahead of myself again...here is the recipe. I changed some quantities and ingredients, so I will amend the below recipe to include the differences for my version.
Copycat Carrabba's Chicken Bryan
Recipe #64356
By: keen5--Jun 11, 2003/this copycat recipe from Algy's Recipe Exchange
Ingredients:
1 tablespoon minced garlic
1 tablespoon minced yellow onion
2 tablespoons butter
1/2 cup dry white wine
1/4 cup fresh lemon juice
2/3 cup cold butter, sliced
1 cup of chopped sun-dried tomatoes
1/4 cup chopped fresh basil
1/2 teaspoon kosher salt
1/2 teaspoon pepper
6 boneless skinless chicken breast halves
extra virgin olive oil, for brushing
1/2 teaspoon salt
1/2 teaspoon black pepper
6 ounces goat cheese,at room temperature
2 ounces of mascarpone cheese, at room temperature
Directions:
Saute garlic and onion in 2 Tbls. butter in a large skillet over medium heat until tender. Stir wine and lemon juice into skillet, increase heat to medium high, and simmer to reduce by half. Reduce heat to low and stir in cold butter, one slice at a time. Stir in tomatoes, basil, kosher salt, and pepper; remove from heat; set aside.
Brush chicken breasts with olive oil and sprinkle with salt and black pepper.
Grill chicken over hot coals 15-20 minutes, or until cooked through.
In a small bowl, combine goat cheese and mascarpone, mix well, and set aside. A couple of minutes before chicken is done, place equal amounts of cheese mixture on each breast. Spoon prepared sun-dried tomato sauce over chicken.
The Result:
This is my new favorite dinner. It was so decadent! Every bite was awesome. It was rich, but not in an overpowering way. It was buttery, creamy, tangy, and lemony, all at the same time. It was certainly an explosion of flavor. This dish paired nicely with the potato and broccoli, so I will probably keep the same side items when I make this dish again. The best part is that the sauce went with everything perfectly. I just spooned some of the sauce on my plain potato and I was in heaven. It was so good! I will definitely make this dish again.
No-Guilt Pumpkin Cookies
I still had some pumpkin leftover from bread-making, so I thought I would try this recipe for cookies. My friend, Claire found it on recipezaar.com when she was looking for pumpkin ideas. After a glowing review from Claire, I decided I just had to make these babies. Oh man! She was quite right to brag about these cookies...they are great! Light, fluffy, cake-like. Not too sweet, but nice and buttery. Yum! I heart them very much. Also, the recipe should come with a warning label...these cookies are highly addictive! You cannot eat just one!
No-Guilt Pumpkin Cookies
Recipe #169079
Ingredients:
1/2 cup sugar or Splenda granular
1/2 cup brown sugar, packed
1 cup margarine or butter, softened
1 cup canned pumpkin
1 teaspoon vanilla
1 egg
2 cups whole wheat flour
1/4 cup ground flax seeds
1 teaspoon baking powder
1 teaspoon baking soda
1 teaspoon cinnamon
1/4 teaspoon salt
Directions:
Preheat oven to 350 degrees. In large bowl, beat sugars and margarine until light and fluffy. Add pumpkin, vanilla, and egg; blend well. Add dry ingredients and mix well. Drop dough by rounded teaspoonfuls 2 inches apart on ungreased cookie sheets.
Bake at 350 degrees for 10-12 minutes or until light golden brown around the edges.
Jen's Notes:
I added a teaspoon of nutmeg, too. What can I say??? I love nutmeg. Also, I think that cinnamon should not be without nutmeg. It is just such a classic pairing.

The Result:
Is it wrong to have cookies for breakfast??? I hope not, because this is precisely what my son and I ate this morning. In fact, it was his idea! Who am I to say that we should not have delicious, No-Guilt Pumpkin Cookies for breakfast???? After all, you are not allowed to feel guilty while eating them...it says so right in the title! I assume that includes breakfast, too.
No-Guilt Pumpkin Cookies
Recipe #169079
Ingredients:
1/2 cup sugar or Splenda granular
1/2 cup brown sugar, packed
1 cup margarine or butter, softened
1 cup canned pumpkin
1 teaspoon vanilla
1 egg
2 cups whole wheat flour
1/4 cup ground flax seeds
1 teaspoon baking powder
1 teaspoon baking soda
1 teaspoon cinnamon
1/4 teaspoon salt
Directions:
Preheat oven to 350 degrees. In large bowl, beat sugars and margarine until light and fluffy. Add pumpkin, vanilla, and egg; blend well. Add dry ingredients and mix well. Drop dough by rounded teaspoonfuls 2 inches apart on ungreased cookie sheets.
Bake at 350 degrees for 10-12 minutes or until light golden brown around the edges.
Jen's Notes:
I added a teaspoon of nutmeg, too. What can I say??? I love nutmeg. Also, I think that cinnamon should not be without nutmeg. It is just such a classic pairing.
The Result:
Is it wrong to have cookies for breakfast??? I hope not, because this is precisely what my son and I ate this morning. In fact, it was his idea! Who am I to say that we should not have delicious, No-Guilt Pumpkin Cookies for breakfast???? After all, you are not allowed to feel guilty while eating them...it says so right in the title! I assume that includes breakfast, too.
March 3, 2009
Spiced Pumpkin Walnut Bread
About once or twice a month I go through my pantry, fridge, and freezer, and take inventory. I see what I have in stock, and then I also make a itemized list of staples that I need. While doing my pantry check last week, I found a huge, unopened can of pumpkin. It was a total head-scratcher! I think I remember buying a can during Thanksgiving, but obviously, I never got around to using it. Huh.
Anyway, since I cannot waste a perfectly good can of pumpkin, I decided to make some pumpkin bread. I love having homemade baked goods in the house, since they are usually a little healthier than anything you could buy. I did a search on recipezaar.com and found this recipe. I had everything on hand, so it was pretty easy to put together. I made a couple substitutions, and amended the original recipe to include my changes.
Here is a funny coincidence...I told my friend, Claire about my pumpkin find and, ironically, she found a can of pumpkin in her pantry, too. She decided to make some pumpkin cookies, and I went with the bread. Oddly enough, we both decided to do our pumpkin baking today. I still have some pumpkin leftover, so I will probably make her cookies tomorrow.
Spiced Pumpkin Walnut Bread
By Bev, 01/25/02, Recipe #18014
Yield: 2 loaves, 16-18 servings
Ingredients:
3 cups sugar
1/2 cup canola oil
1/2 cup of natural applesauce (4 oz.)
3 large eggs
1 (16 ounce) can solid pack pumpkin
3 cups all-purpose flour
1 teaspoon ground cloves
1 teaspoon ground cinnamon
1 teaspoon ground nutmeg
1/2 teaspoon ground allspice
1 teaspoon baking soda
1/2 teaspoon salt
1/2 teaspoon baking powder
1 cup coarsely chopped walnuts
Directions:
Preheat oven to 350ºF.
1. Butter and flour two 9x5x3" loaf pans.
2. Beat sugar, applesauce, and oil in large bowl to blend.
3. Mix in eggs and pumpkin.
4. Sift flour, cloves, cinnamon, nutmeg,allspice, baking soda, salt and baking powder into another large bowl.
5. Stir into pumpkin mixture in 2 additions.
6. Mix in walnuts, if desired.
7. Divide batter equally between prepared pans.
8. Bake until tester inserted into center comes out clean, about 1 hour and 10 minutes.
9. Transfer to racks and cool 10 minutes.
10. Using sharp knife, cut around edge of loaves.
11. Turn loaves out onto racks and cool completely.

The Result:
I am tired of typing, so my review is going to be short.
Here it is....
YUM!!!! This bread is awesome. Try it and you will see! Case closed. Over and out.
Anyway, since I cannot waste a perfectly good can of pumpkin, I decided to make some pumpkin bread. I love having homemade baked goods in the house, since they are usually a little healthier than anything you could buy. I did a search on recipezaar.com and found this recipe. I had everything on hand, so it was pretty easy to put together. I made a couple substitutions, and amended the original recipe to include my changes.
Here is a funny coincidence...I told my friend, Claire about my pumpkin find and, ironically, she found a can of pumpkin in her pantry, too. She decided to make some pumpkin cookies, and I went with the bread. Oddly enough, we both decided to do our pumpkin baking today. I still have some pumpkin leftover, so I will probably make her cookies tomorrow.
Spiced Pumpkin Walnut Bread
By Bev, 01/25/02, Recipe #18014
Yield: 2 loaves, 16-18 servings
Ingredients:
3 cups sugar
1/2 cup canola oil
1/2 cup of natural applesauce (4 oz.)
3 large eggs
1 (16 ounce) can solid pack pumpkin
3 cups all-purpose flour
1 teaspoon ground cloves
1 teaspoon ground cinnamon
1 teaspoon ground nutmeg
1/2 teaspoon ground allspice
1 teaspoon baking soda
1/2 teaspoon salt
1/2 teaspoon baking powder
1 cup coarsely chopped walnuts
Directions:
Preheat oven to 350ºF.
1. Butter and flour two 9x5x3" loaf pans.
2. Beat sugar, applesauce, and oil in large bowl to blend.
3. Mix in eggs and pumpkin.
4. Sift flour, cloves, cinnamon, nutmeg,allspice, baking soda, salt and baking powder into another large bowl.
5. Stir into pumpkin mixture in 2 additions.
6. Mix in walnuts, if desired.
7. Divide batter equally between prepared pans.
8. Bake until tester inserted into center comes out clean, about 1 hour and 10 minutes.
9. Transfer to racks and cool 10 minutes.
10. Using sharp knife, cut around edge of loaves.
11. Turn loaves out onto racks and cool completely.
The Result:
I am tired of typing, so my review is going to be short.
Here it is....
YUM!!!! This bread is awesome. Try it and you will see! Case closed. Over and out.
Subscribe to:
Posts (Atom)