I had a great time on my trip, and now it's back to our usual routine. Our meals this week are going to be somewhat easy, since we seem to have a schedule that is going bonkers lately. It seems like I am constantly juggling 2 or 3 tasks at a time...just to get everything I want to get done accomplished. For instance, right now I am in the middle of baking cookies, updating this blog, and starting my dinner preparation. Yikes! So, enough chit-chat (or chit-typing rather...hardy, har, har) and on to my meal plan for the week!!!!
Weekly Menu Plan: 05/30/10 - 06/05/10
Sunday, 05/30/10: Jen's Bean Tostadas, Chipotle Copycat Lime Rice (vegetarian)
Monday, 05/31/10: Happy Memorial Day! Dinner at my friend Claire's house (I am bringing White Chocolate Cranberry Oatmeal Cookies and Pioneer Woman's Sesame Noodles)
Tuesday, 06/01/10: Thai Green Curry Shrimp, brown rice, veggies (new recipe)
Wednesday, 06/02/10: Slow Cooker Beef Stroganoff over whole wheat egg noodles, salad (new recipe)
Thursday, 06/03/10: Jenn Nelson's Fabulous Marinara Sauce, Whole Wheat Cheese Ravioli (pre-made), salad (vegetarian)
Friday, 06/04/10: Leftovers and salad
Saturday, 06/05/10: Leftovers again!
May 30, 2010
May 22, 2010
Vacation
I am off cooking duty for a bit, since the boy and I are going out of town to visit some friends of ours for the next week. The husband, babies, and dogs will have to fend for themselves until our return. I will be back the week of Memorial Day with some more new recipes! See ya then!!!!
May 20, 2010
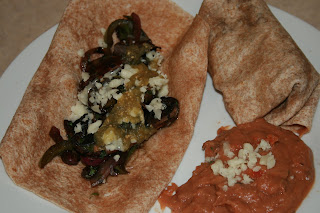
Zucchini Quesadillas
There are three or four zucchini quesadilla recipes that I have come across recently, and I am dying to try all of them. The first one was emailed to me from my friend Claire, and all the rest are variations that I found on the Cooking Light website. All of them look absolutely delicious, so I may just create a hybrid version and combine elements from each recipe. I can't commit to just one zucchini quesadilla recipe, after all. I like to keep my options open! Some yummy, spicy, black beans will round out our meal.
Zucchini Quesadillas
Ingredients:
1 teaspoon of butter
1 1/2 cups of shredded zucchini
1 small can of sliced black olives (drained and dried on paper towel)
1/2 onion, sliced
2 cloves garlic, minced
1 jarred roasted red pepper, diced (drained and dried on paper towel)
2 oz. crumbled goat cheese
4 oz. pepper jack cheese, shredded
2 Tablespoons of taco seasoning or BBQ spice blend (I am using some of the Rick Bayless spice mix I have stored in my fridge)
1/3 cup of your favorite salsa
salt and pepper to taste
8 whole wheat tortillas
cooking spray
guacamole for topping
Directions:
In a large skillet, saute onions, red peppers, and olives until onions are soft and translucent. Add in zucchini, garlic, salsa, and taco (or BBQ spice) seasoning. Cook until veggies are tender. Season with salt and pepper to taste. Remove from heat. Add some veggie filling to a wheat tortilla. Sprinkle with 1 oz. of pepper jack cheese and a 1/2 oz. of goat cheese. Top with another wheat tortilla. Set aside on a sheet pan. Repeat until all the filling is used (it should make about 4 quesadillas). When filling is used, wipe out the skillet with a paper towel. Spray skillet with cooking spray and heat over medium high heat. When pan is hot, carefully add quesadilla with a spatula. Cook for 3 minutes, or until quesadilla is lightly browned on the bottom. Carefully, flip with a spatula and cook the other side of the quesadilla for another 2-3 minutes, or until lightly browned. Repeat with remaining quesadillas, adding more cooking spray if needed. Remove cooked quesadillas to a cutting board and cut into 4 wedges. Serve with guacamole.

The Result:
These were awesome! Seriously, delicious and filling...sooooooo satisfying. We all loved them, and this is yet another dish I will be sure to keep in my vegetarian rotation. The little bit of goat cheese added such a creamy/tangy dimension of yumminess, and the pepper jack cheese gave it the perfect amount of a spicy bite. Yum, yum, yum!!!
Zucchini Quesadillas
Ingredients:
1 teaspoon of butter
1 1/2 cups of shredded zucchini
1 small can of sliced black olives (drained and dried on paper towel)
1/2 onion, sliced
2 cloves garlic, minced
1 jarred roasted red pepper, diced (drained and dried on paper towel)
2 oz. crumbled goat cheese
4 oz. pepper jack cheese, shredded
2 Tablespoons of taco seasoning or BBQ spice blend (I am using some of the Rick Bayless spice mix I have stored in my fridge)
1/3 cup of your favorite salsa
salt and pepper to taste
8 whole wheat tortillas
cooking spray
guacamole for topping
Directions:
In a large skillet, saute onions, red peppers, and olives until onions are soft and translucent. Add in zucchini, garlic, salsa, and taco (or BBQ spice) seasoning. Cook until veggies are tender. Season with salt and pepper to taste. Remove from heat. Add some veggie filling to a wheat tortilla. Sprinkle with 1 oz. of pepper jack cheese and a 1/2 oz. of goat cheese. Top with another wheat tortilla. Set aside on a sheet pan. Repeat until all the filling is used (it should make about 4 quesadillas). When filling is used, wipe out the skillet with a paper towel. Spray skillet with cooking spray and heat over medium high heat. When pan is hot, carefully add quesadilla with a spatula. Cook for 3 minutes, or until quesadilla is lightly browned on the bottom. Carefully, flip with a spatula and cook the other side of the quesadilla for another 2-3 minutes, or until lightly browned. Repeat with remaining quesadillas, adding more cooking spray if needed. Remove cooked quesadillas to a cutting board and cut into 4 wedges. Serve with guacamole.
The Result:
These were awesome! Seriously, delicious and filling...sooooooo satisfying. We all loved them, and this is yet another dish I will be sure to keep in my vegetarian rotation. The little bit of goat cheese added such a creamy/tangy dimension of yumminess, and the pepper jack cheese gave it the perfect amount of a spicy bite. Yum, yum, yum!!!
May 18, 2010
Jen's Chicken Pizzaola
Since last night's calzone concoction was so successful, I figured I would make another experimental dish that will efficiently use up all of the superfluous leftovers that I have lurking in my fridge from that dinner. (I love having a reason to use the word "superfluous".) Mashed potatoes and steamed veggies will round out this 'surprise' meal. I hope this recipe turns out as yummy as I am imagining it. Again, keep your fingers crossed for me!
Jen's Chicken Pizzaola
Ingredients:
1/3 cup of canola oil
2 large chicken breasts, pounded flat to 1/4 inch thick
1 cup Italian-style bread crumbs
1/2 cup of AP flour
2 eggs, beaten
leftover calzone veggie filling
8 pepperoni slices, diced into quarters
1/2 cup of mozzarella cheese
1/2 cup of leftover pesto/ricotta/mascarpone mixture
Parmesan cheese, shredded to taste
salt and pepper to taste
Directions:
Preheat oven to 325 degrees. Combine the diced pepperoni pieces to the calzone veggie filling and set aside.
Set up 3 shallow bowls for a breading station: add AP flour to the first bowl, the beaten eggs to the second bowl, and the breadcrumbs to the third bowl. Dip flattened chicken in AP flour first to coat all sides, shaking off any excess flour. Next, dip the floured chicken in the beaten eggs to coat all sides. Last,dip the coated chicken in the breadcrumbs and coat all sides.
In a large skillet, heat oil over medium heat. Saute coated chicken for 3-4 minutes per side, until golden browned.
Transfer the cooked chickens onto a sheet pan fitted with a wire rack, and sprinkle on some salt and pepper to taste. Smear ricotta/pesto/mascarpone mixture on the tops of the chicken breasts with a spoon or spatula. Spoon the calzone veggie filling on top of the ricotta mixture. Sprinkle the tops of the chicken breasts with the mozzarella cheese.
Bake the chicken in the oven for 5-10 minutes longer, or until chicken is cooked through and cheese is melted. Remove from the oven and sprinkle Parmesan cheese over the top, to taste. Serve and enjoy!

The Result:
This was soooo decadent and delicious! We all loved it. My photo is a little strange; the battery on my SLR died and I had to use my little point and shoot digital. Aside from the shoddy camera work, this chicken was yummy. One chicken breast (once pounded out flat) was huge, and big enough to feed all three of us. The whole breast took up an entire dinner plate, before I cut it into normal portion sizes! We still have a second breast leftover, so we may just eat that for dinner tonight and push back my other menu items. The only downside to this dish was that it was super-filling and I was 'way-beyond-comfortable' stuffed. So stuffed that I almost barfed at my fitness boot camp/bible study afterward. Take it from me, don't eat this dinner and then do an intense workout. Ugh. Anyway, now that you have that mental picture in your mind...this was excellent chicken and I recommend trying it.
Jen's Chicken Pizzaola
Ingredients:
1/3 cup of canola oil
2 large chicken breasts, pounded flat to 1/4 inch thick
1 cup Italian-style bread crumbs
1/2 cup of AP flour
2 eggs, beaten
leftover calzone veggie filling
8 pepperoni slices, diced into quarters
1/2 cup of mozzarella cheese
1/2 cup of leftover pesto/ricotta/mascarpone mixture
Parmesan cheese, shredded to taste
salt and pepper to taste
Directions:
Preheat oven to 325 degrees. Combine the diced pepperoni pieces to the calzone veggie filling and set aside.
Set up 3 shallow bowls for a breading station: add AP flour to the first bowl, the beaten eggs to the second bowl, and the breadcrumbs to the third bowl. Dip flattened chicken in AP flour first to coat all sides, shaking off any excess flour. Next, dip the floured chicken in the beaten eggs to coat all sides. Last,dip the coated chicken in the breadcrumbs and coat all sides.
In a large skillet, heat oil over medium heat. Saute coated chicken for 3-4 minutes per side, until golden browned.
Transfer the cooked chickens onto a sheet pan fitted with a wire rack, and sprinkle on some salt and pepper to taste. Smear ricotta/pesto/mascarpone mixture on the tops of the chicken breasts with a spoon or spatula. Spoon the calzone veggie filling on top of the ricotta mixture. Sprinkle the tops of the chicken breasts with the mozzarella cheese.
Bake the chicken in the oven for 5-10 minutes longer, or until chicken is cooked through and cheese is melted. Remove from the oven and sprinkle Parmesan cheese over the top, to taste. Serve and enjoy!
The Result:
This was soooo decadent and delicious! We all loved it. My photo is a little strange; the battery on my SLR died and I had to use my little point and shoot digital. Aside from the shoddy camera work, this chicken was yummy. One chicken breast (once pounded out flat) was huge, and big enough to feed all three of us. The whole breast took up an entire dinner plate, before I cut it into normal portion sizes! We still have a second breast leftover, so we may just eat that for dinner tonight and push back my other menu items. The only downside to this dish was that it was super-filling and I was 'way-beyond-comfortable' stuffed. So stuffed that I almost barfed at my fitness boot camp/bible study afterward. Take it from me, don't eat this dinner and then do an intense workout. Ugh. Anyway, now that you have that mental picture in your mind...this was excellent chicken and I recommend trying it.
May 17, 2010
Jen's Pepperoni and Veggie Calzones
I randomly picked up a package of pepperoni at the store the other day, which is weird. I don't think I have ever purchased pepperoni to have at home. It is just not something I normally use as an ingredient. Why I decided to buy it, I have no idea. If I was pregnant, I would chalk it up to a craving or something...but alas, pregnancy is not a viable excuse for the spontaneous pepperoni purchase. Anyway, I decided to concoct some sort of veggie/pepperoni calzone for tonight's meal. I think I am going to make my quick pizza dough recipe and the filling and go from there. I am really not sure how this is all going to work, but I have a basic idea of how I want to accomplish my calzone making. Wish me luck!
Jen's Pepperoni and Veggie Calzones
1 batch of Quick Homemade Whole Wheat Pizza Crust (or your favorite pizza dough)
cornmeal for coating the pan
cooking spray
1 Tablespoon of olive oil
pepperoni slices (I used 4-5 slices per calzone to cut back on calories and fat)
2 cloves of minced garlic
1 onion, sliced
1 green pepper, sliced into strips
1 (6 oz.) package of sliced button mushrooms
1 can of sliced black olives
1/2 jar of marinara sauce
tomato paste
dried oregano
dried basil
dried thyme
red pepper flakes
salt and pepper to taste
1/2 cup of part skim ricotta mixed with pesto (I am using leftovers)
1/4 cup of mascarpone cheese
1/2 cup mozzarella cheese, shredded
1/2 cup of Parmesan or Pecorino Romano cheese
Directions:
Preheat oven to 500 degrees.
Make dough according to recipe directions and divide up into 4 balls. Set aside. Coat sheet pan with cooking spray and cornmeal and set aside.
In a large skillet, heat olive oil over medium-high heat. Saute onions, peppers, and mushrooms until cooked. Add minced garlic,oregano, basil, thyme, and red pepper flakes to taste, and cook for an additional 1-2 minutes. Add in tomato paste and cook for another 1-2 minutes. Add marinara sauce, black olives, and salt and pepper to taste. Reduce mixture until thick and veggies are well coated in tomato sauce. Remove from heat and set aside.
Roll out dough balls into 4 individual circles, about 8 inches in diameter and 1/8 inch thick. Mix the ricotta/pesto with the mascarpone until creamy and smooth. Once dough is rolled out, spread ricotta mixture on half of the circle. Add pepperoni slices to taste,over the ricotta. Spread 1 or 2 Tablespoons full of veggie mixture over the pepperoni slices. Sprinkle some of each cheese over the top of veggie mixture. Fold top of the dough in half (the part without the toppings), creating a stuffed pocket of filling. Crimp ends of calzone with tines of fork to close dough. Cut 2-3 vent slats in top of folded calzone. Carefully move the calzones to the prepared sheet pan with a spatula, and bake for 15-20 minutes or until dough is cooked and slightly browned. Serve and enjoy!
Jen's Notes:
All measurements are approximate. My recipe is more of a 'game plan' than precise directions.


The Result:
As the guy from the 80's TV show, The A-Team used to say, "I love it when a plan comes together." These turned out awesome!!! The dough turned out perfectly...crisp and very calzoneish. I ended up amending the flour amounts from the original recipe; using a total of 2 cups whole wheat flour and only 1/2 cup of AP flour. I wanted the dough to be less springy and more shell-like. It turned out great, and it will be a change I keep for this calzone recipe. The only other change I made was to add a 1/4 cup of mascarpone cheese to the ricotta/pesto mix to smooth it out. When I thawed the ricotta the texture was a little grainy, but the additional cheese fixed that problem. These were probably the best homemade calzone I have attempted thus far and my whole family loved them. I am excited to have one leftover for lunch today. Also, I plan on having some of the ingredients that I still have leftover morph into tonight's dinner; another one of my experimental concoctions. Hooray!!!
Jen's Pepperoni and Veggie Calzones
1 batch of Quick Homemade Whole Wheat Pizza Crust (or your favorite pizza dough)
cornmeal for coating the pan
cooking spray
1 Tablespoon of olive oil
pepperoni slices (I used 4-5 slices per calzone to cut back on calories and fat)
2 cloves of minced garlic
1 onion, sliced
1 green pepper, sliced into strips
1 (6 oz.) package of sliced button mushrooms
1 can of sliced black olives
1/2 jar of marinara sauce
tomato paste
dried oregano
dried basil
dried thyme
red pepper flakes
salt and pepper to taste
1/2 cup of part skim ricotta mixed with pesto (I am using leftovers)
1/4 cup of mascarpone cheese
1/2 cup mozzarella cheese, shredded
1/2 cup of Parmesan or Pecorino Romano cheese
Directions:
Preheat oven to 500 degrees.
Make dough according to recipe directions and divide up into 4 balls. Set aside. Coat sheet pan with cooking spray and cornmeal and set aside.
In a large skillet, heat olive oil over medium-high heat. Saute onions, peppers, and mushrooms until cooked. Add minced garlic,oregano, basil, thyme, and red pepper flakes to taste, and cook for an additional 1-2 minutes. Add in tomato paste and cook for another 1-2 minutes. Add marinara sauce, black olives, and salt and pepper to taste. Reduce mixture until thick and veggies are well coated in tomato sauce. Remove from heat and set aside.
Roll out dough balls into 4 individual circles, about 8 inches in diameter and 1/8 inch thick. Mix the ricotta/pesto with the mascarpone until creamy and smooth. Once dough is rolled out, spread ricotta mixture on half of the circle. Add pepperoni slices to taste,over the ricotta. Spread 1 or 2 Tablespoons full of veggie mixture over the pepperoni slices. Sprinkle some of each cheese over the top of veggie mixture. Fold top of the dough in half (the part without the toppings), creating a stuffed pocket of filling. Crimp ends of calzone with tines of fork to close dough. Cut 2-3 vent slats in top of folded calzone. Carefully move the calzones to the prepared sheet pan with a spatula, and bake for 15-20 minutes or until dough is cooked and slightly browned. Serve and enjoy!
Jen's Notes:
All measurements are approximate. My recipe is more of a 'game plan' than precise directions.
The Result:
As the guy from the 80's TV show, The A-Team used to say, "I love it when a plan comes together." These turned out awesome!!! The dough turned out perfectly...crisp and very calzoneish. I ended up amending the flour amounts from the original recipe; using a total of 2 cups whole wheat flour and only 1/2 cup of AP flour. I wanted the dough to be less springy and more shell-like. It turned out great, and it will be a change I keep for this calzone recipe. The only other change I made was to add a 1/4 cup of mascarpone cheese to the ricotta/pesto mix to smooth it out. When I thawed the ricotta the texture was a little grainy, but the additional cheese fixed that problem. These were probably the best homemade calzone I have attempted thus far and my whole family loved them. I am excited to have one leftover for lunch today. Also, I plan on having some of the ingredients that I still have leftover morph into tonight's dinner; another one of my experimental concoctions. Hooray!!!
May 16, 2010
Middle Eastern Chickpea Burgers
My friend, Michelle recently tried this vegan recipe out and loved it. I will agree; these were darn good "burgers"...kinda reminiscent of falafel. We topped ours with avocado slices and hummus, but the recipe itself calls for a tomato chutney topping. I will post both recipes, even though I did not make the chutney. I will certainly keep these sandwiches in my vegetarian repertoire.
Middle Eastern Chickpea Burgers
From: Reprinted by Experience Life Magazine with permission from The Cancer-Fighting Kitchen: Nourishing, Big-Flavor Recipes for Cancer Treatment and Recovery. Copyright © 2009 by Rebecca Katz with Mat Edelson, Celestial Arts, a division of the Crown Publishing Group, Berkeley, CA.
Ingredients:
2 cups cooked chickpeas, or one 15-ounce can, drained, rinsed and mixed with a spritz of fresh lemon juice and a pinch of salt
1/2 tsp. sea salt
1/2 tsp. turmeric
1/2 tsp. paprika
1/4 tsp. ground cumin
1/4 tsp. ground coriander
1/8 tsp. ground cinnamon
2 tsp. minced garlic
1 tsp. minced fresh ginger
3 tbs. extra-virgin olive oil
2 tbs. freshly squeezed lemon juice
2 1/2 cups cooked brown basmati rice
3 tbs. finely diced red bell pepper
1/4 cup loosely packed minced, fresh flat-leaf parsley
Directions:
Preheat the oven to 375 degrees F, and line a baking sheet with parchment paper.
Combine the chickpeas, salt, turmeric, paprika, cumin, coriander, cinnamon, garlic, ginger, olive oil and lemon juice in a food processor and process until smooth and well combined, scraping the sides occasionally. Transfer the mixture to a bowl and fold in the rice, bell pepper and parsley.
Moisten your hands to keep the mixture from sticking, then shape the mixture into 1/4-inch-thick patties about 21/2 inches in diameter. Place them on the prepared pan and bake for 22 to 25 minutes, until the patties start to get dry and crisp on the outside. They will firm up as they cool. (Serve with Katz's Tomato Mint Chutney.)
Variation: For a crispy burger, heat 2 teaspoons of olive oil in a skillet over medium heat and cook the patties for about 3 minutes on each side, until golden brown.
Notes: Store in a covered container in the refrigerator for three to five days. To freeze these burgers, either cooked or uncooked, stack them up with parchment paper between the burgers, then wrap first in plastic wrap, then in foil. The parchment paper makes it easy to remove the desired number of burgers from the bundle. Once thawed, cooked burgers can be reheated at 350 degrees F for 15 minutes, and uncooked burgers can be baked as above, at 375 degrees F for 22 to 25 minutes.
Per serving: Calories: 100; Total Fat: 3.5 g (0.5 g saturated, 2 g monounsaturated); Carbohydrates: 15 g; Protein: 3g; Fiber: 3 g; Sodium: 223 mg
*******************************************************************
Katz's Tomato Mint Chutney
Ingredients:
2 tablespoons extra-virgin olive oil
2 shallots, diced small
1/4 teaspoon red pepper flakes
1 teaspoon cumin seeds
1/4 teaspoon brown mustard seeds
2 cinnamon sticks
4 cups coarsely chopped fresh tomatoes or diced canned tomatoes
3 tablespoons maple syrup
1/2 teaspoon sea salt
1 teaspoon grated fresh ginger
1/4 cup loosely packed fresh mint leaves, chopped
Directions:
Heat the olive oil in a large, heavy skillet over medium-low heat, then add the shallots, red pepper flakes, cumin seeds, mustard seeds, and cinnamon sticks and sauté until the shallots are golden brown, about 4 minutes. Stir in the tomatoes, maple syrup, and salt, then lower the heat and simmer for 15 to 20 minutes, until the tomato juices have evaporated.
Stir in the ginger and mint and serve warm or at room temperature.(Makes 1 cup.)

The Result:
Awesome!
Middle Eastern Chickpea Burgers
From: Reprinted by Experience Life Magazine with permission from The Cancer-Fighting Kitchen: Nourishing, Big-Flavor Recipes for Cancer Treatment and Recovery. Copyright © 2009 by Rebecca Katz with Mat Edelson, Celestial Arts, a division of the Crown Publishing Group, Berkeley, CA.
Ingredients:
2 cups cooked chickpeas, or one 15-ounce can, drained, rinsed and mixed with a spritz of fresh lemon juice and a pinch of salt
1/2 tsp. sea salt
1/2 tsp. turmeric
1/2 tsp. paprika
1/4 tsp. ground cumin
1/4 tsp. ground coriander
1/8 tsp. ground cinnamon
2 tsp. minced garlic
1 tsp. minced fresh ginger
3 tbs. extra-virgin olive oil
2 tbs. freshly squeezed lemon juice
2 1/2 cups cooked brown basmati rice
3 tbs. finely diced red bell pepper
1/4 cup loosely packed minced, fresh flat-leaf parsley
Directions:
Preheat the oven to 375 degrees F, and line a baking sheet with parchment paper.
Combine the chickpeas, salt, turmeric, paprika, cumin, coriander, cinnamon, garlic, ginger, olive oil and lemon juice in a food processor and process until smooth and well combined, scraping the sides occasionally. Transfer the mixture to a bowl and fold in the rice, bell pepper and parsley.
Moisten your hands to keep the mixture from sticking, then shape the mixture into 1/4-inch-thick patties about 21/2 inches in diameter. Place them on the prepared pan and bake for 22 to 25 minutes, until the patties start to get dry and crisp on the outside. They will firm up as they cool. (Serve with Katz's Tomato Mint Chutney.)
Variation: For a crispy burger, heat 2 teaspoons of olive oil in a skillet over medium heat and cook the patties for about 3 minutes on each side, until golden brown.
Notes: Store in a covered container in the refrigerator for three to five days. To freeze these burgers, either cooked or uncooked, stack them up with parchment paper between the burgers, then wrap first in plastic wrap, then in foil. The parchment paper makes it easy to remove the desired number of burgers from the bundle. Once thawed, cooked burgers can be reheated at 350 degrees F for 15 minutes, and uncooked burgers can be baked as above, at 375 degrees F for 22 to 25 minutes.
Per serving: Calories: 100; Total Fat: 3.5 g (0.5 g saturated, 2 g monounsaturated); Carbohydrates: 15 g; Protein: 3g; Fiber: 3 g; Sodium: 223 mg
*******************************************************************
Katz's Tomato Mint Chutney
Ingredients:
2 tablespoons extra-virgin olive oil
2 shallots, diced small
1/4 teaspoon red pepper flakes
1 teaspoon cumin seeds
1/4 teaspoon brown mustard seeds
2 cinnamon sticks
4 cups coarsely chopped fresh tomatoes or diced canned tomatoes
3 tablespoons maple syrup
1/2 teaspoon sea salt
1 teaspoon grated fresh ginger
1/4 cup loosely packed fresh mint leaves, chopped
Directions:
Heat the olive oil in a large, heavy skillet over medium-low heat, then add the shallots, red pepper flakes, cumin seeds, mustard seeds, and cinnamon sticks and sauté until the shallots are golden brown, about 4 minutes. Stir in the tomatoes, maple syrup, and salt, then lower the heat and simmer for 15 to 20 minutes, until the tomato juices have evaporated.
Stir in the ginger and mint and serve warm or at room temperature.(Makes 1 cup.)
The Result:
Awesome!
Weekly Menu Plan: 05/16/10 - 05/22/10
Here is what we are having for dinner this week...
Weekly Menu Plan: 05/16/10 - 05/22/10
Sunday, 05/16/10: Middle Eastern Chickpea Burgers on Sandwich Thins, hummus, avocado slices, baked potato, & salad (vegetarian)(new recipe)
Monday, 05/17/10: Jen's Pepperoni and Veggie Calzones, salad (new recipe)
Tuesday, 05/18/10: Jen's Chicken Pizzaola (new recipe), mashed pototoes, veggies
Wednesday, 05/19/10: Leftovers
Thursday, 05/20/10: Zucchini Quesadillas, refried beans (vegetarian)(new recipe)
Friday, 05/21/10: Leftovers
Saturday, 05/22/10: Shepard's Pie, veggies
May 14, 2010
Piadina with Fontina and Prosciutto
Here is my final Giada recipe for the week. Well, a version of it anyway. This piadina (Italian flat bread) is sort of like a pizza; so I decided to cheat and use whole wheat pizza dough as a substitute for the flat bread. My twins are not feeling too hot today (stuffy noses and cranky), and I just don't want to fuss with making the dough from scratch. Instead, I will just grill up the pre-made dough that I bought from Fresh and Easy and top it as Giada recommends in this recipe. The overall effect should be similar to the intended dish.
Friday night is such a fun family night at our house, and I like serving a fun dinner to set the tone for the weekend. Hopefully, this piadina will deliver!
Piadina with Fontina and Prosciutto
Adapted From: Giada at Home cookbook; foodnetwork.com
Ingredients:
pizza dough of your choice, I am using pre-made whole wheat
2 tablespoons extra-virgin olive oil
1 pound part-skim ricotta cheese
2 teaspoons lemon zest (from about 2 lemons)
juice of 1 lemon
Freshly ground black pepper and salt, to taste
6 ounces fontina cheese, shredded
4 ounces prosciutto, thinly sliced
1 cup chopped fresh basil leaves
Directions:
Place a grill pan over medium-high heat or preheat a gas or charcoal grill. On a lightly floured work surface, roll out dough into a circle, about 1/8-inch thick. Brush the circle with the extra-virgin olive oil and grill for 4 minutes each side. Remove the dough from the grill to a sheet pan and cool slightly.
Combine the ricotta cheese,lemon juice, and lemon zest in a small bowl. Season with salt and pepper, to taste. Spread over the grilled dough with the ricotta mixture. Sprinkle the fontina cheese evenly over the ricotta cheese. Arrange the prosciutto slices on top of the cheeses. Put the sheet pan with the piadina back on the grill for 3-5 minutes and close the lid (this will melt the cheese and warm everything through). Cut piadina into 8 wedges and transfer to a serving platter. Garnish with the chopped basil.
Jen's Notes:
The original recipe (linked above) indicates to make 8 individual piadinas. I am just going to make one large one, since I am just feeding my family and not eight people. Also, I omitted the dough instructions from my post completely. If you are interested in the original, just follow the foodnetwork.com link under the recipe title.


The Result:
This was excellent! Sooooo yummy. I added the juice of one lemon to the ricotta, because the zest didn't seem like it was enough zing. It turned out perfectly! I ended up grilling the crust, taking it off of the grill and putting it on a sheet pan, adding the topping, and then put the whole thing back on the grill to melt all the cheese and warm it through (I amended the ingredients/directions to reflect my final changes). It was awesome. I will make this version again, that is for sure!
Friday night is such a fun family night at our house, and I like serving a fun dinner to set the tone for the weekend. Hopefully, this piadina will deliver!
Piadina with Fontina and Prosciutto
Adapted From: Giada at Home cookbook; foodnetwork.com
Ingredients:
pizza dough of your choice, I am using pre-made whole wheat
2 tablespoons extra-virgin olive oil
1 pound part-skim ricotta cheese
2 teaspoons lemon zest (from about 2 lemons)
juice of 1 lemon
Freshly ground black pepper and salt, to taste
6 ounces fontina cheese, shredded
4 ounces prosciutto, thinly sliced
1 cup chopped fresh basil leaves
Directions:
Place a grill pan over medium-high heat or preheat a gas or charcoal grill. On a lightly floured work surface, roll out dough into a circle, about 1/8-inch thick. Brush the circle with the extra-virgin olive oil and grill for 4 minutes each side. Remove the dough from the grill to a sheet pan and cool slightly.
Combine the ricotta cheese,lemon juice, and lemon zest in a small bowl. Season with salt and pepper, to taste. Spread over the grilled dough with the ricotta mixture. Sprinkle the fontina cheese evenly over the ricotta cheese. Arrange the prosciutto slices on top of the cheeses. Put the sheet pan with the piadina back on the grill for 3-5 minutes and close the lid (this will melt the cheese and warm everything through). Cut piadina into 8 wedges and transfer to a serving platter. Garnish with the chopped basil.
Jen's Notes:
The original recipe (linked above) indicates to make 8 individual piadinas. I am just going to make one large one, since I am just feeding my family and not eight people. Also, I omitted the dough instructions from my post completely. If you are interested in the original, just follow the foodnetwork.com link under the recipe title.
The Result:
This was excellent! Sooooo yummy. I added the juice of one lemon to the ricotta, because the zest didn't seem like it was enough zing. It turned out perfectly! I ended up grilling the crust, taking it off of the grill and putting it on a sheet pan, adding the topping, and then put the whole thing back on the grill to melt all the cheese and warm it through (I amended the ingredients/directions to reflect my final changes). It was awesome. I will make this version again, that is for sure!
May 13, 2010
Pasta Ponza
Oh man, did I do some indulging at last night's bible study group! Our host made a main dish, and some of the participants brought a side dish, appetizer, dessert, or bottle of wine. It was certainly a great spread! I got on the scale this morning and it definitely reflected exactly how much food and drink I enjoyed. Ugh. Anyway, I thought I would lighten things up tonight with a bit of this vegetarian pasta dish from the Giada at Home cookbook, and a big green salad. I think my meal will be considerably more salad than pasta, so hopefully I can get my diet efforts back on track. After I type this post up, I am headed straight for our elliptical machine!
Pasta Ponza
From: Giada at Home cookbook, foodnetwork.com
Ingredients:
Butter for greasing (I am using cooking spray)
2 cups (12 ounces) red cherry or grape tomatoes, halved
2 cups (12 ounces) yellow cherry or grape tomatoes, halved
1/4 cup capers, rinsed and drained
1 tablespoon extra-virgin olive oil, plus extra for drizzling
1/2 teaspoon kosher salt, plus extra for seasoning
1/4 teaspoon freshly ground black pepper, plus extra for seasoning
1/2 cup Italian-style seasoned breadcrumbs
1 pound ziti, penne, or other short tube-shaped pasta
1 1/4 cups (2 1/2 ounces) Pecorino Romano cheese, grated
1/4 cup chopped fresh flat-leaf parsley
Directions:
Place an oven rack in the center of the oven. Preheat the oven to 375 degrees F. Butter (or spray with cooking spray) an 8 by 8-inch glass baking dish. Set aside.
Place the tomatoes, capers, 1 tablespoon olive oil, 1/2 teaspoon salt, and 1/4 teaspoon pepper in the prepared baking dish. Toss to coat. Sprinkle the breadcrumbs over the tomato mixture. Drizzle the top with olive oil and bake for 30 to 35 minutes until the top is golden. Cool for 5 minutes.
Bring a large pot of salted water to a boil over high heat. Add the pasta and cook until tender but still firm to the bite, stirring occasionally, about 8 to 10 minutes. Drain and reserve about 1 cup of the pasta water.
Place the pasta in a large serving bowl. Spoon the tomato mixture onto the pasta. Add the cheese and toss well. Thin out the sauce with a little pasta water, if needed. Season with salt and pepper, to taste. Sprinkle with the chopped parsley and serve immediately.

The Result:
This was easy to put together, but surprisingly ho-hum in flavor. It was a decent pasta dish...but nothing remarkable. I would make it again if I had all the ingredients on hand, and I needed something low-stress for dinner. Other than that, I can't say that it was too fabulous...just okay, at best.
Pasta Ponza
From: Giada at Home cookbook, foodnetwork.com
Ingredients:
Butter for greasing (I am using cooking spray)
2 cups (12 ounces) red cherry or grape tomatoes, halved
2 cups (12 ounces) yellow cherry or grape tomatoes, halved
1/4 cup capers, rinsed and drained
1 tablespoon extra-virgin olive oil, plus extra for drizzling
1/2 teaspoon kosher salt, plus extra for seasoning
1/4 teaspoon freshly ground black pepper, plus extra for seasoning
1/2 cup Italian-style seasoned breadcrumbs
1 pound ziti, penne, or other short tube-shaped pasta
1 1/4 cups (2 1/2 ounces) Pecorino Romano cheese, grated
1/4 cup chopped fresh flat-leaf parsley
Directions:
Place an oven rack in the center of the oven. Preheat the oven to 375 degrees F. Butter (or spray with cooking spray) an 8 by 8-inch glass baking dish. Set aside.
Place the tomatoes, capers, 1 tablespoon olive oil, 1/2 teaspoon salt, and 1/4 teaspoon pepper in the prepared baking dish. Toss to coat. Sprinkle the breadcrumbs over the tomato mixture. Drizzle the top with olive oil and bake for 30 to 35 minutes until the top is golden. Cool for 5 minutes.
Bring a large pot of salted water to a boil over high heat. Add the pasta and cook until tender but still firm to the bite, stirring occasionally, about 8 to 10 minutes. Drain and reserve about 1 cup of the pasta water.
Place the pasta in a large serving bowl. Spoon the tomato mixture onto the pasta. Add the cheese and toss well. Thin out the sauce with a little pasta water, if needed. Season with salt and pepper, to taste. Sprinkle with the chopped parsley and serve immediately.
The Result:
This was easy to put together, but surprisingly ho-hum in flavor. It was a decent pasta dish...but nothing remarkable. I would make it again if I had all the ingredients on hand, and I needed something low-stress for dinner. Other than that, I can't say that it was too fabulous...just okay, at best.
Hot Artichoke Dip
I made this appetizer for my bible study last night, and everyone really seemed to like it. It was simple to put together; all with ingredients I already had on hand. I love appetizers that I can assemble from items that I usually keep in my fridge and/or pantry!
I thought the dip was a perfect blend of warm, creamy, deliciousness; and I tried really hard to only have a small sample. Let me tell you, it was hard to exercise self control with this dip calling my name from the kitchen!!!
Hot Artichoke Dip
Adapted from: Pioneer Woman Cooks cookbook, copyright 2009
Ingredients:
2 (14 ounce) cans of artichoke hearts, drained
1 (8 ounce) block of low-fat cream cheese or Nuefchatel cheese
1 cup of mayonnaise
3 green onions, chopped
cayenne pepper to taste (I probably used 1/4 to 1/2 teaspoon)
1 cup of grated Parmesan cheese
Salt and pepper to taste
Directions:
Preheat the oven to 350 degrees. Add one can of artichoke hearts, green onions, cream cheese,cayenne pepper, and mayo into a food processor or blender. Pulse the mixture 6 or 7 times just to chop and combine the ingredients. Add in Parmesan cheese, salt and pepper, and pulse once or twice more to mix it in. Roughly chop the artichokes from the other can into bite sized pieces, and gently fold them into the mixture. Pour the dip into an oven safe dish, and bake for 15 to 20 minutes. Serve immediately with tortilla chips, pita triangles, raw veggies, or crackers.
May 11, 2010
Apple and Horseradish-Glazed Salmon
Since my last salmon recipe was such a disaster, I feel I need to redeem myself in the fish-cooking department. I found this recipe in The Best of Cooking Light Everyday Favorites cookbook, and thought that it was an unusual take on salmon. The flavors of this dish really intrigued me, but it still looks to be fairly simple to prepare. This dinner should help me get over "the salmon fiasco" of last week, and provide a healthful meal, as well. I have a fitness boot camp/bible study starting up tonight; and since I need to eat before I go, I didn't want anything heavy weighing me down. I figured that this dish would do the trick. Brown rice and salad and/or steamed veggies will complete our dinner. I will report back with the results later. Keep your fingers crossed for me!
Apple and Horseradish-Glazed Salmon
From: Cooking Light, May 2004
Ingredients:
1/3 cup apple jelly
1 tablespoon finely chopped fresh chives
2 tablespoons prepared horseradish
1 tablespoon champagne vinegar
1/2 teaspoon kosher salt, divided
4 (6-ounce) salmon fillets (about 1 inch thick), skinned
1/4 teaspoon freshly ground black pepper
2 teaspoons olive oil
Directions:
Preheat oven to 350°.
Combine apple jelly, chives, horseradish, vinegar, and 1/4 teaspoon salt, stirring well with a whisk.
Sprinkle salmon with 1/4 teaspoon salt and pepper. Heat oil in a large nonstick skillet over medium heat. Add salmon, and cook 3 minutes. Turn salmon over; brush with half of apple mixture. Wrap handle of skillet with foil; bake at 350° for 5 minutes or until fish flakes easily when tested with a fork. Brush with remaining apple mixture.
Nutritional Information:
Yield: 4 servings (serving size: 1 fillet)
Calories:375 (40% from fat)
Fat:16.8g (sat 4.3g,mono 7.7g,poly 3.4g)
Protein:36.4g
Carbohydrate:18.1g
Fiber:0.1g
Cholesterol:90mg
Iron:0.7mg
Sodium:376mg
Calcium:30mg

The Result:
I love being introduced to new food combinations that I would have never had thought to put together on my own! The flavors were a mellow blend of savory/sweet/tangy/hot...all at the same time. It was really sort of unique (in a good way). I can say that the flavor profile wasn't like anything I have ever had before; and I really liked that about it. I couldn't find apple jelly, so I substituted apple butter instead. The finished product was really not a glaze, but more like a topping or a sauce. It was still really yummy; and something that I would substitute again, if needed. Overall, this was a very enjoyable dish.
Apple and Horseradish-Glazed Salmon
From: Cooking Light, May 2004
Ingredients:
1/3 cup apple jelly
1 tablespoon finely chopped fresh chives
2 tablespoons prepared horseradish
1 tablespoon champagne vinegar
1/2 teaspoon kosher salt, divided
4 (6-ounce) salmon fillets (about 1 inch thick), skinned
1/4 teaspoon freshly ground black pepper
2 teaspoons olive oil
Directions:
Preheat oven to 350°.
Combine apple jelly, chives, horseradish, vinegar, and 1/4 teaspoon salt, stirring well with a whisk.
Sprinkle salmon with 1/4 teaspoon salt and pepper. Heat oil in a large nonstick skillet over medium heat. Add salmon, and cook 3 minutes. Turn salmon over; brush with half of apple mixture. Wrap handle of skillet with foil; bake at 350° for 5 minutes or until fish flakes easily when tested with a fork. Brush with remaining apple mixture.
Nutritional Information:
Yield: 4 servings (serving size: 1 fillet)
Calories:375 (40% from fat)
Fat:16.8g (sat 4.3g,mono 7.7g,poly 3.4g)
Protein:36.4g
Carbohydrate:18.1g
Fiber:0.1g
Cholesterol:90mg
Iron:0.7mg
Sodium:376mg
Calcium:30mg
The Result:
I love being introduced to new food combinations that I would have never had thought to put together on my own! The flavors were a mellow blend of savory/sweet/tangy/hot...all at the same time. It was really sort of unique (in a good way). I can say that the flavor profile wasn't like anything I have ever had before; and I really liked that about it. I couldn't find apple jelly, so I substituted apple butter instead. The finished product was really not a glaze, but more like a topping or a sauce. It was still really yummy; and something that I would substitute again, if needed. Overall, this was a very enjoyable dish.
May 10, 2010
Chicken Milanese with Tomato and Fennel Sauce
I am now willing to admit, I have a cookbook addiction. It's true. I need help. I am constantly checking out cookbooks from the library and then purchasing the ones I cannot live without (which is to say, my cookbook collection is getting out of control). I just can't stop myself. For example, I have three library cookbooks sitting on my coffee table, and three more on hold at the library. The books I love, I keep renewing until the library cuts me off. I am only willing to return one of my borrowed copies, after I decide to purchase it. I recently went through all of my cookbooks and weeded out the copies that I simply don't use. I got rid of five books, and now I am clamoring to replace them. What does this confession have to do with this recipe, you ask??? Well, I found this dish in one of my library cookbooks Giada at Home. It is her latest, and in traditional Giada-style, it is packed with recipes that I am excited to try. I think I have three of her dishes slated for this week alone. Sigh. This may be another cookbook that I am forced to purchase for myself. I need an intervention.
Chicken Milanese with Tomato and Fennel Sauce
From: Giada at Home cookbook by Giada De Larentiis
Ingredients:
Chicken:
1/3 cup all-purpose flour
2 eggs, beaten
1 1/4 cups plain bread crumbs
2/3 cup grated Parmesan
2 teaspoons dried basil
1 teaspoon dried thyme
4 (6 to 8-ounce) boneless and skinless chicken breasts, tenderloins removed
Kosher salt and freshly ground black pepper
1/3 cup vegetable oil
Sauce:
1 tablespoon olive oil
2 fennel bulbs, trimmed and thinly sliced
2 1/2 cups (12 ounces) cherry tomatoes, halved
1/4 teaspoon kosher salt, plus more for seasoning
1/4 teaspoon freshly ground black pepper, plus more for seasoning
1 clove garlic, minced
1 teaspoon dried thyme or 1 tablespoon chopped fresh thyme leaves
1/2 cup mascarpone cheese, at room temperature
Directions:
For the chicken: Put an oven rack in the center of the oven. Preheat the oven to 150 degrees F. Line a baking sheet with a wire rack.
Using 3 wide shallow bowls, add the flour to 1, the eggs to another and to the third bowl combine the bread crumbs, Parmesan cheese, basil, and thyme.
On a work surface, put the chicken between 2 pieces of plastic wrap. Using a meat mallet, lightly pound the chicken until approximately 1/4 to 1/2-inch thick. Season the chicken with salt and pepper. Dredge the chicken pieces in the flour to coat lightly, then dip into the beaten eggs, allowing the excess egg to drip off. Coat the chicken with the bread crumb mixture, pressing gently to adhere.
In a large, nonstick saute pan, heat the vegetable oil over medium heat. Add 2 pieces of the breaded chicken into the oil and cook until light golden brown, about 3 to 4 minutes on each side. Transfer the chicken to the prepared baking sheet and keep warm in the oven. Repeat with the remaining chicken. Reserve the cooking juices in the saute pan.
For the sauce: Using the same saute pan, add the olive oil to the reserved cooking juices and heat over medium heat. Add the fennel and cook, stirring frequently, until softened, about 5 to 6 minutes. Stir in the cherry tomatoes, 1/4 teaspoon salt, 1/4 teaspoon pepper, garlic and thyme. Cook for 5 to 6 minutes until the tomatoes are tender. Remove the pan from the heat. Add the mascarpone cheese and stir until the mixture is creamy. Season with salt and pepper, to taste.
Transfer the chicken to a serving platter and spoon the sauce over the top before serving.

The Result:
This was fan-freakin'-tastic! The tomatoes burst and mixed with the mascarpone and fennel to create a savory, creamy sauce. After we were done eating, and I put all the food away, I literally stuck my finger in the pan and licked up the sauce remnants (gross and TMI I know, but I couldn't help myself). It was so good! Normally, I am not a huge fan of raw fennel; but cooked fennel is a whole other issue. The cooking mellows the flavor and makes it very yummy. This was the perfect balance of flavors and the chicken was tender and juicy. So freakin' good!!!! This recipe was a great introduction to Giada's new cookbook and it will be something I make again. I LOVED it!!!
Chicken Milanese with Tomato and Fennel Sauce
From: Giada at Home cookbook by Giada De Larentiis
Ingredients:
Chicken:
1/3 cup all-purpose flour
2 eggs, beaten
1 1/4 cups plain bread crumbs
2/3 cup grated Parmesan
2 teaspoons dried basil
1 teaspoon dried thyme
4 (6 to 8-ounce) boneless and skinless chicken breasts, tenderloins removed
Kosher salt and freshly ground black pepper
1/3 cup vegetable oil
Sauce:
1 tablespoon olive oil
2 fennel bulbs, trimmed and thinly sliced
2 1/2 cups (12 ounces) cherry tomatoes, halved
1/4 teaspoon kosher salt, plus more for seasoning
1/4 teaspoon freshly ground black pepper, plus more for seasoning
1 clove garlic, minced
1 teaspoon dried thyme or 1 tablespoon chopped fresh thyme leaves
1/2 cup mascarpone cheese, at room temperature
Directions:
For the chicken: Put an oven rack in the center of the oven. Preheat the oven to 150 degrees F. Line a baking sheet with a wire rack.
Using 3 wide shallow bowls, add the flour to 1, the eggs to another and to the third bowl combine the bread crumbs, Parmesan cheese, basil, and thyme.
On a work surface, put the chicken between 2 pieces of plastic wrap. Using a meat mallet, lightly pound the chicken until approximately 1/4 to 1/2-inch thick. Season the chicken with salt and pepper. Dredge the chicken pieces in the flour to coat lightly, then dip into the beaten eggs, allowing the excess egg to drip off. Coat the chicken with the bread crumb mixture, pressing gently to adhere.
In a large, nonstick saute pan, heat the vegetable oil over medium heat. Add 2 pieces of the breaded chicken into the oil and cook until light golden brown, about 3 to 4 minutes on each side. Transfer the chicken to the prepared baking sheet and keep warm in the oven. Repeat with the remaining chicken. Reserve the cooking juices in the saute pan.
For the sauce: Using the same saute pan, add the olive oil to the reserved cooking juices and heat over medium heat. Add the fennel and cook, stirring frequently, until softened, about 5 to 6 minutes. Stir in the cherry tomatoes, 1/4 teaspoon salt, 1/4 teaspoon pepper, garlic and thyme. Cook for 5 to 6 minutes until the tomatoes are tender. Remove the pan from the heat. Add the mascarpone cheese and stir until the mixture is creamy. Season with salt and pepper, to taste.
Transfer the chicken to a serving platter and spoon the sauce over the top before serving.
The Result:
This was fan-freakin'-tastic! The tomatoes burst and mixed with the mascarpone and fennel to create a savory, creamy sauce. After we were done eating, and I put all the food away, I literally stuck my finger in the pan and licked up the sauce remnants (gross and TMI I know, but I couldn't help myself). It was so good! Normally, I am not a huge fan of raw fennel; but cooked fennel is a whole other issue. The cooking mellows the flavor and makes it very yummy. This was the perfect balance of flavors and the chicken was tender and juicy. So freakin' good!!!! This recipe was a great introduction to Giada's new cookbook and it will be something I make again. I LOVED it!!!
May 9, 2010
Portobello Mushroom Fajitas
I found this recipe in The Best of Cooking Light Everyday Favorites cookbook that I am holding hostage from the library. I finally broke down and ordered one online yesterday, so I should be getting it in the mail soon and returning my borrowed copy. The Phoenix Public Library system will be thankful, since they won't have to waste precious resources hunting me down and recovering their copy of this book. :)
Oh, and Happy Mothers Day to all the mamas out there!
Portobello Mushroom Fajitas
From: Martha Rose Shulman, Cooking Light, JANUARY 2005
Ingredients:
1 tablespoon olive oil
4 cups (1/2-inch-thick) slices portobello mushrooms (about 8 ounces)
1 cup vertically sliced red onion
1 cup (1/4-inch-thick) green bell pepper strips
2 garlic cloves, minced
3 tablespoons chopped fresh cilantro
1 tablespoon fresh lime juice
1/4 teaspoon salt
1/4 teaspoon freshly ground black pepper
1 serrano chile, minced
12 (6-inch) flour tortillas
1 cup (4 ounces) crumbled queso fresco (I am using Monterrey Jack cheese instead)
3/4 cup salsa verde
Directions:
Heat oil in a large nonstick skillet over medium-high heat. Add mushrooms; sauté 5 minutes or until almost tender. Add onion, bell pepper, and garlic. Reduce heat to medium, and cook for 4 minutes or until bell pepper is crisp-tender, stirring frequently. Remove from heat; stir in cilantro, lime juice, salt, black pepper, and chile.
Warm tortillas according to package directions. Spoon about 1/4 cup mushroom mixture down center of each tortilla; top each tortilla with 4 teaspoons cheese and 1 tablespoon salsa. Roll up.
Nutritional Information:
Yield: 4 servings (serving size: 3 fajitas)
Calories:437 (26% from fat)
Fat:12.7g (sat 3.6g,mono 6.8g,poly 1.5g)
Protein:13.8g
Carbohydrate:65.9g
Fiber:4.9g
Cholesterol:9mg
Iron:3.9mg
Sodium:792mg
Calcium:219mg
The Result:
First, I am not a very good fajita photographer...I just couldn't get a nice pic. However--despite my sucky camera skills--these fajitas were fairly mediocre. Not great, but good. My husband and I thought they tasted like traditional fajita filling, without the main meat component. Basically, fajitas without the fajita. It is a decent enough vegetarian take on the regular steak, shrimp, or chicken versions; but, since we are not strict vegetarians, I think we will stick with the classic meat or shrimp approach. Overall, these were good...no complaints taste-wise...but I just like the non-vegetarian kind much better and I felt like these were a little lacking. I don't think I will make these again; but if they look yummy to you, then try 'em and see for yourself.
Weekly Menu Plan: 05/09/10 - 05/15/10
I have another fun-filled week planned with a bunch of new recipes! I must have really missed cooking when I was at the end of my pregnancy, because I just can't get enough of it now. Or maybe it's because I have been finding so many tasty things that I am just dying to try lately. Either way, I am excited to have new stuff on the menu again for the next several days.
Weekly Menu Plan: 05/09/10 - 05/15/10
Sunday, 05/09/10: Portobello Mushroom Fajitas, refried beans, salad (vegetarian)
Monday, 05/10/10: Chicken Milanese with Tomato and Fennel Sauce, steamed veggies, salad
Tuesday, 05/11/10: Apple and Horseradish Glazed Salmon, brown rice, veggies
Wednesday, 05/12/10: Leftovers!
Thursday, 05/13/10: Pasta Ponza, salad (vegetarian)
Friday, 05/14/10: Piadina with Fontina and Prosciutto, salad
Saturday, 05/15/10: Dinner out! I am going to the Glee Live show...I can't wait!!!
May 8, 2010
Antipasto-Style Penne
I am trying to shake off last night's dinner fiasco, and start fresh today with another new Cooking Light recipe. This pasta looks very promising, and just the thing to make me forget about the salmon crackers I made yesterday. (I take it personally when I screw up our dinner...especially when it involves pricey ingredients, like wild Alaskan Sockeye Salmon fillets.) Anywho, I am excited to try this dish; especially since it has all the bright Italian-inspired flavors that I love. As with most of our pasta meals, a fresh green salad will round out our dinner.
Antipasto-Style Penne
From: David Joachim, Cooking Light, DECEMBER 2009; myrecipes.com
Ingredients:
1 medium red bell pepper
1/2 cup pitted kalamata olives, chopped
1/3 cup refrigerated pesto
3 ounces prosciutto, chopped
1 (7-ounce) jar oil-packed sun-dried tomato halves, drained and chopped
1 (6-ounce) jar marinated quartered artichoke hearts, drained and chopped
8 ounces uncooked penne pasta (about 2 cups)
1/2 cup (2 ounces) grated Parmigiano-Reggiano cheese, divided
1/4 cup pine nuts, toasted
Directions:
1. Preheat broiler.
2. Cut bell pepper in half lengthwise; discard seeds and membranes. Place pepper halves, skin sides up, on a foil-lined baking sheet; flatten with hand. Broil 8 minutes or until blackened. Place in a zip-top plastic bag; seal. Let stand 5 minutes. Peel and chop bell pepper; place in a large bowl. Stir in olives, pesto, prosciutto, tomatoes, and artichokes.
3. Cook the pasta according to package directions, omitting salt and fat; drain. Add cooked pasta and 1/4 cup Parmigiano-Reggiano cheese to bell pepper mixture, and toss gently to combine. Spoon about 1 cup pasta mixture into each of 6 bowls, and sprinkle each serving with 2 teaspoons remaining cheese and 2 teaspoons pine nuts.
Nutritional Information:
Yield: 6 servings
Calories:404
Fat:21.3g (sat 4.4g,mono 10.6g,poly 4.4g)
Protein:16.5g
Carbohydrate:39.9g
Fiber:4.3g
Cholesterol:21mg
Iron:2.9mg
Sodium:764mg
Calcium:162mg
Jen's Notes:
If you prefer crispy prosciutto, spread it out on a cooking spray-coated baking sheet and broil 4 minutes.

The Result:
Fan-freakin'-tastic! This was soooo yummy! If you like the flavors of classic Italian antipasto, you will love this pasta. We all loved this delicious recipe, and I can't wait to make it again soon. Yum!!!! I made sure to top the pasta with the crispy prosciutto and I roasted my red pepper over the open flame on my gas stove. Other than those minor differences, this recipe was perfect as-is. Also, it was pretty simple to put together and required very little actual cooking. By the time I got everything assembled, the pasta was room temperature; which I actually liked. This dish will be a great meal in the midst of the soon-to-be ridiculous Arizona heat. This will be a pasta you will see a lot more often from us...especially during the summertime.
Antipasto-Style Penne
From: David Joachim, Cooking Light, DECEMBER 2009; myrecipes.com
Ingredients:
1 medium red bell pepper
1/2 cup pitted kalamata olives, chopped
1/3 cup refrigerated pesto
3 ounces prosciutto, chopped
1 (7-ounce) jar oil-packed sun-dried tomato halves, drained and chopped
1 (6-ounce) jar marinated quartered artichoke hearts, drained and chopped
8 ounces uncooked penne pasta (about 2 cups)
1/2 cup (2 ounces) grated Parmigiano-Reggiano cheese, divided
1/4 cup pine nuts, toasted
Directions:
1. Preheat broiler.
2. Cut bell pepper in half lengthwise; discard seeds and membranes. Place pepper halves, skin sides up, on a foil-lined baking sheet; flatten with hand. Broil 8 minutes or until blackened. Place in a zip-top plastic bag; seal. Let stand 5 minutes. Peel and chop bell pepper; place in a large bowl. Stir in olives, pesto, prosciutto, tomatoes, and artichokes.
3. Cook the pasta according to package directions, omitting salt and fat; drain. Add cooked pasta and 1/4 cup Parmigiano-Reggiano cheese to bell pepper mixture, and toss gently to combine. Spoon about 1 cup pasta mixture into each of 6 bowls, and sprinkle each serving with 2 teaspoons remaining cheese and 2 teaspoons pine nuts.
Nutritional Information:
Yield: 6 servings
Calories:404
Fat:21.3g (sat 4.4g,mono 10.6g,poly 4.4g)
Protein:16.5g
Carbohydrate:39.9g
Fiber:4.3g
Cholesterol:21mg
Iron:2.9mg
Sodium:764mg
Calcium:162mg
Jen's Notes:
If you prefer crispy prosciutto, spread it out on a cooking spray-coated baking sheet and broil 4 minutes.
The Result:
Fan-freakin'-tastic! This was soooo yummy! If you like the flavors of classic Italian antipasto, you will love this pasta. We all loved this delicious recipe, and I can't wait to make it again soon. Yum!!!! I made sure to top the pasta with the crispy prosciutto and I roasted my red pepper over the open flame on my gas stove. Other than those minor differences, this recipe was perfect as-is. Also, it was pretty simple to put together and required very little actual cooking. By the time I got everything assembled, the pasta was room temperature; which I actually liked. This dish will be a great meal in the midst of the soon-to-be ridiculous Arizona heat. This will be a pasta you will see a lot more often from us...especially during the summertime.
May 7, 2010
Salmon with Lentils
Let me share something somewhat random...my biggest gripe about the Food Network website is that it does not have nutritional info for it's recipes. I was trying to calculate calories for a serving of this dish, and not having the nutritional data listed on the website is a total pain. I think I am gonna try and find a recipe calorie calculator to see how the portions tally out, but it would be nice if they did all the work and had it published. Since I have started on my mission to loose my baby weight, I have been fairly diligent about tracking what I eat. It is amazing how fast calories add up during the day; especially when I am not paying attention. Ugh.
Anyway, let me step down from my calorie soapbox for now and share tonight's dinner recipe. This is a Barefoot Contessa dish that has been featured both on her show and in her cookbook, Barefoot In Paris. The reviews are positive and it looks to be fairly healthy. I am going to serve this dish with some sauteed, fresh green beans. As always with new Ina recipes, I am looking forward to trying this out!
Salmon with Lentils
From: 2004, Barefoot in Paris cookbook
Ingredients:
1⁄2 pound French green lentils (lentilles du Puy)
1⁄4 cup good olive oil, plus extra for salmon
2 cups chopped yellow onions
2 cups chopped leeks, white and light green parts only
1 teaspoon fresh thyme leaves
2 teaspoons kosher salt
3⁄4 teaspoon freshly ground black pepper
1 tablespoon minced fresh garlic
1 1⁄2 cups chopped celery (4 stalks)
1 1⁄2 cups chopped carrots (3 carrots)
1 1⁄2 cups homemade chicken stock or good canned broth
2 tablespoons tomato paste
2 tablespoons good red wine vinegar
4 (6-ounce)salmon fillets, skin removed
Directions:
Place the lentils in a heat-proof bowl and cover with boiling water. Set aside for 15 minutes, then drain.
Meanwhile, heat the oil in a saute pan, add the onions, leeks, thyme, salt, and pepper and cook over medium heat for 10 minutes, until the onions are translucent. Add the garlic and cook for 2 more minutes. Add the drained lentils, celery, carrots, chicken stock, and tomato paste. Cover and simmer over low heat for 20 minutes, until the lentils are tender. Add the vinegar and season, to taste.
Preheat the oven to 450 degrees F.
For the salmon, heat a dry oven-proof saute pan over high heat for 4 minutes. Meanwhile, rub both sides of the salmon fillets with olive oil and season the tops very liberally with salt and pepper. When the pan is very hot, place the salmon fillets seasoning-sides down in the pan and cook over medium heat without moving them for 2 minutes, until very browned. Turn the fillets and place the pan in the oven for 5 to 7 minutes, until the salmon is cooked rare. Spoon a mound of lentils on each plate and place a salmon fillet on top. Serve hot.

The Result:
Oh man, did I have an off cooking night! I burnt my hand, I burnt my tongue, and I turned the salmon into pink charcoal. I waaaaaaaaaaaaaaayyyyyy overcooked the fish by mistake. Oops! Despite my screw-ups, this was still a good recipe. The lentils were really tasty, but it wasn't enough to salvage the disastrous result of the fish. I do need to just try this whole dish over again, and revise my review when the salmon does not suck. I will say that I think it would have been a fantastic meal if I wouldn't have goofed it up so bad. Ugh.
Anyway, let me step down from my calorie soapbox for now and share tonight's dinner recipe. This is a Barefoot Contessa dish that has been featured both on her show and in her cookbook, Barefoot In Paris. The reviews are positive and it looks to be fairly healthy. I am going to serve this dish with some sauteed, fresh green beans. As always with new Ina recipes, I am looking forward to trying this out!
Salmon with Lentils
From: 2004, Barefoot in Paris cookbook
Ingredients:
1⁄2 pound French green lentils (lentilles du Puy)
1⁄4 cup good olive oil, plus extra for salmon
2 cups chopped yellow onions
2 cups chopped leeks, white and light green parts only
1 teaspoon fresh thyme leaves
2 teaspoons kosher salt
3⁄4 teaspoon freshly ground black pepper
1 tablespoon minced fresh garlic
1 1⁄2 cups chopped celery (4 stalks)
1 1⁄2 cups chopped carrots (3 carrots)
1 1⁄2 cups homemade chicken stock or good canned broth
2 tablespoons tomato paste
2 tablespoons good red wine vinegar
4 (6-ounce)salmon fillets, skin removed
Directions:
Place the lentils in a heat-proof bowl and cover with boiling water. Set aside for 15 minutes, then drain.
Meanwhile, heat the oil in a saute pan, add the onions, leeks, thyme, salt, and pepper and cook over medium heat for 10 minutes, until the onions are translucent. Add the garlic and cook for 2 more minutes. Add the drained lentils, celery, carrots, chicken stock, and tomato paste. Cover and simmer over low heat for 20 minutes, until the lentils are tender. Add the vinegar and season, to taste.
Preheat the oven to 450 degrees F.
For the salmon, heat a dry oven-proof saute pan over high heat for 4 minutes. Meanwhile, rub both sides of the salmon fillets with olive oil and season the tops very liberally with salt and pepper. When the pan is very hot, place the salmon fillets seasoning-sides down in the pan and cook over medium heat without moving them for 2 minutes, until very browned. Turn the fillets and place the pan in the oven for 5 to 7 minutes, until the salmon is cooked rare. Spoon a mound of lentils on each plate and place a salmon fillet on top. Serve hot.
The Result:
Oh man, did I have an off cooking night! I burnt my hand, I burnt my tongue, and I turned the salmon into pink charcoal. I waaaaaaaaaaaaaaayyyyyy overcooked the fish by mistake. Oops! Despite my screw-ups, this was still a good recipe. The lentils were really tasty, but it wasn't enough to salvage the disastrous result of the fish. I do need to just try this whole dish over again, and revise my review when the salmon does not suck. I will say that I think it would have been a fantastic meal if I wouldn't have goofed it up so bad. Ugh.
May 6, 2010
Hibachi Steak with Noodles
Has hell frozen over???? Is the world coming to an end soon???? I think it must be close, because I am trying a Sandra Lee recipe for dinner tonight. Yup. Sandra Lee. It's not a typo. I know, I know...crazy, right??? If you haven't guessed, I am NOT a Sandra Lee fan. Then how and why did I decide to use one of her recipes? Well, let me explain. I have an elliptical machine in my bedroom; and when I workout on said elliptical machine, I watch the Food Network.(Let's ignore the fact that I watch food shows while exercising...I have issues.) Typically, I try to time my exercise schedule with a show I like to watch (i.e. Barefoot Contessa), but sometimes the show ends or my timing is off and I end up watching things I don't usually like to watch...ever. Case in point, Sandra's Money Saving Meals. While I find this show less offensive than her previous show Semi-Homemade (seriously, tablescapes!?!?!), it is still a little ridiculous. Although, the concept of the new show is solid, I just can't get past her perfectly feathered hair and her talk of "round 2 recipes" while shaking her hips. Her mannerisms, voice, and overt blondness drives me bonkers. If you are a Sandra Lee fan, I am sorry. I am sure she is a nice person, but just not my cup of tea. Also, I don't consider opening a can or box of pre-packaged food "cooking"...not for every meal, at least.
Okay, now that we have straightened out my views on Sandra Lee; let's talk about why I am trying one of her recipes. The answer is...I don't know. It looked good, and easy, and I have all the ingredients, and I was trapped on the elliptical and she must have pulled some voodoo magic through the television and hypnotized me. That is really the only rational explanation. I rest my case. Wish me luck.
Hibachi Steak with Noodles
Adapted from: foodnetwork.com; Sandra's Money Saving Meals
Ingredients:
2 tablespoons canola oil
1 large carrot, thinly sliced
1 zucchini, thinly sliced
1 medium onion, thinly sliced
1 (8-ounce) package sliced mushrooms
1 pound top round steak (I would prefer lean sirloin instead)
1 green bell pepper, sliced
1 cup of sugar snap peas, ends trimmed
3/4 cup reduced sodium soy sauce
3 tablespoons cider vinegar
3 garlic cloves, minced
1 piece of peeled fresh ginger, grated (1 inch piece)
1 1/2 teaspoons cornstarch
2 tablespoons butter
1 package of noodles, such as thin spaghetti or cappelini
chopped cilantro, for garnish
Directions:
Put a large skillet over high heat and add half of the oil. Cut the steak into small cubes, and when oil is hot add steak to skillet and stir-fry until browned on all sides, about 4 to 5 minutes. Remove to plate and set aside to rest. Add the other half of oil to hot skillet. Add vegetables and cook until tender, but crisp.
While veggies are cooking, bring a large pot of salted water to a boil over high heat and cook noodles according to package directions. Drain and add to a serving bowl or platter.
In a small bowl combine the soy sauce, cider vinegar, garlic, ginger, and cornstarch and set aside.
Add the steak, along with any accumulated juices,back to the pan with the vegetables. Stir the cornstarch/soy sauce mixture into the vegetables and cook until the sauce has thickened, about 2 to 3 minutes. Stir in the butter. Top the cooked noodles with the steak and vegetable mixture and serve with cilantro garnish on top.


The Result:
This was really good! Really! I amended the recipe by adding a bit more veggies, but I kept the spirit of the dish in tact. Hooray for Sandra Lee...for once! I made my changes to the above ingredients and directions to show what I actually did, and linked to her original version under the recipe title. The only comment I have is that round steak is the wrong cut of meat to use. It is simply too tough for a quick cooking method. I think a lean sirloin would have been a much better choice of meat. Other than that, Sandra's dish was very yummy. This is something that I will certainly make again. Who'da thunk it!!!
May 5, 2010
Corn and Cheese Enchiladas
Happy Cinco de Mayo, everyone! Tonight we are going to get into the spirit of the event by having some Mexican-inspired food. A long time ago, in a galaxy far, far away (i.e. pre-kids), Cinco de Mayo was a big deal. I would go out with my girlfriends and we would dance all night and drink margaritas until our lips were chapped from all the salt-rimmed glasses. Alas, things are much more civil now...which is actually fine by me. I would much rather spend the evening quietly with my husband and kiddos, anyway!!! However, we can still celebrate--gringo-style--by making a healthy, vegetarian version of enchiladas.
This is another dish I found on the myrecipes.com website. The only variation that I am making is that I am substituting frozen corn for fresh, but otherwise following the recipe. I think I will serve this festive dish with some vegetarian pinto beans and, of course, a green salad.
Doesn't that sound exciting???? I am telling you...we are gonna party 'til the break of 7:00 pm tonight!!!
Corn and Cheese Enchiladas
From: myrecipes.com; All You magazine, July 2008
Ingredients:
8 6-inch corn tortillas
1 tablespoon vegetable oil
5 scallions, white and light green parts, chopped
2 garlic cloves, finely chopped
1 1/2 cups fresh (from 2 medium ears) OR frozen and thawed corn kernels
1/2 cup whole milk
Salt to taste
2 cups grated pepper Jack
1 10-oz. can enchilada sauce
fresh cilantro, chopped for garnish
Directions:
Preheat oven to 350°F. Stack tortillas, wrap in foil and bake until softened, 8 to 10 minutes.
While tortillas are baking, oil a 7-by-11-inch glass baking dish. Warm 1 Tbsp. oil in large skillet over medium-high heat. Add scallions and garlic, and cook until fragrant, about 1 minute. Stir in corn and milk and cook, stirring occasionally, until thickened, 7 to 10 minutes. Season with salt.
Remove tortillas from foil. Set aside 1/2 cup cheese. Spoon a heaping tablespoon of corn mixture in center of a tortilla. Sprinkle with a heaping tablespoon of cheese. Roll up tortilla and set in dish, seam side down. Repeat with remaining tortillas, overlapping them slightly. Pour enchilada sauce over tortillas and sprinkle with reserved 1/2 cup cheese. Bake until bubbling, about 20 minutes.
Nutritional Information:
Yield: 4 Servings
Calories:457
Fat:25g (sat 13g)
Protein:20g
Carbohydrate:41g
Fiber:5g
Cholesterol:64mg
Sodium:323mg


The Result:
These were soooo good! We had some friends over for dinner, and we all liked them a lot. My only critique is that I have the worst luck with corn tortillas! They always break apart and become a total mess. I even heated them up this time, according to the directions, and they were still a a total mess. So, the taste of this dish turned out the same; but it was more like a casserole rather than actual rolled enchiladas. Really, no difference...other than it totally annoys me! The corn tortilla thing is not this recipes fault, and is just my issue with corn tortillas in general. I love the way they taste, so I will just have to keep trying and figure out a way to get them to work for me.
We had some pinto beans and a green salad to round out our meal. One more note...I ended up making 12 enchiladas and using 2 cans of sauce, since we had 6 people eating (4 adults and 2 kids). The portions ended up being perfect, and this is another keeper recipe.
This is another dish I found on the myrecipes.com website. The only variation that I am making is that I am substituting frozen corn for fresh, but otherwise following the recipe. I think I will serve this festive dish with some vegetarian pinto beans and, of course, a green salad.
Doesn't that sound exciting???? I am telling you...we are gonna party 'til the break of 7:00 pm tonight!!!
Corn and Cheese Enchiladas
From: myrecipes.com; All You magazine, July 2008
Ingredients:
8 6-inch corn tortillas
1 tablespoon vegetable oil
5 scallions, white and light green parts, chopped
2 garlic cloves, finely chopped
1 1/2 cups fresh (from 2 medium ears) OR frozen and thawed corn kernels
1/2 cup whole milk
Salt to taste
2 cups grated pepper Jack
1 10-oz. can enchilada sauce
fresh cilantro, chopped for garnish
Directions:
Preheat oven to 350°F. Stack tortillas, wrap in foil and bake until softened, 8 to 10 minutes.
While tortillas are baking, oil a 7-by-11-inch glass baking dish. Warm 1 Tbsp. oil in large skillet over medium-high heat. Add scallions and garlic, and cook until fragrant, about 1 minute. Stir in corn and milk and cook, stirring occasionally, until thickened, 7 to 10 minutes. Season with salt.
Remove tortillas from foil. Set aside 1/2 cup cheese. Spoon a heaping tablespoon of corn mixture in center of a tortilla. Sprinkle with a heaping tablespoon of cheese. Roll up tortilla and set in dish, seam side down. Repeat with remaining tortillas, overlapping them slightly. Pour enchilada sauce over tortillas and sprinkle with reserved 1/2 cup cheese. Bake until bubbling, about 20 minutes.
Nutritional Information:
Yield: 4 Servings
Calories:457
Fat:25g (sat 13g)
Protein:20g
Carbohydrate:41g
Fiber:5g
Cholesterol:64mg
Sodium:323mg
The Result:
These were soooo good! We had some friends over for dinner, and we all liked them a lot. My only critique is that I have the worst luck with corn tortillas! They always break apart and become a total mess. I even heated them up this time, according to the directions, and they were still a a total mess. So, the taste of this dish turned out the same; but it was more like a casserole rather than actual rolled enchiladas. Really, no difference...other than it totally annoys me! The corn tortilla thing is not this recipes fault, and is just my issue with corn tortillas in general. I love the way they taste, so I will just have to keep trying and figure out a way to get them to work for me.
We had some pinto beans and a green salad to round out our meal. One more note...I ended up making 12 enchiladas and using 2 cans of sauce, since we had 6 people eating (4 adults and 2 kids). The portions ended up being perfect, and this is another keeper recipe.
May 4, 2010
Smoked Gouda, Spinach, & Pepper Omelet Sandwiches
We are doing a kinda "breakfast for dinner" type thing this evening. I found these sandwiches on the Cooking Light (myrecipes.com) website, and I thought they would help fill my vegetarian requirement for the week quite nicely. The original recipe calls for smoked mozzarella, but I don't have any on hand. Instead, I think I will substitute smoked Gouda; which should give me a similar flavor. Steamed veggies and baked potatoes will round out our meal. I love breakfast for dinner, so I am looking forward to these easy and nutritious egg sandwiches.
Smoked Gouda, Spinach, & Pepper Omelet Sandwiches
Adapted From: Michele Powers, Cooking Light, JULY 2005; myrecipes.com
Ingredients:
2 tablespoons fat-free milk
1/4 teaspoon salt
1/4 teaspoon freshly ground black pepper
6 large egg whites
3 large eggs
Dash of hot pepper sauce
Cooking spray
1 cup finely diced red bell pepper
3/4 cup onion, diced
4 sourdough English muffins, split
1/2 cup (2 ounces) shredded smoked Gouda cheese
1 1/2 cups bagged baby spinach leaves
Directions:
Preheat broiler.
Combine first 6 ingredients in a large bowl, stirring with a whisk until combined; set aside.
Heat a large nonstick skillet over medium-high heat. Coat pan with cooking spray. Add bell pepper and onion; saute 4 minutes or until tender. Reduce heat to medium. Pour egg mixture into pan; let egg mixture set slightly. Tilt pan; carefully lift edges of omelet with a spatula to allow uncooked portion to flow underneath cooked portion. Cook 3 minutes. Wrap handle of pan with foil; place pan under broiler. Broil 1 minute or until set and lightly browned.
Arrange muffin halves in a single layer on a baking sheet. Sprinkle muffin halves evenly with cheese, and broil 1 minute or until cheese begins to brown.
Divide omelet into 4 portions; place 1 portion on bottom half of each muffin. Top evenly with spinach leaves; top with remaining muffin halves.
Nutritional Information:
Yield: 4 servings (serving size: 1 sandwich)
Calories:295 (28% from fat)
Fat:9g (sat 3.6g,mono 1.6g,poly 1.1g)
Protein:19g
Carbohydrate:33.8g
Fiber:2.4g
Cholesterol:168mg
Iron:2.7mg
Sodium:686mg
Calcium:173mg


The Result:
These were good, but nothing spectacular. They were filling and yummy, but not anything truly noteworthy...pretty much just an egg and veggie sandwich. They would still make a great breakfast; but I felt these sandwiches were just a little to lackluster to be featured as the star of dinner. The husband did have one good note to mention: the cheese needed to be a little more flavorful. Maybe a smoked provolone would have been a better cheese choice. The Gouda was fine, but just a little too subtle for our taste buds. I think a sharper, more pungent flavor would have amped up these sammies a bit. I don't think I will make them again for our main meal, but they will be appearing on our breakfast table in the future.
UPDATE:
I had the leftover omelet yesterday for lunch on a wheat sandwich thin, with spinach leaves and 2 Tablespoons of red pepper hummus (I skipped the cheese all together). This version was much better than the original, and one I would consider making again for a lunch or dinner. I swear, I think hummus makes everything better!!!
Smoked Gouda, Spinach, & Pepper Omelet Sandwiches
Adapted From: Michele Powers, Cooking Light, JULY 2005; myrecipes.com
Ingredients:
2 tablespoons fat-free milk
1/4 teaspoon salt
1/4 teaspoon freshly ground black pepper
6 large egg whites
3 large eggs
Dash of hot pepper sauce
Cooking spray
1 cup finely diced red bell pepper
3/4 cup onion, diced
4 sourdough English muffins, split
1/2 cup (2 ounces) shredded smoked Gouda cheese
1 1/2 cups bagged baby spinach leaves
Directions:
Preheat broiler.
Combine first 6 ingredients in a large bowl, stirring with a whisk until combined; set aside.
Heat a large nonstick skillet over medium-high heat. Coat pan with cooking spray. Add bell pepper and onion; saute 4 minutes or until tender. Reduce heat to medium. Pour egg mixture into pan; let egg mixture set slightly. Tilt pan; carefully lift edges of omelet with a spatula to allow uncooked portion to flow underneath cooked portion. Cook 3 minutes. Wrap handle of pan with foil; place pan under broiler. Broil 1 minute or until set and lightly browned.
Arrange muffin halves in a single layer on a baking sheet. Sprinkle muffin halves evenly with cheese, and broil 1 minute or until cheese begins to brown.
Divide omelet into 4 portions; place 1 portion on bottom half of each muffin. Top evenly with spinach leaves; top with remaining muffin halves.
Nutritional Information:
Yield: 4 servings (serving size: 1 sandwich)
Calories:295 (28% from fat)
Fat:9g (sat 3.6g,mono 1.6g,poly 1.1g)
Protein:19g
Carbohydrate:33.8g
Fiber:2.4g
Cholesterol:168mg
Iron:2.7mg
Sodium:686mg
Calcium:173mg
The Result:
These were good, but nothing spectacular. They were filling and yummy, but not anything truly noteworthy...pretty much just an egg and veggie sandwich. They would still make a great breakfast; but I felt these sandwiches were just a little to lackluster to be featured as the star of dinner. The husband did have one good note to mention: the cheese needed to be a little more flavorful. Maybe a smoked provolone would have been a better cheese choice. The Gouda was fine, but just a little too subtle for our taste buds. I think a sharper, more pungent flavor would have amped up these sammies a bit. I don't think I will make them again for our main meal, but they will be appearing on our breakfast table in the future.
UPDATE:
I had the leftover omelet yesterday for lunch on a wheat sandwich thin, with spinach leaves and 2 Tablespoons of red pepper hummus (I skipped the cheese all together). This version was much better than the original, and one I would consider making again for a lunch or dinner. I swear, I think hummus makes everything better!!!
May 2, 2010
Vegetarian Stuffed Mushrooms
The husband and boy are feeling a bit under the weather, so everyone (except for me) went to bed a little early this evening. Being left alone didn't exactly hurt my feelings, since then I had some time to workout on our elliptical and get a jump start on my blog post for tomorrow night's dinner. Once in a while it is nice to get some uninterrupted "me" time (although, the babies did keep fussing and I had to stop and feed them both in the midst of my alone time...so I guess it wasn't totally uninterrupted). Anyway, I love getting a chance to pursue some of my interests without feeling like I am short-changing anyone on quality time. But, I digress...
I found this recipe by searching through the myrecipes.com website, which is put together by the publishers of Cooking Light and several other magazines under the same corporate conglomeration. I did a search in their "vegetarian" files, and this popped up as a favorite amongst it's reviewers. I absolutely l-o-v-e portobellos, which is what grabbed my attention first. I thought that the addition of kalamata olives and fontina cheese made it sound interesting, so I thought I would give it a go. I think I will serve these stuffed mushrooms with either some roasted or baked potatoes.
Vegetarian Stuffed Mushrooms
From: myrecipes.com; Health magazine, May 2006
Ingredients:
4 large portobello mushroom caps
2 teaspoons olive oil
1 1/2 tablespoons balsamic vinegar
1/4 teaspoon coarse salt
1/2 teaspoon freshly ground black pepper, divided
1 1/2 cups chopped tomato
1/3 cup chopped kalamata olives
1 cup fresh whole-grain breadcrumbs
1/2 cup (4 ounces) shredded fontina cheese
1/4 cup chopped fresh chives
Directions:
1. Preheat oven to 400°.
2. Place mushroom caps, gill sides up, on a rimmed baking sheet; drizzle with oil and vinegar, and season with salt and 1/4 teaspoon pepper. Bake until caps are just tender, about 10 minutes.
3. Meanwhile, combine tomato, olives, breadcrumbs, cheese, and chives in a medium bowl. Season with remaining 1/4 teaspoon pepper.
4. Divide tomato mixture evenly (about 1/2 cup per mushroom) among portobello caps. Bake 10-12 minutes or until lightly browned and mushrooms are tender. Serve hot.
CALORIES 189 ; FAT 11g (sat 3g,mono 6g,poly 1g); CHOLESTEROL 16mg; CALCIUM 111mg; CARBOHYDRATE 16g; SODIUM 457mg; PROTEIN 8g; FIBER 3g; IRON 2mg

The Result:
These were sooooo good! I wasn't sure how they were gonna turn out, but they ended up being mighty tasty.
The recipe turned out as written, so I didn't really have to change anything on this one. The only word of caution is that the recipe made a lot more filling than what my medium-sized mushrooms needed, and I couldn't think of another use for it. So, my dogs ended up benefiting from all the excess filling. (It's nice to spoil the pups once in a while...they appreciated their treat mixed in with their dog food.) I guess you could adjust the filling quantities to make a little less. I hate wasting food!
Anyway, for the breadcrumbs I toasted 4 slices of whole wheat bread and then wizzed them up in the food processor. It ended up working out perfectly, and I got the whole grain breadcrumbs that I needed. I ended up eating 2 caps total (with some rice and salad), and it was pretty filling.
Overall, this is a great recipe and one that I will make again.
I found this recipe by searching through the myrecipes.com website, which is put together by the publishers of Cooking Light and several other magazines under the same corporate conglomeration. I did a search in their "vegetarian" files, and this popped up as a favorite amongst it's reviewers. I absolutely l-o-v-e portobellos, which is what grabbed my attention first. I thought that the addition of kalamata olives and fontina cheese made it sound interesting, so I thought I would give it a go. I think I will serve these stuffed mushrooms with either some roasted or baked potatoes.
Vegetarian Stuffed Mushrooms
From: myrecipes.com; Health magazine, May 2006
Ingredients:
4 large portobello mushroom caps
2 teaspoons olive oil
1 1/2 tablespoons balsamic vinegar
1/4 teaspoon coarse salt
1/2 teaspoon freshly ground black pepper, divided
1 1/2 cups chopped tomato
1/3 cup chopped kalamata olives
1 cup fresh whole-grain breadcrumbs
1/2 cup (4 ounces) shredded fontina cheese
1/4 cup chopped fresh chives
Directions:
1. Preheat oven to 400°.
2. Place mushroom caps, gill sides up, on a rimmed baking sheet; drizzle with oil and vinegar, and season with salt and 1/4 teaspoon pepper. Bake until caps are just tender, about 10 minutes.
3. Meanwhile, combine tomato, olives, breadcrumbs, cheese, and chives in a medium bowl. Season with remaining 1/4 teaspoon pepper.
4. Divide tomato mixture evenly (about 1/2 cup per mushroom) among portobello caps. Bake 10-12 minutes or until lightly browned and mushrooms are tender. Serve hot.
CALORIES 189 ; FAT 11g (sat 3g,mono 6g,poly 1g); CHOLESTEROL 16mg; CALCIUM 111mg; CARBOHYDRATE 16g; SODIUM 457mg; PROTEIN 8g; FIBER 3g; IRON 2mg
The Result:
These were sooooo good! I wasn't sure how they were gonna turn out, but they ended up being mighty tasty.
The recipe turned out as written, so I didn't really have to change anything on this one. The only word of caution is that the recipe made a lot more filling than what my medium-sized mushrooms needed, and I couldn't think of another use for it. So, my dogs ended up benefiting from all the excess filling. (It's nice to spoil the pups once in a while...they appreciated their treat mixed in with their dog food.) I guess you could adjust the filling quantities to make a little less. I hate wasting food!
Anyway, for the breadcrumbs I toasted 4 slices of whole wheat bread and then wizzed them up in the food processor. It ended up working out perfectly, and I got the whole grain breadcrumbs that I needed. I ended up eating 2 caps total (with some rice and salad), and it was pretty filling.
Overall, this is a great recipe and one that I will make again.
Weekly Menu Plan: 05/02/10 - 05/08/10
Here are the meals that I have planned for this week...drum roll, please...all NEW recipes!!!
Weekly Menu Plan: 05/02/10 - 05/08/10
Sunday, 05/02/10: Caesar Club Sandwich (new recipe), glazed carrots
Monday, 05/03/10: Vegetarian Stuffed Mushrooms (new recipe), leftover risotto, salad (vegetarian)
Tuesday, 05/04/10: Smoked Gouda, Spinach, and Red Pepper Omelet Sandwiches (new recipe), salad, baked potatoes (vegetarian)
Wednesday, 05/05/10: Corn and Cheese Enchiladas (new recipe), salad, pinto beans (vegetarian) Happy Cinco de Mayo (and Happy Birthday to my friend, Cindy)!!!
Thursday, 05/06/10: Hibachi Steak with Noodles (new recipe)
Friday, 05/07/10: Salmon with Lentils (new recipe), sauteed green beans
Saturday, 05/08/10: Antipasto-Style Penne (new recipe)
Caesar Club Sandwich
I don't know what it is, but sometimes when the end of the weekend rolls around, I am spent. I was just sitting here trying to think of a good way to introduce this sandwich to you, but my mind is totally and completely blank. As a stall tactic, I have decided to just describe the state of my blankness...just so the empty page won't mock me. Anyway, I guess I could tell you that my friend Claire made this sandwich a week or so ago with good results. I could also tell you that it comes from both the Food Network website and the Barefoot Contessa At Home cookbook. Other than that, I've got nothing for you today. No thought-provoking or witty commentary here...just the facts. Oh, and I am going to serve this sandwich with some glazed carrots and a baked potato. Yup, I am officially out of things to type...here is the recipe.
Caesar Club Sandwich
From: Barefoot Contessa At Home cookbook, foodnetwork.com
Ingredients:
2 split (1 whole) chicken breasts, bone in, skin on
Good olive oil
Kosher salt
Freshly ground black pepper
4 ounces thinly sliced pancetta (I am using bacon instead)
1 large garlic clove, chopped
2 tablespoons chopped fresh flat-leaf parsley
1 1/2 teaspoons anchovy paste
1 teaspoons Dijon mustard
1 1/2 tablespoons freshly squeezed lemon juice
1/2 cup good mayonnaise
1 large ciabatta bread
2 ounces baby arugula, washed and spun dry
12 sun-dried tomatoes, in oil
2 to 3 ounces Parmesan, shaved
Directions:
Preheat the oven to 350 degrees F.
Place the chicken breasts on a sheet pan skin side up. Rub the chicken with olive oil and sprinkle with salt and pepper. Roast for 35 to 40 minutes, until cooked through. Cool slightly, discard the skin and bones, and slice the meat thickly. Set aside.
Meanwhile, place the pancetta (or bacon) on another sheet pan in a single layer. Roast for 10 to 15 minutes, until crisp. Set aside to drain on paper towels.
Place the garlic and parsley in the bowl of a food processor fitted with a steel blade and process until minced. Add the anchovy paste, mustard, lemon juice, and mayonnaise and process again to make a smooth dressing. (Refrigerate the Caesar dressing if not using it immediately.)
Slice the ciabatta in half horizontally and separate the top from the bottom. Toast the bread in the oven, cut side up, for 5 to 7 minutes; cool slightly. Spread the cut sides of each piece with the Caesar dressing. Place half the arugula on the bottom piece of bread and then layer in order: the sun-dried tomatoes, shaved Parmesan, crispy pancetta (or bacon), and sliced chicken. Sprinkle with salt and pepper and finish with another layer of arugula. Place the top slice of ciabatta on top and cut in thirds crosswise. Serve at room temperature.


The Results:
Oh man! This is definitely in my top 5 favorite sandwiches. Yum-freakin'-o! I am telling you...Ina rarely disappoints, and this was fantastic. It always amazes me how simple ingredients, when put together correctly, can be sooooooo delicious! Needless to say, this is a keeper.
Caesar Club Sandwich
From: Barefoot Contessa At Home cookbook, foodnetwork.com
Ingredients:
2 split (1 whole) chicken breasts, bone in, skin on
Good olive oil
Kosher salt
Freshly ground black pepper
4 ounces thinly sliced pancetta (I am using bacon instead)
1 large garlic clove, chopped
2 tablespoons chopped fresh flat-leaf parsley
1 1/2 teaspoons anchovy paste
1 teaspoons Dijon mustard
1 1/2 tablespoons freshly squeezed lemon juice
1/2 cup good mayonnaise
1 large ciabatta bread
2 ounces baby arugula, washed and spun dry
12 sun-dried tomatoes, in oil
2 to 3 ounces Parmesan, shaved
Directions:
Preheat the oven to 350 degrees F.
Place the chicken breasts on a sheet pan skin side up. Rub the chicken with olive oil and sprinkle with salt and pepper. Roast for 35 to 40 minutes, until cooked through. Cool slightly, discard the skin and bones, and slice the meat thickly. Set aside.
Meanwhile, place the pancetta (or bacon) on another sheet pan in a single layer. Roast for 10 to 15 minutes, until crisp. Set aside to drain on paper towels.
Place the garlic and parsley in the bowl of a food processor fitted with a steel blade and process until minced. Add the anchovy paste, mustard, lemon juice, and mayonnaise and process again to make a smooth dressing. (Refrigerate the Caesar dressing if not using it immediately.)
Slice the ciabatta in half horizontally and separate the top from the bottom. Toast the bread in the oven, cut side up, for 5 to 7 minutes; cool slightly. Spread the cut sides of each piece with the Caesar dressing. Place half the arugula on the bottom piece of bread and then layer in order: the sun-dried tomatoes, shaved Parmesan, crispy pancetta (or bacon), and sliced chicken. Sprinkle with salt and pepper and finish with another layer of arugula. Place the top slice of ciabatta on top and cut in thirds crosswise. Serve at room temperature.
The Results:
Oh man! This is definitely in my top 5 favorite sandwiches. Yum-freakin'-o! I am telling you...Ina rarely disappoints, and this was fantastic. It always amazes me how simple ingredients, when put together correctly, can be sooooooo delicious! Needless to say, this is a keeper.
May 1, 2010
Easy Easy Risotto with Marinara
This is a dish I found in the Pasta & Co. Encore cookbook. What got my attention was the directions indicating to rinse the risotto before cooking. Hmmmm...that seems really incongruent to the usual risotto method, so I was instantly intrigued. I figured I would give it a go, to see what the difference is in method; and if successful, have another vegetarian risotto recipe up my sleeve. I am a little skeptical, but we will see...I will let you know how it goes!
Easy Easy Risotto with Marinara
From: Pasta & Co. Encore cookbook
Ingredients:
2 cups Arborio rice
1/4 cup of extra virgin olive oil
2 cups minced onion
2 large garlic cloves, peeled and put through a press
29 oz. of chicken broth or homemade stock (equals 2 x 14 1/2 oz. cans of broth, if not using homemade stock)
1 cup of marinara sauce
1 1/2 teaspoons of salt
Freshly ground black pepper to taste
pinch of nutmeg
3 bay leaves
1/2 cup of Parmesan cheese
Directions:
Rinse the rice under cold running water and drain well (this violates a cardinal rule of good risotto making). In a large nonstick skillet, heat olive oil over medium-high heat. Saute onions and rice until golden, about 10 minutes. Add garlic and cook for another minute. Add chicken broth/stock, marinara sauce, salt, pepper, nutmeg, & bay leaves. Stir and cover tightly with lid or foil. Reduce heat to low and cook very slowly, without stirring, for about 30 minutes or until rice is tender. This dish is meant to be a bit sticky. Fold in Parmesan and taste for seasoning. Serve hot or at room temperature.

The Result:
This was just okay. It was good, but nothing truly special. It tasted like risotto mixed with marinara sauce...eh. I will say that the no-stir method was kinda nice, however I have had (and made) better risotto recipes. I garnished our risotto with a chunk of heirloom tomato (which we had sliced up for a quick side dish, as well). Let's just say that the tomatoes were the highlight of the meal. Overall, this was merely mediocre, and not a recipe that I would be in a hurry to make again.
Easy Easy Risotto with Marinara
From: Pasta & Co. Encore cookbook
Ingredients:
2 cups Arborio rice
1/4 cup of extra virgin olive oil
2 cups minced onion
2 large garlic cloves, peeled and put through a press
29 oz. of chicken broth or homemade stock (equals 2 x 14 1/2 oz. cans of broth, if not using homemade stock)
1 cup of marinara sauce
1 1/2 teaspoons of salt
Freshly ground black pepper to taste
pinch of nutmeg
3 bay leaves
1/2 cup of Parmesan cheese
Directions:
Rinse the rice under cold running water and drain well (this violates a cardinal rule of good risotto making). In a large nonstick skillet, heat olive oil over medium-high heat. Saute onions and rice until golden, about 10 minutes. Add garlic and cook for another minute. Add chicken broth/stock, marinara sauce, salt, pepper, nutmeg, & bay leaves. Stir and cover tightly with lid or foil. Reduce heat to low and cook very slowly, without stirring, for about 30 minutes or until rice is tender. This dish is meant to be a bit sticky. Fold in Parmesan and taste for seasoning. Serve hot or at room temperature.
The Result:
This was just okay. It was good, but nothing truly special. It tasted like risotto mixed with marinara sauce...eh. I will say that the no-stir method was kinda nice, however I have had (and made) better risotto recipes. I garnished our risotto with a chunk of heirloom tomato (which we had sliced up for a quick side dish, as well). Let's just say that the tomatoes were the highlight of the meal. Overall, this was merely mediocre, and not a recipe that I would be in a hurry to make again.
Subscribe to:
Posts (Atom)