August 26, 2011

Chicken Spaghetti

Holy casserole, Batman!

I have had this recipe tagged to try out for years. For one reason or another, it never came to fruition. I have a slight aversion to canned cream of "...(insert flavor here)" soup. Not the taste of it mind you; but the fact that it is soooo not healthful and soooo over-processed. I guess you could say that I am an outward cream of "..." soup snob, but I secretly kinda like it. I know that probably doesn't make a whole lot of sense, but sometimes I am a complicated person.

Anyway, I finally got around to making this recipe for last night's dinner. I had my first PTO meeting at my son's new school,so I prepped and baked everything before the meeting. I gave the hubs some final cooking instructions and asked him to 'pretty please with sugar on top' feed the kids and save me a plate for after my meeting. I then left the house while our dinner was still in the oven.

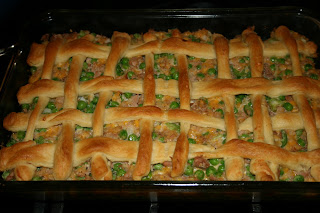
When I came home after the meeting, I asked how dinner was and got a strange response. The husband told me I would have to try it and formulate my own opinion. That made me nervous. I basically thought he was trying to politely tell me that I poisoned my family with this recipe. Thankfully, my assumption was wrong. I took a couple bites and instantly fell in love. After seeing me swoon, the husband reported that the kids all had seconds. My eldest baby daughter literally and cried for more! He also had two big portions and said it was the best casserole that we have had in awhile. Wow! A ringing endorsement by all...that hardly ever happens!!! I am so happy I finally tried this dish. My family has already requested that it be put into frequent meal rotation. Score!

Chicken Spaghetti
From: The Pioneer Woman Cooks: Recipes from an Accidental Country Girl cookbook By: Ree Drummond

Ingredients:
2 cups Cooked Chicken
3 cups Dry Spaghetti, Broken Into Two Inch Pieces
2 cans Cream Of Mushroom Soup
2 cups Grated Sharp Cheddar Cheese
1/4 cup Finely Diced Green Pepper
1/4 cup Finely Diced Onion
1 jar (4 Ounce) Diced Pimentos, Drained
2 cups Reserved Chicken Broth From Pot
1 teaspoon Lawry's Seasoned Salt
1/8 teaspoon (to 1/4 Teaspoon) Cayenne Pepper
Salt And Pepper, to taste
1 cup Additional Grated Sharp Cheddar Cheese

Directions:
Cook 1 cut up fryer and pick out the meat to make two cups. Cook spaghetti in same chicken broth until al dente. Do not overcook. When spaghetti is cooked, combine with remaining ingredients except additional 1 cup sharp cheddar.

Place mixture in casserole pan and top with remaining sharp cheddar. Cover and freeze up to six months, cover and refrigerate up to two days, or bake immediately: 350 degrees for 45 minutes until bubbly. (If the cheese on top starts to get too cooked, cover with foil).


The Result:
For my chicken, I used 4 large bone-in, skin-on chicken thighs and 1 chicken leg and boiled them according to the directions. I think this is the key to this recipe...the chicken AND the chicken broth/pasta water that is from the pot. DON'T SKIP THIS STEP! I know it's tempting to shortcut this method, but I really think it made the difference from turning this recipe into a "good" casserole into a "delicious" casserole. Aside from which chicken parts I used, I followed this recipe as-is and we all loved it. PW knows how to deliver a fantastic dinner, that's for sure.

August 25, 2011

Brie Croque Monsieur

I am a sucker for a fancy grilled cheese. This one was really tasty and one that I will make again. I really liked that the whole sandwich is dipped a la French toast style, making it oh so decadent. Yum!

Brie Croque Monsieur
Adapted from: Framed Cooks blog

Ingredients:
1 wedge (8 oz.) Brie cheese, cut into thin slices
3 large eggs
3/4 cup milk
1/4 tsp Salt
1/8 tsp Pepper
6 slices prosciutto de Parma
8 slices French bread, sliced thick
4 tbsp butter, melted, divided

Directions:
In a medium bowl, whisk together eggs, milk salt and pepper. Set aside.

Assemble six sandwiches, each with some prosciutto and slices of cheese between two slices of bread.

Heat half of the melted butter in a large nonstick pan on medium heat, swirling to coat bottom of pan.

Dip the sandwiches into the egg and milk mixture, turning to coat. Immediately place in preheated pan, and cook for 2-3 minutes per side or until bread is golden brown and cheese is melting. Repeat with remaining butter and sandwiches. Serve hot.


The Result:
So delish! You really cannot see the cheese from the photo, but it's in there! This was pretty quick to assemble and a total hit at my house. Hooray for fancy grilled cheese...or in this case fancy grilled ham and cheese!

Hot Crossed Tuna Casserole

Typically, I am not a fan of Tuna Casserole. It's always seemed, well, strange to me. Maybe it's because I was scarred as a child. One of my neighborhood friend's mother always made it when I was invited to their family dinner. It was gloppy and gloopy, with an overwhelming sense of tuna-ishness. It was not good.

My friend, Claire Gertrude recently made this version of tuna casserole that she remembered from her childhood. She assured me that it was not your typical tuna casserole mess, and let me sample some. She was right! It was yummy...especially with the sauce. It totally reminded me of a deconstructed tuna melt sandwich (which I love) and the cucumber dill sauce gave it just the right balance. If you are tuna-casserole adverse, this may be the recipe to make you reconsider how you feel about them.

Hot Crossed Tuna Casserole
From: Cooking Claire blog

Ingredients:
3 or 4 cans tuna, drained
1 16 oz. package frozen peas, thawed (I put mine in frozen)
1 c. shredded cheddar cheese
1 c. celery, sliced
1/2 c. bread crumbs
1/4 c. chopped onion
1/4 tsp. salt
1/8 tsp. pepper
1 cup mayonnaise
1 tube crescent roll dough

Cucumber Sauce:
1/2 c. chopped cucumbers
1 T. chives, chopped
1 T. chopped parsley
1/4 t. salt
1/4 t. dill weed
1/2 c. mayo
1/2 c. sour cream

Directions:
Combine tuna, peas, cheese, celery, bread crumbs, onion, seasonings, and mayonnaise; mix well. Spoon into a baking dish. Separate crescent roll dough into 2 rectangles. Press perforations to seal. Cut dough into 4 long and 8 short strips. Place strips over casserole in lattice design. Bake at 350 for 35 to 40 minutes or until crust is brown. Serve with cucumber sauce.

To make sauce, combine all ingredients and mix well. Chill. Pour over top of each serving.


The Result:
Easy, comforting, and family-friendly. My kids loved this, and it was even better the next day for leftover lunch. The lattice crust makes it visually appealing, as well. I don't think "visually appealing" is an adjective used to often describe tuna casserole, so that is definitely a check in the "pro" column for this recipe. More tuna casserole...yes, please.

August 19, 2011

Cliantro Almond Pesto

This is a quick and easy "no cook" recipe that will compliment either beef, chicken, or fish. We had it last night as a condiment for grilled steaks and it was darn tasty! Once again, thanks Gertrude.

Cilantro Almond Pesto
From:
myrecipes.com via the Cooking Claire blog

Ingredients:
3/4 cup fresh cilantro
2 tablespoons slivered almonds, toasted
1 tablespoon chopped seeded jalapeno pepper
1/8 teaspoon salt
1/8 teaspoon black pepper
1 garlic clove, chopped
3 tablespoons plain fat-free yogurt
1 1/2 teaspoons fresh lime juice

Directions:
Combine first 6 ingredients in a blender; process until finely chopped (about 15 seconds). Add yogurt and juice; process until smooth.

The Result:
See???? Totally easy!!! All you need is a blender and a smile to whip up this yummy pesto topping.

August 17, 2011

Slow Cooker Hungarian Pot Roast with Sour Cream and Paprika Gravy

Pot roast is one of my favorite comfort meals. It automatically brings me back to my childhood and family dinners with my grandparents. I usually make my mom's, or my grandma's, standard version of pot roast; never really venturing out to try new flavors. I figure the original is such a hit, why mess with what works???? Well, that was the old pot roast philosophy, at least. I think I may have a new way of thinking about it, thanks to this dish.

I think what caught my attention about this recipe, was the gravy. You see, I love paprika gravy. Actually, I love paprika in general. The color, the smell, the flavor...it's my favorite spice. I know I've shared this before but, if I had a prison/death row "last meal" request situation it would be for my mom's version of a childhood dish we call "Chicken Paprika"...mainly for the paprika gravy in that recipe. So, when I found a pot roast version with paprika gravy I knew I had to try it immediately.

Slow Cooker Hungarian Pot Roast with Sour Cream and Paprika Gravy
From: Kalyn's Kitchen website

Ingredients:
2 tsp. + 1 T olive oil
1 rump roast, about 2.5 pounds (trim visible fat if there is any)
generous amount of steak seasoning (about 1 T) to rub on roast before browning
4 large yellow onions, cut into slices at least 1/2 inch thick
2 T sweet Hungarian or Spanish paprika (or more)
1/2 tsp. sharp Hungarian paprika or smoked Spanish paprika (optional, but good)
1 jar (12 oz.) roasted red bell peppers
1 can (14.5 oz.) diced tomatoes with juice (I like petite dice for this)
2 cups homemade beef stock or low-sodium beef broth
fresh ground black pepper to taste
1 1/2 cups sour cream (I used light sour cream, do not use fat-free)

Directions:
Trim any visible fat from rump roast, then rub roast on all sides with steak seasoning. Heat 2 tsp. olive oil in heavy frying pan, add roast and brown well on all sides. (Don't rush this step., it may take 15-20 minutes to get the roast nicely browned.) When roast is well-browned, place in crockpot.

While roast browns, peel onions and cut into slices at least 1/2 inch thick. Heat additional 1 T olive oil in pan, then add onions and paprika and saute onions until lightly browned, turning often to brown all the onion slices. Put onions in crockpot on top of and around the roast. Add 2 cups beef stock to frying pan, scraping off any browned bits and simmering until beef stock is reduced to about 1 cup.

While onions brown and stock reduces, drain jar of roasted red peppers, then cut into lengthwise slices about 1/2 inch thick. Put sliced peppers and canned tomatoes into crockpot, seasoning with black pepper. When stock has reduced to about 1 cup, pour over top of crockpot ingredients.

Cook on high for about 4 hours, or until roast feels tender when pierced with a fork. When roast is tender, remove meat, let cool a few minutes, and then cut into thick slices. While meat cools enough to handle, strain liquid into a saucepan (catching the vegetables) and simmer over medium high heat to reduce for gravy. Add sliced meat and vegetables back into crockpot and keep warm.

****HERE IS WHERE I DEVIATED FROM THE RECIPE****SEE BELOW FOR MY VERSION****

When liquid has reduced by about half, whisk in sour cream. (Edit: A reader named Ned left the suggestion to add a small amount of the liquid to the sour cream and whisk together, then whisk that mixture back into the juice in the pan for easier combining without lumps. I think that sounds like a great idea.) Pour sour cream gravy back over meat and vegetables in crockpot and cook about 20-30 minutes more, or until heated through. Serve hot.


The Result:
The gravy was orgasmic. The husband and I were literally taking turns licking the empty saucepan as we were cleaning up the dinner dishes. The pot roast itself was delicious enough, with all the onions, peppers, and tomatoes...but that gravy pushed it over the top to awesome. Honestly, this was a little labor-intensive at first. There is a lot of prep work involved to just get this into the slow cooker, and then the gravy itself took awhile to make. However, it was sooooo fantastic! Totally worth the trouble!!!

I didn't follow the gravy instructions as written, but the rest of the recipe I followed as-is. I will note my difference below and in the directions with an asterisks.

This pot roast made me very happy!

****ALTERNATE METHOD FOR GRAVY:****
I let the pot roast liquid reduce by half (from 2 cups to 1 cup) and removed to a separate bowl. Temper in the container of light sour cream with the liquid and set the mixture aside.

In the saucepan, melt 2 tablespoons of butter. Sprinkle two tablespoons of AP flour over the melted butter and whisk to combine turning into a thick paste. Let flour/butter mixture cook for a couple of minutes. Continually whisk in the pot roast liquid and bring to a boil. Turn down the heat, while still whisking and let the gravy thicken to desired consistency. Season with salt and pepper to taste. Serve gravy on the side or pour gravy over meat in the slow cooker and serve immediately.

August 15, 2011

Sesame Tofu Noodle Bowl with Peanut Sauce

I don't like tofu. Well, let me amend that...I didn't like tofu before this recipe. I thought that the flavor and texture were--in a word--yucky. (I know, I know...not very mature.) On a whim, I decided to give tofu one more shot before chalking it off forever. Aggie from Aggie's Kitchen admitted her own aversion to tofu that sounded similar to mine. Then, she recommended this dish. Since Aggie is a trusted recipe source, I went for it. Oh man, I'm glad I did. This was really, really good. I LIKED the tofu in this recipe. I'm talkin' LIKE liked. Yeah, crazy right???? This may be the start of a beautiful friendship between tofu and me. Only time will tell...

Sesame Tofu Noodle Bowl with Peanut Sauce
From: Family Kitchen on babble.com By:Aggie's Kitchen (via Eat, Live, Run)

Ingredients:

For tofu:
1 package of extra firm tofu (see below for instructions on how to drain properly)
1 tablespoon sesame oil
a couple splashes soy sauce
2 tablespoons sesame seeds
1 tablespoons canola oil

For sauce:
1/2 cup peanut butter
2 tablespoons rice vinegar
1/3 cup low sodium soy sauce
1/3 cup warm water
2 teaspoons sesame oil
2 teaspoons honey or agave
pinch of red pepper flakes
2 tablespoons minced ginger

For noodles:
1 package soba noodles
2 large red bell peppers, sliced thin
1 large bok choy, sliced thin (I used 3 baby bok choy)
handful of chopped fresh cilantro, for serving

Directions:

TO PROPERLY DRAIN TOFU:
Take tofu out of package and place on a plate lined with paper towel. Place additional paper towels on top of the tofu. Add another plate to sandwich the tofu. Place a heavy weight (like a heavy skillet, heavy can, etc.; I used the top of my cast iron panini press) on the top plate to press the tofu. Let the tofu drain for 1/2 hour, then change the paper towels, flip the tofu over, and let it drain for an additional half hour (1 hour of total draining time).

Once draining process is complete, pat tofu to dry well. Slice longways into rectangles, about 1/2 inch thick, then smaller into cubes. Place in a bowl and gently toss with sesame oil, soy sauce and sesame seeds.

Heat canola oil up a large non stick skillet over medium-high heat. Add tofu to pan and cook until bottom sides are browned. Flip over and continue to cook till all sides are browned and crisp, about 5-7 minutes. Set aside.

While tofu is cooking, make peanut sauce by adding all the ingredients to a blender and combining until smooth, about 30 seconds.

In the meantime, bring pot of salted water to a boil and add soba noodles. Cook according to instructions.

Place red pepper strips and bok choy in a colander. When noodles are ready, pour over vegetables in colander and drain water, while rinsing with cold water at the same time. Doing this blanches the veggies quickly and easily. Transfer noodles and veggies to a large bowl and add peanut sauce. Gently toss and combine together. Add tofu and cilantro and serve into bowls.


The Result:
Dealing with the tofu was a bit of a pain. However, I must say, it was worth it. I really enjoyed this recipe...AND the tofu was pretty darn yummy. (I honestly thought that I would never say that about tofu.) I think the more I prepare tofu, the easier it will get (i.e. I will become more efficient at dealing with it). The key is to properly drain the tofu. Eureka!!!! What a revelation!!! Tofu can actually be delicious!

All in all, this is a great one to try if you are apprehensive about tofu. I think this recipe can be served as a gateway tofu dish...good for those of us who think that they are tofu-adverse. (A tofu ambassador, if you please.) The texture and flavor of all the components worked really well together. My kids even ate it without complaint. Hooray! I now have a "go-to" tofu recipe.

August 14, 2011

Grilled Pork Chops with Asian Black Bean-Garlic Marinade

This pork chop recipe had been on my menu plan for a couple of weeks now. I originally slated it when we were doing SBD phase 1, but I kept pushing it back because I couldn't find the black bean-garlic sauce. I finally got the chance to try a different grocery store and I was able to purchase the key ingredient. All in all, this marinade was really easy to whip up and was soooo tasty. The flavor was reminiscent of the Saito Chicken marinade we love, but a little more intense (which is a good thing). There is a high sodium content in the black bean-garlic sauce which, along with the other ingredients, basically brined our pork chops. I was afraid that the sodium was going to be too much, but it wasn't. (PS-don't taste the marinade beforehand...just trust me on this.) The meat turned out to be flavorful and juicy, not overly salty. Hooray! We served our chops with some steamed green beans and broccoli mixed together and had a very yummy dinner.

Grilled Pork Chops with Asian Black Bean-Garlic Marinade
Adapted from: The Bon Appetit Cookbook: Fast Easy Fresh via the Kalyn's Kitchen website

Ingredients:
4-8 thick cut pork chops, preferably bone-in (mine were boneless)
olive oil, for oiling grill grates
3 T Black Bean Garlic Sauce
2 tsp. minced garlic
1 1/2 T soy sauce
2 tsp. sesame seed oil
3 T fresh lime juice (I used my fresh-frozen lime juice)
1 T ginger puree
3 T peanut oil

Directions:
Trim any excess fat off the pork chops (leave a little bit on, but not much). Combine marinade ingredients. Put pork chops into a Ziploc bag (or a plastic container with a snap-tight lid) and pour marinade over. Let pork marinate in the refrigerator for 4-6 hours (or longer if you're away from home all day.)

When you're ready to cook the pork chops, remove the meat from the refrigerator and let it come to room temperature. Oil the grill grates with a paper towel dipped in olive oil, then preheat gas or charcoal grill to medium-high. (You can only hold your hand there for 2-3 seconds at that heat.) Lay pork chops on the grill at a diagonal to grill grates and cook 3-4 minutes or until grill marks appear, then rotate a quarter-turn and cook 3-4 minutes more to get second set of grill marks.

Turn pork chops over and cook 6-8 minutes more, or until internal temperature is about 145F on an instant-read meat thermometer. (I use my Polder Meat Thermometer with Probe and Timer to get the temperature just right.) If you don't have a meat thermometer, the pork should feel firm but not hard to the touch. You can cut a piece open to check and it should be barely pink inside. (For years I cooked pork to 160F, but now I like it only cooked to medium; if you want it more well done, cook just slightly longer.) Serve hot.


The Result:
So good! I actually made 8 boneless pork chops for this quantity of marinade, although the original recipe suggests a serving of only 4 chops. I think the marinade recipe is flexible enough to where it worked, but I don't think I would have stretched it anymore than that. This is another grilling favorite!

August 12, 2011

Pesto Smoked Salmon Sandwich

Gertrude and I went up to northern Arizona to complete a 12 mile run last weekend. Well, that was the goal anyway...it turned out a little different than we anticipated. Originally, we thought we were being sooooo clever by getting out of ridiculously hot Phoenix for a morning, and traveling up to cooler weather to do our long training run. In theory, it was a good idea. It turned out to be the run from hell. We never anticipated that it would still be hot (there is really no escaping the heat anywhere in an Arizona summer) AND that running at a higher elevation, with hills, would be more of an--ahem--challenge. Needless to say, we did not run 12 miles. We ran 4.75 miles. Disappointing, I know.

On the drive back from our craptastically bad running fail we decided to stop somewhere fun for lunch. We chose one of my favorite spots, Postino Winecafe, since Gertrude had never been there before. It was a good choice, let me tell you. We had yummy bruschetta, wine (duh), split a sandwich/salad combo, and split dessert. All courses were phenomenal and we were happy, happy ladies. The good lunch took some of the sting out of the bad run.

One of our brushettas was a pesto smoked salmon creation that I modeled this sandwich after. It was fantastic, and I knew I needed to recreate it at home. My sandwich turned out just as tasty as the original bruschetta offering, albeit a little heartier. It totally hit the spot and eased my craving for Postino Winecafe. Yum! All in all, our delicious lunch made up for our sucky run and I got a new sandwich idea out of the whole excursion.

Pesto Smoked Salmon Sandwich

Ingredients:
olive oil
1 ciabiatta loaf
2 packages of smoked salmon (about 8 ounces total)
1/2 package of softened cream cheese
3-4 tablespoons of pesto (store-bought or homemade)
1/4 red onion, minced finely
1/2 small jar of capers
1 large beefsteak tomato,sliced
salt and pepper to taste

Directions:
Preheat the oven to 350 degrees. Place the whole ciabiatta loaf directly on the oven rack for 6 minutes, so the crust may get crisp and the inside may get warm. Remove from oven with tongs and let cool slightly on a cutting board.

Once bread is cool enough to handle, slice the entire loaf lengthwise and brush some olive oil on both the top and bottom halves. Spread 1/4 cup of softened cream cheese on each half. On the bottom half, sprinkle capers and red onions over the cream cheese. Layer the smoked salmon on next. Place tomato slices on top of the smoked salmon and sprinkle on salt and pepper to taste. On the top half of the bread, slather pesto sauce over the cream cheese layer. Place top and bottom halves of the loaf together to assemble one large sandwich. Cut into individual sandwich servings and serve immediately.


The Result:
This was sooooo great! Seriously, delicious. It was virtually no-cook, with the exception of heating up the bread. I love it when that happens!!! Also, it kept well in the fridge as leftovers for the next day. SO GOOD!

August 11, 2011

Grilled Balsamic London Broil

My bff, Gertrude and I went to a local butcher shop yesterday that is aptly named The Meat Shop.

(Note: I've decided that I have a co-dependent relationship with my bff, Claire and we spend way too much time together, and I mention her way too much on my blog. I've decided to make up a new bff named Gertrude so it doesn't seem like I only have one friend and I can mention someone else on my blog besides ol' "what's her name".)

(Not that "what's her name" is ol', by the way. Claire, if you are reading this you are not ol', but young and spry. I'm just sayin'...)

Anyway, Gertrude and I stopped into this locally owned and operated butcher shop and loved it! They carried locally grown, grass-fed beef and pork; some of which they actually raise themselves. The meat possibilities were endless, and I was overwhelmed with choices. (We decided that a spur of the moment meat shopping trip was probably not the best idea; and next time we would be armed with a meat purchasing plan.)

I ended up buying a couple slabs of grass-fed London broil (that were cut right in front of my very eyes), handmade sausage (Linguisa), pork chorizo, and some ground pork/bacon burgers. Since the London broil was fresh, I decided to grill it right away for our dinner and push back my other meal plans. I wanted to make sure that we got all the benefits of the grass-fed beefy goodness at it's optimum state of freshness. I searched food.com and found this easy marinade that turned out to be really yummy. Our dinner was fantastic, and I am trying to figure out a way to purchase all of my beef and pork at The Meat Shop. Yum!

Grilled Balsamic London Broil
Adapted From: food.com, by: Ginny P; Sept. 2002, #39911

Ingredients:
1/2 lb London broil (top round steak), 1 inch thick
1 tablespoon olive oil
2 tablespoons balsamic vinegar
2 tablespoons low sodium soy sauce
1/2 teaspoon dried thyme
1/2 teaspoon garlic powder or 1 clove of minced fresh garlic
black pepper, to taste

Directions:

Put all ingredients, except meat, in a container fitted with a lid; cover and shake.

Pour the marinade over the meat in a zip top bag.

Marinate in the refrigerator for 4 hours or overnight, turning the meat occasionally.

Grill or broil until done as desired (5-7 minutes per side).

Let the meat rest for 5 minutes, slice thinly, and serve.

The Result:
We had 3 adults and 3 kids eating dinner; so I doubled the quantity of all the ingredients, including the meat. I forgot to take a photo, but this recipe was so easy and delicious. The meat was perfectly seasoned and cooked. We served our London broil with a side of baked sweet potato fries, and enjoyed every bite. Based on the success of this London Broil, I can't wait to dive into my other purchases from The Meat Shop.

August 10, 2011

Creamy Caprese Pasta

I am on roll with vegetarian keeper recipes...if you can count two recipes as an official "roll". I don't remember how I came across this dish; I think it popped up in my Facebook feed for a "Meatless Monday" meal idea. Although we had it on a Tuesday night, it was still easy to put together and delicious.

Creamy Caprese Pasta
Adapted from: howsweetitis.com

Ingredients:
1 pound whole wheat penne pasta
1 cup of your favorite pasta/tomato sauce
1/3 cup heavy cream or half and half
1/3 cup freshly grated Parmesan cheese + more for garnish
4 ounces fresh mozzarella, cut into cubes
4 ounces fresh mozzarella, sliced into rounds
6-8 slices of provolone
1 pint of grape tomatoes (I cut some in half and left some whole)
1 bunch of fresh basil leaves, chopped

Directions:

Preheat oven to 350 degrees F. Boil water and cook pasta according to directions.

While pasta is cooking, heat tomato sauce over low heat in a large saucepan. Once warm, stir in heavy cream and grated Parmesan. Once pasta is done cooking, drain and dump into the sauce, mixing to coat and turning off heat. Fold in mozzarella cubes and tomatoes, then chop 3-4 fresh basil leaves and add them in too. Once combined, spray a baking dish with non-stick spray and pour the entire pasta mixture into the dish. Top with fresh mozzarella rounds, provolone slices, and more Parmesan. Bake for 25 minutes, or until cheese is golden and bubbly. Remove from oven and let it cool slightly. Top with additional fresh basil and serve.


The Result:
This pasta dish was both fresh tasting and homey. My family loved it and polished off the whole pan. I consider this a perfect summertime pasta dish!

Portobello Goat Cheese Pitas

It seems that we have really been on a meat-spree lately. I feel like we are just consuming mass quantities of beef, chicken, and pork. What is that all about???? Once upon a time ago, I was pretty diligent about having 2-3 vegetarian meals every week. I'm not sure why that fell apart, but I think it had something to do with us just getting tired of the vegetarian options out there (especially since we are not fans of tofu). Anyway, my hope was restored in vegetarian meals when I found this recipe in Cooking Light magazine. This was virtually no-cook, and it was flavorful and fast to put together...a perfect choice for getting me back on the vegetarian band wagon.

Portobello Goat Cheese Pitas
Adapted From: Cooking Light magazine, August 2004, Alison Lewis

Ingredients:
1 1/2 teaspoons bottled minced garlic (I used minced fresh garlic)
1 teaspoon olive oil
4 (6-inch) pita rounds (I used naan bread)
1/2 teaspoon salt, divided
1/4 teaspoon black pepper, divided
4-6 whole portobello mushroom caps, sliced
2 medium tomatoes, cut into 1/4-inch-thick slices
1/3 cup (3 ounces) goat cheese
1/2 cup chopped fresh basil
balsamic vinegar, to drizzle

Directions:
Preheat oven to 375 degrees. Place sliced portobellos on large cookie sheet and drizzle with olive oil salt and pepper. Toss with clean hands. Roast in the oven for 15 minutes. Remove from oven and sprinkle the minced garlic onto the cooked mushrooms. Return the sheet to the oven and bake for an additional 5 minutes. Remove from oven, drizzle a little bit of balsamic vinegar evenly over mushrooms, and set aside.

Soften goat cheese at room temperature. (This can also be done in the microwave for a few seconds. Just be careful and watch it closely or your goat cheese will turn to liquid.) When goat cheese is at desired texture (i.e. easily spreadable) spread on pita rounds or on naan bread. Sprinkle chopped fresh basil over goat cheese layer. Add fresh sliced tomatoes and a few portobello slices. Fold and serve as a sandwich.


The Result:
Yet another gem to add to my vegetarian repertoire. The original recipe called for grilled portobellos, but I didn't feel like messing with the grill or a grill pan for that matter. I think it was just easier to stick the mushrooms in the oven and let them do their thing. I did link the original recipe above, just in case you would like to see the original method. Also, I thought it needed a boost so I added in the balsamic drizzle (not in the original recipe). Either way, these pitas were easy and delicious!

August 7, 2011

Quick and Easy Spicy Broiled Shrimp

My son is starting Kindergarten tomorrow, and I am waaaaayyyy more nervous about it than he is. I feel like it's my first day of school or something. We have everything all ready to go, but I'm still anxious/weepy/excited/happy/sad/hormonal about the whole situation. I can't believe my baby is so grown up!!! Where did the time go??? He was just born, wasn't he???? I'm a mess. Anyway, we are trying to have a relaxing last weekend before the school year kicks into full gear. We had this really easy shrimp dinner the other night; right smack-dab in the middle of all the back to school chaos. As the title promises, it really is a quick and easy shrimp recipe. What the title doesn't tell you is that it's also darn tasty. A perfect meal to put together if your mind is, oh say, preoccupied on things like Kindergarten; but you still would like a yummy, fuss-free dinner on the table.

Quick and Easy Spicy Broiled Shrimp
From: Kalyn's Kitchen website

Ingredients:
1/2 lb. frozen shrimp peeled and deveined with tails left on, thawed overnight in refrigerator
2 tsp. extra virgin olive oil (use your best olive oil for this)
1 lemon, cut in half
2 tsp. Worcestershire sauce
1/2 - 1 tsp. Tony Chachere's Creole Seasoning (or make your own Creole Seasoning Blend)
salt and fresh ground pepper to taste (NOTE: don't add salt if you're using Tony Chachere's seasoning that has salt)

Directions:
Thaw shrimp overnight in the refrigerator (or thaw in the bag in lukewarm water if you forget to plan ahead.) I used 31-40 count shrimp, so if you're lucky enough to find larger shrimp, increase the cooking time a tiny bit.

When you're ready to cook, remove shrimp from the refrigerator and drain in a colander placed in the sink, then use a paper towel to pat shrimp dry if they still seem wet. Preheat broiler and put the rack so it's as close to the broiler as possible.

Arrange the shrimp in a single layer on a baking sheet (or in two individual casserole dishes if you want to get a bit fancier.) I sprayed the casserole dishes with non-stick spray but it's probably not essential.

Once shrimp are arranged in a single layer, add seasonings in this order:
~drizzle shrimp with olive oil
~squeeze lemon juice over the shrimp (I used a squeezer that catches the seeds)
~sprinkle Worcestershire sauce over the shrimp
~sprinkle Creole Seasoning over the shrimp
~season with salt and fresh ground black pepper (skip the salt if you use Tony Chachere's Creole Seasoning which has salt)

Put shrimp under the broiler and cook for 7-8 minutes, or just until the shrimp turn pink and feel barely firm to the touch. Don't overcook. If your shrimp are larger than 31-40 count they may take a minute or two longer to cook, but not much.

Serve hot, with 100% whole wheat bread to mop up the juices if desired.


The Result:
I ended up making 2 lbs. of shrimp, since we had 5 people eating and I wanted some for leftover lunches the next day. I really love the Kalyn's Kitchen website...it really has some great recipes on it. This dish made the shrimp lovers in my house happy campers!

Grilled Halibut with Garlic, Basil, and Lemon

The best thing about summer, in my opinion, is grilled food. Give me something from the grill, and I am a happy woman. These halibut steaks are no exception. Really, this is a tasty way to prepare any grilled white fish; but I decided to experiment with the thick, "meaty"-like texture of halibut steaks. Halibut is a firm, mild fish that holds up really well on the hot grates of a barbeque. It's one of my favorite grillin' fish around (maybe I like swordfish better, but it's in the top two). This recipe was simple and delicious. We paired our fish with a Caprese salad and a glass of white wine after our kids were in bed for the evening. (It's not that they wouldn't have enjoyed our fish dinner, it's just that we decided to feed them early so we could enjoy our fish dinner by ourselves.) Yum!

Grilled Halibut with Garlic, Basil, and Lemon
From: Kalyn's Kitchen website

Ingredients:
4-6 halibut steaks
3/4 cup olive oil
1/4 cup lemon juice
2 tsp. coarse ground black pepper
2 tsp. Spike Seasoning (optional, but good)
2 T garlic puree (or slightly less garlic powder but I think the garlic puree from a jar gives better flavor)
1 T dried basil

Directions:
Thaw the fish completely in refrigerator if frozen. Mix marinade ingredients (oil through basil). Put fish in Zip-loc bag or plastic container with a snap-tight lid, arranging it in a single layer. Pour marinade over and marinate in refrigerator for 2-3 hours. (Turn it over a few times if you're home. Don't marinate it too much longer than this or the marinade will start to "cook" the fish.)

When you're ready to cook, take the fish out of the fridge and let it come to room temperature. Oil the grill grates generously with oil poured on to a paper towel, or use a non-stick spray made for the grill. Turn grill on to high and preheat while the fish comes to room temperature.

Turn the grill to medium-high when you are ready to put the fish on (or for a charcoal grill, you can only hold your hand there for a few seconds when it's hot enough to cook fish.) To get grill marks, lay the fish diagonally across grill grates; after first grill marks appear (about 3 minutes) rotate fish so it's laying diagonally the other way. After about 6 minutes carefully turn fish over to cook the other side.

Total cooking time for grilled fish is about 10 minutes per inch of thickness, but the best way to test is by lightly pressing on the fish with your finger; it should feel firm but not hard to the touch when it's done.

This marinade would also be good on shrimp, scallops, or chicken. Chicken could be marinated quite a bit longer; I would marinate shrimp or scallops for only about 2 hours.


The Result:
This was a really light and flavorful meal. The marinade was delicious, however mine got a little watered down since my fish wasn't thawed all the way in the middle. Also, I don't think my grill was nearly hot enough. Oops! Sometimes, the grill can be a fickle beast. Even with those little snafus, this recipe was great and SBD phase 1 friendly.

August 1, 2011

Grilled Chicken Salad with Rustic Guacamole, Romaine and Queso Anejo

Why, hello there. Have you missed me? I've missed all of you. Once again, life has been hectic around these parts. We are in the middle of some major real estate juggling, and that is no easy feat with three kids in tow. Also, my son is gearing up to start kindergarten in less than a week; so in addition to moving/packing, we are in full "yikes,school is starting soon" mode. Basically, I have been doing some fly-by-the-seat-of-my-pants cooking. Nothing exciting to post...unless you want to know exactly how I manage to whip up scrambled eggs for dinner.

I started South Beach Diet Phase 1 again, too. Well, I did. I lasted a week, and then I broke down and had some carbs (and alcohol). I needed to shed a few pounds fast before my 1/2 marathon in (eek!) 5 weeks. I took off 5 of the 8 pounds I set for my goal pre-race weight. Then, I caved in to temptation. I decided from now until the race I am going to try to stick with SBD phase 1, but if I have carbs now and again no biggie. I should still be able to lose the 3 extra pounds on a low/modified carb intake.

Enough about me. Let's talk about Rick Bayless...

I heart Rick Bayless (as I've mentioned several times). Every recipe just reconfirms my adoration. Someday I hope to eat at all of his restaurants...do a food vacation centered around Rick Bayless. That may sound a little extreme, but that is how much I l-o-v-e him. This chicken salad was fantastic. My BFF Claire made it last week, and reminded me of it in the Mexican Everyday cookbook. It is SBD Phase 1 friendly and it was delicious. RB took the pedestrian chicken Caesar salad and made it sing. Rick B. rocks!

Grilled Chicken Salad with Rustic Guacamole, Romaine and Queso Anejo
From: Mexican Everyday by: Rick Bayless

Ingredients:

DRESSING:
½ cup vegetable or olive oil, plus a little more for onion
4 garlic cloves, peeled and halved
Fresh hot green chiles to taste (I like 2 serranos or 1 large jalapeno), stemmed and halved
½ cup fresh lime juice
¾ cup (loosely packed) cilantro, roughly chopped
Salt
¼ teaspoon ground black pepper

GRILLED CHICKEN SALAD:
4 medium (about 1¼ pounds total) boneless, skinless chicken breast halves
1 medium white onion, cut into ½-half-inch slices
2 ripe avocados
8 cups romaine hearts, sliced crosswise at ½-inch thick
1/3 cup grated Mexican queso anejo or other garnishing cheese (Romano or Parmesan)

Directions:
Heat oil in small skillet over medium heat. Add garlic and chiles; cook, stirring frequently, until garlic is soft and lightly browned (usually 1 to 2 minutes). Pour oil, garlic and chiles into blender jar or food processor. Add lime juice, cilantro, black pepper, and 1 scant teaspoon salt. Process garlic mixture until smooth.

Pour 1/3 of garlic mixture over chicken breasts, spreading it evenly over all sides.

Heat a grill pan or gas grill to medium to medium-high heat (or start a charcoal fire and let it burn until coals are medium hot and covered with white ash). Lightly brush or spray onion slices with oil; sprinkle with salt. Lay chicken and onion on grill pan or grill. Cook until chicken is just cooked through and onion is well browned (3 to 4 minutes on each side). Chop onion into small pieces and scoop into bowl. Set the chicken aside to cool.

Pit and peel avocados, scooping flesh into bowl with onion. Add another 1/3 of garlic mixture, then coarsely mash everything together with old-fashioned potato masher, large fork or back of spoon. Taste and season with salt (usually about ½ teaspoon).

Scoop the sliced romaine into large bowl. Drizzle on remaining 1/3 of garlic mixture and toss to combine. Divide between 4 dinner plates. Scoop a portion of guacamole into center of each plate. Cut each breast into cubes and arrange over guacamole. Sprinkle each plate with garnishing cheese. Serve.


The Result:
It. was. awesome. I followed the recipe to the letter, and it was soooooo tasty. Each component was perfectly complimented by the next. It was very filling and satisfying; and I just love the idea of the salad dressing being used for the chicken marinade and in the guacamole. Yum. Try this salad...it will make you happy.