This is a variation on a standard recipe for breaded fish. I needed to amend it to lower the amount of net carbs, so I needed to mix the breadcrumbs as one of the main components. It's funny, but I think it was actually crisper and more flavorful than the normal breaded fish variations that I make. I forgot to take a photo, but it turned out to be golden-browned, baked fish goodness.
Low-Carb Pecan Tilapia
Ingredients:
cooking spray
1 cup of almond flour
1 cup of pecan halves
1 tbsp of garlic powder
1 tbsp of paparika
1 tbsp of tumeric
1 tsp of salt
1/2 tsp of pepper
1 tsp of lemon pepper seasoning
4 large tilapia fillets
1/2 cup of egg whites
1 whole egg
splash of water
(Note: I put all the spices in as a substitute for seasoned salt, so if you wanted to skip the spices just use a couple of tbsp of seasoned salt.)
Directions:
Preheat oven to 350 degrees. Prepare a baking sheet by placing a cooling rack on it and spraying the rack with cooking spray. Set aside.
In a food processor, combine almond flour, spices and pecans. Pulse until combined and pecans are chopped. Place mixture in a shallow bowl or dish.
Combine egg whites, egg, and a splash of water in a separate shallow bowl. Whisk to combine.
Coat tilapia in egg mixture then coat completely in pecan mixture, making sure to press the coating into the fish with your hands on both sides. Place coated fish onto baking sheet. Repeat with the remaining fillets. Spray the tops of the prepared fish with a light layer of cooking spray over the tops. Bake for 1/2 hour or until the fish flakes easily.
Showing posts with label SBD Phase 1. Show all posts
Showing posts with label SBD Phase 1. Show all posts
May 8, 2013


May 7, 2013
Buffalo Chicken BLAT Wraps
It was t-ball night again, so I packed these wraps as a picnic dinner at the ballpark. I wrapped the lettuce leaves in a gallon sized zip top bag with some damp paper towel, and then packaged up the rest in a divided Tupperware. It was a delicious, portable dinner that was healthy and satisfying.
Buffalo Chicken BLAT Wraps
Adapted From: Iowa Girl Eats website
Ingredients:
1 (1 lb.) package of chicken tenders
2 Tbsp of Ranch Seasoning Mix (see below)
2 teaspoons of bacon fat
Buffalo Wing Sauce (I like Frank’s Hot Sauce)
4-5 slices bacon, chopped
2 tomatoes
1 avocado
a splash of lemon juice
a splash of lime juice
salt and pepper to taste
hearts of romaine
Ranch Seasoning Mix:
dried tarragon
lemon pepper seasoning
garlic powder
dried chives
dried parsley
salt and pepper, to taste
Combine 1 tsp of each spice in a small, air tight bowl. Add salt and pepper to taste. Store with spices for up to a month.
Directions:
Cook bacon in a large cast iron skillet over medium heat until crispy. Drain on a paper towel-lined plate and set aside.
Drain some of the remaining bacon fat off (keep about 1 tsp), and heat the rest in the same skillet over medium-high heat.
Season chicken with Ranch Seasoning Mix and toss to coat. Add chicken to hot skillet and cook for 3-4 minutes a side, or until no longer pink in the middle. Remove chicken to a plate and let cool for a few minutes. Chop into bite-sized pieces and mix with just enough buffalo wing sauce to coat chicken pieces.
Cut tomatoes in half, then thinly slice. Sprinkle some Ranch Seasoning Mix over tomatoes and set aside.
Slice avocado in half, pop out the seed, peel, and thinly slice. Season avocado slices with a splash of lemon juice, a splash of lime juice, salt and pepper. Set aside.
Cut core off of romaine hearts, then rinse and pat dry.
Assemble wraps by placing chicken, bacon, tomato, and avocado inside romaine lettuce leaves.
Buffalo Chicken BLAT Wraps
Adapted From: Iowa Girl Eats website
Ingredients:
1 (1 lb.) package of chicken tenders
2 Tbsp of Ranch Seasoning Mix (see below)
2 teaspoons of bacon fat
Buffalo Wing Sauce (I like Frank’s Hot Sauce)
4-5 slices bacon, chopped
2 tomatoes
1 avocado
a splash of lemon juice
a splash of lime juice
salt and pepper to taste
hearts of romaine
Ranch Seasoning Mix:
dried tarragon
lemon pepper seasoning
garlic powder
dried chives
dried parsley
salt and pepper, to taste
Combine 1 tsp of each spice in a small, air tight bowl. Add salt and pepper to taste. Store with spices for up to a month.
Directions:
Cook bacon in a large cast iron skillet over medium heat until crispy. Drain on a paper towel-lined plate and set aside.
Drain some of the remaining bacon fat off (keep about 1 tsp), and heat the rest in the same skillet over medium-high heat.
Season chicken with Ranch Seasoning Mix and toss to coat. Add chicken to hot skillet and cook for 3-4 minutes a side, or until no longer pink in the middle. Remove chicken to a plate and let cool for a few minutes. Chop into bite-sized pieces and mix with just enough buffalo wing sauce to coat chicken pieces.
Cut tomatoes in half, then thinly slice. Sprinkle some Ranch Seasoning Mix over tomatoes and set aside.
Slice avocado in half, pop out the seed, peel, and thinly slice. Season avocado slices with a splash of lemon juice, a splash of lime juice, salt and pepper. Set aside.
Cut core off of romaine hearts, then rinse and pat dry.
Assemble wraps by placing chicken, bacon, tomato, and avocado inside romaine lettuce leaves.
Balsamic Glazed Steak Rolls


I've taken quite a long sabbatical off from eating right/working out and it's really caught up with me. While it was nice to "check out" mentally and physically, I think I've had enough. I'm ready to get back into the business of being healthy again. I've regained a decent chunk of the the weight I lost previously, and I'm now getting into the no-turning-back scary zone if I keep eating like crap and not focusing on regular exercise. Anyway, all this means is that I'm being more conscious about what I eat and more focused with my exercise routine. As part of that focus, I've decided to go fairly low-carb/low-cal for the next 30 days. I'm hoping this will give me a jump start so I can start to see some positive results on the scale. This is also good news, because I'll be trying some new recipes as well. Hooray! The first new recipe was these steak rolls, which were magically delicious. Really. So freaking tasty. This was the perfect dinner to kick start my plan to get back into healthy living!
Balsamic Glazed Steak Rolls
Adapted From: Picture the Recipe website via Pinterest
Ingredients:
1 (2 lb) skirt steak OR 8-10 thin sliced sirloin
Salt & Pepper (according to taste)
3 tbsp Worcestershire sauce
Any steak seasoning you like (I used Steak Magic)
1 tbsp olive oil
For the Veggie filling -
* 1 carrot
* 1 bell pepper
* 1/2-1 a zucchini (depending on size)
* 5-6 green onions
* 2 cloves of garlic
* 1 tsp Italian herb seasoning
For the Balsamic glaze sauce-
* 1-2 tsp bacon grease
* 2 tbsp finely chopped shallots
* 1/4 cup balsamic vinegar
* 1 tbsp honey
* 1/4 cup beef broth
Directions:
- Start by prepping the steak. (I used skirt steak cos it’s what I had on hand, but in hind sight, I probably would have gone for a more leaner cut like flank steak or looked for thin sliced sirloin.) I trimmed as much fat as I could and cut the steak into 3 inch wide strips. I managed 8 strips and used the odd shaped ends to taste test my marinade and balsamic glaze. You can then tenderize the meat with a meat hammer (if you’re using sirloin it doesn’t need any tenderizing).
- Season the steak pieces generously on both sides with salt, pepper and Worcestershire sauce. And let them sit in the marinade for at least 30 minutes if not a couple hours.
- While the steak is marinating you can prep the filling for them. Chop up the carrot, bell pepper and zucchini into matchstick size pieces, little longer than the width of the steak strips. I used a mandolin slicer to jet thin sliced and hand cut them to make matchsticks. I then cut the green onion in a similar size and sliced them in half length wise. For the garlic, simply peel and crush the cloves with the flat side of your knife, just enough to bruise them.
- Now for the sauce, melt the bacon grease in a small sauce pan on medium heat.
- Add the finely chopped shallot and saute it for a minute or 2 until they turn soft and translucent.
- Add the balsamic vinegar, honey and beef stock and stir to mix everything well.
- Allow the sauce to come to a boil and reduce to almost half its volume. You’ll notice it starts becoming thicker and have the consistency of syrup. The butter also starts separating and comes to the top. Turn the heat off and transfer the sauce to a bowl.
- In the same pan (no need to wash it) add a touch of olive oil and toss in the garlic cloves to allow them to flavor the oil for a few minutes.
- Turn the heat up to high and toss in the carrots, bell pepper and zucchini (there’s no need to cook the green onion) and stir fry the veggies for no longer than 2-3 minutes.
- Season them with the the Italian herb seasoning and salt and transfer the veggies to a bowl.
- To assemble the steak rolls, simply take a strip of the marinated steak and lay it with the short side towards you. Place the veggies (don't forget the green onion!) in the middle and oil the beef up over the filling, securing it with toothpick. Repeat the same with the other rolls.
- Heat a large skillet over medium-high heat. Add a touch of oil swirling to coat bottom. When hot, add beef rolls, seam side down, not touching and pan fry for a couple minutes. Then turn roll and cook it on all sides in the same way. Cook until you’re desired doneness. I cooked mine medium rare.
- Remove the toothpick and serve with the balsamic glaze sauce spooned over the top of each roll and any extra veggies.
August 19, 2012
Tuna-Stuffed Tomatoes

The husband and I have been diverting from our normally healthy diet for the past few months. So much so, that the bad habits have taken over and we've both seen a gradual weight gain over time. A pound here...a couple pounds there... and before I knew it, I've gained 25 pounds. Yeesh. It was really almost unnoticeable to let unhealthful foods creep back into our routine because they seem to be quicker/easier to obtain and don't require as much planning. A meal here and a snack there really adds up over time; especially since I wasn't paying attention to how/what I was consuming!
Well, I've decided enough and it's time to get back on track again. I asked the husband if he'd be up for a "Clean Eating Challenge" this week and he agreed. 'Clean Eating' for us just means that we will be consuming healthy, minimally processed whole foods. We are trying to pack as much nutrition in every bite as possible. Whole grains and complex carbs, lots of fruits and veggies (organic/local if possible), lean protein, small amounts of healthy fats, and a reduced sugar intake. The sugar we will have will be as natural and unprocessed as possible (i.e. honey, agave nectar, pure maple syrup, etc.) and in very small quantities. I've also decided to reduce my alcohol intake to just a glass or two of wine on a weekend night as a treat, instead of a glass or two of wine every night as the norm. Smaller portions and lower calorie intake are both also a big factor in our challenge.
I've planned a weeks worth of food choices for every meal and both snacks. These tuna stuffed tomatoes were my first attempt at a clean lunchtime meal. I really revised my normal tuna salad recipe and, surprisingly, I didn't miss the excess ingredients that were high in calories/fat. These stuffed tomatoes were delicious, filling and satisfying. The husband and I each had one for lunch and really enjoyed our meal. So far, so good!
Tuna-Stuffed Tomatoes
Ingredients:
2 (large) cans of tuna in water, drained
2 ribs celery, chopped finely
1/4 white onion, chopped finely
2 green onions, chopped finely
1/2 red bell pepper, chopped finely
2 T Dijon mustard
1/2 cup non fat plain Greek yogurt
1 T mayo
1 T lemon juice
2 T dill relish
salt and pepper to taste
2 large beefsteak or heirloom tomatoes
Directions:
Combine all ingredients in a bowl with the exception of the tomatoes and set aside. Cut the top of the tomatoes and hollow out the center core. Fill the tomato cavity with a heaping spoonful of tuna salad. Enjoy!
June 4, 2012
Chimichurri
I have several posts to update, but I thought I'd pop on here and give you an easy recipe. I need some uninterrupted time with my laptop, so I can get everything updated; but alas, I'm the mother of three small children and I hardly ever get a block of time where I can do that. (Okay here is an amendment: if I do get some time I'm usually cleaning/picking up the house/controlling chaos/napping/rocking back in forth in a fetal position.)
For right now, here is an easy Chimichurri recipe that I used as topping for some grilled steaks we had recently. I'm going to Maui in October for a wedding and I want to be bikini-ready...or at least tankini-ready. I'm doing a modified low-carb diet until then; it's actually a macro-nutrient cycling diet from the book Crack the Fat Loss Code by Wendy Chant. Anyway, I'm in the first week which is low-carb. This chimichurri (which if you don't know what that is, it's similar to a pesto sauce) was easy to whip up and would go well with any protein (chicken, fish, steak, etc.) main ingredient. It fits the low-carb profile and was really, really tasty. Even if you are not doing a low-carb diet, I would recommend this topping for a twist on grilled meats/poultry/fish. YUM!
Chimichurri
Adapted From: food.com, recipe #21151
Ingredients:
1 bunch of parsley (flat leaf or curly is fine)
1/2 bunch of cilantro
8 cloves garlic, smashed & peeled
3/4 cup extra virgin olive oil
1/4 cup red wine vinegar
1-2 Tablespoons lemon juice
1 tablespoon diced onion
1 teaspoon black pepper
1/2 teaspoon salt
Directions:
Pulse parsley and cilantro in a food processor to chop. Add remaining ingredients and blend. Separate sauce into equal parts.
(Use half for basting or marinade and use other half for table service).
For right now, here is an easy Chimichurri recipe that I used as topping for some grilled steaks we had recently. I'm going to Maui in October for a wedding and I want to be bikini-ready...or at least tankini-ready. I'm doing a modified low-carb diet until then; it's actually a macro-nutrient cycling diet from the book Crack the Fat Loss Code by Wendy Chant. Anyway, I'm in the first week which is low-carb. This chimichurri (which if you don't know what that is, it's similar to a pesto sauce) was easy to whip up and would go well with any protein (chicken, fish, steak, etc.) main ingredient. It fits the low-carb profile and was really, really tasty. Even if you are not doing a low-carb diet, I would recommend this topping for a twist on grilled meats/poultry/fish. YUM!
Chimichurri
Adapted From: food.com, recipe #21151
Ingredients:
1 bunch of parsley (flat leaf or curly is fine)
1/2 bunch of cilantro
8 cloves garlic, smashed & peeled
3/4 cup extra virgin olive oil
1/4 cup red wine vinegar
1-2 Tablespoons lemon juice
1 tablespoon diced onion
1 teaspoon black pepper
1/2 teaspoon salt
Directions:
Pulse parsley and cilantro in a food processor to chop. Add remaining ingredients and blend. Separate sauce into equal parts.
(Use half for basting or marinade and use other half for table service).
May 9, 2012
Fajita Shrimp Salad with Cilantro-Lime Dressing

I had a major dinner mishap last night; but thankfully, I was able to recover and come up with this tasty, tasty salad. I had menu planned and started preparing the Pioneer Woman's Shrimp Quesadillas, only to discover I did not have two of the main ingredients. I didn't take inventory before I went grocery shopping this week, and I thought I had both the El Pato sauce and tortillas on hand. It turns out that I didn't have either. Doh! As you can guess, it's pretty much impossible to make quesadillas without tortillas. Sadly, I didn't discover this little tidbit of info (i.e. the missing ingredients) until dinner was well underway. (Normally, I would have tried to make tortillas, however it was already 5:30pm and there just wasn't enough time.) I decided to serve my quesadilla filling over salad greens and concoct a dressing instead. The salad and dressing ended up both being hits. Totally delicious!!! Whew!!!
Fajita Shrimp Salad with Cilantro-Lime Dressing
Ingredients:
salad:
2 heads of chopped romaine lettuce, washed and dried
1-2 cups of shredded cheddar cheese
2 Tablespoons of canola oil
1 large onion, sliced
1 green bell pepper, sliced
1 red bell pepper, sliced
4 zucchini, cut into 1/2 inch pieces
1 lb. of raw shrimp, peel and deveined (I used large count)
1/2 jar of your favorite salsa
1/2 cup of fresh cilantro, chopped
3-4 Roma tomatoes, diced
salt and pepper to taste
1 can of black beans, rinsed and drained (optional)
1 diced avocado (optional)
dressing:
1/3 cup seasoned rice vinegar
1/4 cup lime juice
1 garlic clove
1 whole Chipotle chiles
2 teaspoons honey
1/2 teaspoon salt
3/4 cup olive oil
1 cup cilantro
Directions:
To cook the veggies/shrimp:
In a large bowl, add raw shrimp and salsa. Set aside to marinate while you prepare the vegetables.
In a cast iron skillet heat canola oil over medium-high heat. When oil is hot and shimmering, add onions and peppers. Cook until softened and slightly charred. Season with salt and pepper to taste. Remove onion and peppers to a large bowl and set aside to cool.
In the same skillet, add shrimp and salsa mixture. Cook the shrimp until pink and salsa has reduced to become thick and coat the shrimp. Remove to the same bowl that the onions and peppers are cooling in and set aside again.
Again, in the same skillet add a little more canola oil if necessary, but do not clean the skillet out completely. (You want all of the previous charred/cooked bits from veggies and shrimp in the pan.) When oil is hot, add zucchini, and cook until slightly charred and softened. (The zucchini should pick up the other cooked bits of flavor from the skillet.) Season with salt and pepper to taste and remove to the same shrimp/veggie bowl to cool. Add fresh, chopped cilantro to the bowl and stir to combine all the cooked ingredients.
To make the dressing:
In a food processor, add all dressing ingredients except for the olive oil. Pulse a few times to chop/combine everything. Once all the ingredients are well combined, switch the food processor to continuously spin and drizzle in the olive oil in the top of the processor. Once mixture is emulsified, turn food processor off and remove dressing to a mason jar. Store in the fridge for up to a week.
To assemble the salad:
Place chopped romaine on plates. Top with shredded cheese and diced tomatoes. Add a generous scoop of cooled veggies/shrimp mixture. (Add black beans and/or avocado, if desired.) Top with dressing and serve.
NOTE:
I would have added a can of rinsed/drained black beans if I would have had them on hand. Diced avocado would've been a great addition, as well. Maybe next time...
May 7, 2012
Grilled Chile-Lime Chicken

My weight has been slowly creeping back up by a few pounds here and there. It's gotten to be about 15 lb. gain so far, and it's enough to make me say ENOUGH! I've really not been paying much attention to what or how I've been eating, so it really is understandable. Also, I've been starving since this whole swim/bike/run thing has taken over my life. Luckily, this is the last week before my triathlon and my training is officially over. I can start to focus again on building muscle/weight training and eating smaller portions. To kickstart my efforts, I worked a few low-carb, healthy meals into the rotation this week. (I can't go totally no carb, because it ends up doing more harm than good for me.) This chicken marinade recipe was really tasty and easy to put together. This is a great summertime recipe, as well--not too heavy. All in all, I would put this down in the 'win' column. This was the perfect dinner to get me headed in the right direction.
Grilled Chile-Lime Chicken
From: bettycrocker.com via Pinterest
Ingredients:
2 teaspoons grated lime peel
1/4 cup lime juice
1/4 cup olive or vegetable oil
2 tablespoons chopped fresh cilantro
1/2 teaspoon sugar
1/2 teaspoon salt
1 small jalapeño chile, seeded, finely chopped
1 clove garlic, finely chopped
4 boneless skinless chicken breasts (1 1/4 lb)
Directions:
1.To make marinade, in shallow glass or plastic dish, or resealable food-storage plastic bag, mix all ingredients except chicken.
2.Between pieces of plastic wrap or waxed paper, place each chicken breast smooth side down; gently pound with flat side of meat mallet or rolling pin until about 1/4 inch thick. Add chicken to marinade; turn to coat. Cover dish or seal bag; refrigerate at least 30 minutes but no longer than 24 hours.
3.Heat coals or gas grill for direct heat. Remove chicken from marinade; discard marinade. Cover and grill chicken over medium heat 8 to 10 minutes, turning once, until juice of chicken is clear when center of thickest part is cut (170°F).
January 26, 2012
Turkey Lasagna with Zucchini "Noodles"
I've been alternating between stalling to write this post (via goofing around on the Internet) for most of the afternoon. Really, I guess I've been thinking about how to preface this post. It's not that this recipe wasn't good--it was--I just had some technical difficulties with it. I want to be truthful about my experience with this recipe, so here it goes.
I'm not sure if it was the recipe that wasn't solid, or my cooking skills last night. Either way, I had issues, man!
Okay, first the positives...The overall flavor was great, and it was SBD Phase 1 friendly. No one (read: my family) complained about not having actual "noodles" and I loved that this was a more healthful version of standard lasagna. I would give this an A+ for a flavor grade.
Now, the not-so-positives...
It. was. a. soupy. mess. Seriously, like super-soupy. (Haha! Say that three times fast...super-soupy, super-soupy, super-soupy.)
I followed the directions fairly precisely, but it is possible that I messed it up somewhere along the way. In the photo you can see the excess, watery sauce along the edges of the pan. I'm not sure how to fix that, since I did bake the zucchini slices as prescribed. Maybe my sauce itself was watery???? I don't know. The texture did not affect the flavor, but it did impede on my desire to have a clean kitchen. I had watery sauce everywhere, including bubbled over in the bottom of my oven. Once the food got on the plate, it looked pretty messy. Thankfully, we're not sticklers about presentation at my house.
Aside from the lack of neatness, this was good. I even had leftovers today for lunch, and it was still very tasty. I'm just mad that it was watery, I guess. Oh well! Like I said, that could just have been my issue and I wouldn't let my result deter you from making this yummy, filling, and very satisfying low-carb lasagna.
Turkey Lasagna with Zucchini "Noodles"
Adapted From: the Dashing Dish website
(Here is the link: http://www.dashingdish.com/2011/01/no-noodles-about-it-the-best-low-carb-lasagna/)
Ingredients:
For the Noodles:
6 large zucchini*, cut lengthwise into 1/8 inch strips, should resemble thick lasagna type “noodles”. (*SEE NOTE)
For the Meat Sauce:
1.25 lb lean ground turkey meat
1 lb. of Italian sausage (I used pork)
1 large onion, diced
2 cups fresh mushrooms
1/2 can tomato paste
1/2 (25 ounce) jar of spaghetti sauce (I used one with 70 calories per 1/2 cup serving)
5 cloves garlic, minced)
Salt and pepper, or to taste
*Optional seasoning: 2 tbs of Italian Seasoning (i.e. dried thyme, oregano, basil)
For the Cheese Layer:
1 (16 ounce) container light cottage cheese (or light ricotta cheese)
1/2 cup grated Parmesan cheese
3/4 cup shredded mozzarella cheese
*NOTE: If you don’t want to use zucchini for the ‘noodles’, you could also use a large eggplant, cut lengthwise into 1/8 inch strips, or 1 box no-boil lasagna noodles!
Directions:
For the noodle layer:
Preheat oven to 425 degrees. Spray a cookie sheet with non-stick cooking spray, arrange zucchini slices and season with salt and pepper. Bake zucchini slices for 5 minutes on each side, then remove from oven. Set zucchini slices aside and lower oven temperature to 375 degrees.
For the meat sauce layer:
In a large non-stick skillet, cook meat until it’s browned. To the skillet, add the veggies, seasonings, garlic, and spaghetti sauce. Add tomato paste. Simmer for about 10 minutes or until veggies start to soften, stirring occasionally.
For the cheesy layer:
Mix the cottage cheese and Parmesan cheese together (skip this step if using ricotta.)
Put it all together:
Spray a 9×13 baking dish with non-stick cooking spray. Begin by spreading 1/3 of the meat sauce in the bottom of the pan. Follow meat sauce with a layer of zucchini slices, followed by a layer of cottage (or ricotta) cheese. Repeat the layers until casserole dish is full. Sprinkle the mozzarella evenly over the top. Cover with foil and bake at 375 degrees for 1 hour.Remove foil and bake or broil another 5-10 minutes until cheese is browned. Remove from oven and let rest for about 10 minutes before slicing, and serve warm!

The Results:
Tasty, but moist. (See above rant.)
I'm not sure if it was the recipe that wasn't solid, or my cooking skills last night. Either way, I had issues, man!
Okay, first the positives...The overall flavor was great, and it was SBD Phase 1 friendly. No one (read: my family) complained about not having actual "noodles" and I loved that this was a more healthful version of standard lasagna. I would give this an A+ for a flavor grade.
Now, the not-so-positives...
It. was. a. soupy. mess. Seriously, like super-soupy. (Haha! Say that three times fast...super-soupy, super-soupy, super-soupy.)
I followed the directions fairly precisely, but it is possible that I messed it up somewhere along the way. In the photo you can see the excess, watery sauce along the edges of the pan. I'm not sure how to fix that, since I did bake the zucchini slices as prescribed. Maybe my sauce itself was watery???? I don't know. The texture did not affect the flavor, but it did impede on my desire to have a clean kitchen. I had watery sauce everywhere, including bubbled over in the bottom of my oven. Once the food got on the plate, it looked pretty messy. Thankfully, we're not sticklers about presentation at my house.
Aside from the lack of neatness, this was good. I even had leftovers today for lunch, and it was still very tasty. I'm just mad that it was watery, I guess. Oh well! Like I said, that could just have been my issue and I wouldn't let my result deter you from making this yummy, filling, and very satisfying low-carb lasagna.
Turkey Lasagna with Zucchini "Noodles"
Adapted From: the Dashing Dish website
(Here is the link: http://www.dashingdish.com/2011/01/no-noodles-about-it-the-best-low-carb-lasagna/)
Ingredients:
For the Noodles:
6 large zucchini*, cut lengthwise into 1/8 inch strips, should resemble thick lasagna type “noodles”. (*SEE NOTE)
For the Meat Sauce:
1.25 lb lean ground turkey meat
1 lb. of Italian sausage (I used pork)
1 large onion, diced
2 cups fresh mushrooms
1/2 can tomato paste
1/2 (25 ounce) jar of spaghetti sauce (I used one with 70 calories per 1/2 cup serving)
5 cloves garlic, minced)
Salt and pepper, or to taste
*Optional seasoning: 2 tbs of Italian Seasoning (i.e. dried thyme, oregano, basil)
For the Cheese Layer:
1 (16 ounce) container light cottage cheese (or light ricotta cheese)
1/2 cup grated Parmesan cheese
3/4 cup shredded mozzarella cheese
*NOTE: If you don’t want to use zucchini for the ‘noodles’, you could also use a large eggplant, cut lengthwise into 1/8 inch strips, or 1 box no-boil lasagna noodles!
Directions:
For the noodle layer:
Preheat oven to 425 degrees. Spray a cookie sheet with non-stick cooking spray, arrange zucchini slices and season with salt and pepper. Bake zucchini slices for 5 minutes on each side, then remove from oven. Set zucchini slices aside and lower oven temperature to 375 degrees.
For the meat sauce layer:
In a large non-stick skillet, cook meat until it’s browned. To the skillet, add the veggies, seasonings, garlic, and spaghetti sauce. Add tomato paste. Simmer for about 10 minutes or until veggies start to soften, stirring occasionally.
For the cheesy layer:
Mix the cottage cheese and Parmesan cheese together (skip this step if using ricotta.)
Put it all together:
Spray a 9×13 baking dish with non-stick cooking spray. Begin by spreading 1/3 of the meat sauce in the bottom of the pan. Follow meat sauce with a layer of zucchini slices, followed by a layer of cottage (or ricotta) cheese. Repeat the layers until casserole dish is full. Sprinkle the mozzarella evenly over the top. Cover with foil and bake at 375 degrees for 1 hour.Remove foil and bake or broil another 5-10 minutes until cheese is browned. Remove from oven and let rest for about 10 minutes before slicing, and serve warm!
The Results:
Tasty, but moist. (See above rant.)
January 25, 2012
Flax & Parmesan Pizza
Hello, post-moving/post-going to the gym sporadically/post-holiday/post-eating free-for-all/post-2011 butt jiggle. I am not happy to see you. This is a warning: you are not my friend, trunk-junk...so don't get too comfy back there. We will not be having a long-term relationship.
That was my oh-so-humorous attempt at letting you know I've gained 10 lbs. in the past few months. (Insert sad face here.) Well, I didn't have enough motivation to get rid of it before Christmas; but after a miserable half marathon performance by yours truly, I AM motivated to get rid of it now. Enter, South Beach Diet-Phase 1. Yes, I've flirted with SBD before. Yes, I had mixed feelings about it. This time, I just wanted to kick start the scale to move in the correct direction (i.e. down!). SBD is a healthy, fairly easy way to cut back on carbs and make the weight numbers get smaller.
Thankfully, Pinterest is around. There are tons of low carb food choices available on that website. We love pizza around here, and I was thrilled to find a low (net) carb version that was high in fiber. We topped our pizza with some sauteed veggies and a wee bit of bacon, but I'll get to that in a minute down in the 'ingredients' section. This was a great alternative to traditional pizza crust and one that I will make again when I need to take it easy on the carbs.
Flax & Parmesan Pizza
From: the I Breathe...I'm Hungry... blog via Pinterest
Ingredients:
1 cup flax meal (ground flax seeds)
2 eggs
1/2 cup finely grated Parmesan cheese
pinch of salt
Toppings:
pizza sauce (marinara)
mozzarella cheese, shredded
provolone cheese, shredded
sauteed onions, mushrooms, red bell peppers, and zucchini
5 slices of thick cut bacon, chopped up
grated Parmesan cheese for topping
Directions:
Mix all ingredients in a medium bowl. Press onto greased cookie sheet about 1/3 inch thick in a circle. Bake in a preheated 350 degree (F) oven for 8 minutes. Remove. Add toppings of your choice (see above for mine). Bake for another 15 minutes at 350. Remove from oven, cool, and eat.

The Result:
The husband and I loved this pizza, but not so much for my kiddos. I think the dark crust appearance threw them for a loop, and they poo-poo'd it a bit. Which is really just too dang bad; because kids or no kids, we (adults) really dug this version of low carb pizza and I am sure I will make it again.
That was my oh-so-humorous attempt at letting you know I've gained 10 lbs. in the past few months. (Insert sad face here.) Well, I didn't have enough motivation to get rid of it before Christmas; but after a miserable half marathon performance by yours truly, I AM motivated to get rid of it now. Enter, South Beach Diet-Phase 1. Yes, I've flirted with SBD before. Yes, I had mixed feelings about it. This time, I just wanted to kick start the scale to move in the correct direction (i.e. down!). SBD is a healthy, fairly easy way to cut back on carbs and make the weight numbers get smaller.
Thankfully, Pinterest is around. There are tons of low carb food choices available on that website. We love pizza around here, and I was thrilled to find a low (net) carb version that was high in fiber. We topped our pizza with some sauteed veggies and a wee bit of bacon, but I'll get to that in a minute down in the 'ingredients' section. This was a great alternative to traditional pizza crust and one that I will make again when I need to take it easy on the carbs.
Flax & Parmesan Pizza
From: the I Breathe...I'm Hungry... blog via Pinterest
Ingredients:
1 cup flax meal (ground flax seeds)
2 eggs
1/2 cup finely grated Parmesan cheese
pinch of salt
Toppings:
pizza sauce (marinara)
mozzarella cheese, shredded
provolone cheese, shredded
sauteed onions, mushrooms, red bell peppers, and zucchini
5 slices of thick cut bacon, chopped up
grated Parmesan cheese for topping
Directions:
Mix all ingredients in a medium bowl. Press onto greased cookie sheet about 1/3 inch thick in a circle. Bake in a preheated 350 degree (F) oven for 8 minutes. Remove. Add toppings of your choice (see above for mine). Bake for another 15 minutes at 350. Remove from oven, cool, and eat.
The Result:
The husband and I loved this pizza, but not so much for my kiddos. I think the dark crust appearance threw them for a loop, and they poo-poo'd it a bit. Which is really just too dang bad; because kids or no kids, we (adults) really dug this version of low carb pizza and I am sure I will make it again.
January 24, 2012
Cheese and Pesto Chicken
Yes, there has been a serious lack of recipes on here lately. I need to check the photos on my camera, because it's been so long since I've cooked anything new I can't even remember what new stuff I have made in the recent (or maybe not-so-recent) past. So in the interim of me getting my act together and uploading some new recipes and photos, I decided to pop on the old blog and at least post this easy, yummy dinner. I threw this dish together the other night out of necessity (I was missing some main ingredients for what I had planned to make originally...duh) and it turned out great. I didn't take a photo, but this was one tasty dish!
Cheese and Pesto Chicken
Ingredients:
cooking spray
4 chicken breasts
salt and pepper to taste
1/2 container of herbed soft cheese (I used Allouette brand)
1/2 jar of pesto
1 cup of shredded mozzarella cheese
Directions:
Spray baking dish with cooking spray. Place chicken breasts in bottom of dish and sprinkle with salt and pepper to taste. With a spatula, spread the herbed cheese over the seasoned breasts. Then top with pesto and cover dish with foil. Bake at 375 degrees for 20-25 minutes or until breasts are cooked through. When time is up, remove foil and sprinkle mozzarella cheese over top of cooked pesto chicken mixture. Switch oven over to broil and cook uncovered for another 2 minutes, or until cheese is melted, slightly browned and bubbly. Serve and enjoy!
The Result:
This was easy, fast, and delish! Also, we've started Phase 1 of South Beach Diet over again to lose some extra holiday pounds. This chicken recipe fits in nicely with the SBD repertoire; especially with our sides of salad and roasted asparagus. Yum!
Cheese and Pesto Chicken
Ingredients:
cooking spray
4 chicken breasts
salt and pepper to taste
1/2 container of herbed soft cheese (I used Allouette brand)
1/2 jar of pesto
1 cup of shredded mozzarella cheese
Directions:
Spray baking dish with cooking spray. Place chicken breasts in bottom of dish and sprinkle with salt and pepper to taste. With a spatula, spread the herbed cheese over the seasoned breasts. Then top with pesto and cover dish with foil. Bake at 375 degrees for 20-25 minutes or until breasts are cooked through. When time is up, remove foil and sprinkle mozzarella cheese over top of cooked pesto chicken mixture. Switch oven over to broil and cook uncovered for another 2 minutes, or until cheese is melted, slightly browned and bubbly. Serve and enjoy!
The Result:
This was easy, fast, and delish! Also, we've started Phase 1 of South Beach Diet over again to lose some extra holiday pounds. This chicken recipe fits in nicely with the SBD repertoire; especially with our sides of salad and roasted asparagus. Yum!
January 8, 2012
Grilled Bruschetta Chicken
I'm almost caught up on my blog posting! At least I'm up to this past Saturday's dinner.
This was a Pinterest recipe that I kept circling back to over and over again. I think I must have "pinned" it three or four times. I kept seeing it and thinking I needed to try it, but then I would get busy and forget about it. Well, the stars aligned and I found it again and decided to make it this past weekend. Also, it helped that I needed a "healthy" dinner to make since I'm back on the running/working out/eating right bandwagon. Healthy or not, this meal was pretty awesome. We all loved this chicken dish, kids included, which makes it a win in my book.
Grilled Bruschetta Chicken
Adapted From: the Kraft Foods website via The Girl Who Ate Everything
Ingredients:
4 small boneless skinless chicken breast halves
1/2 cup of Sun-Dried Tomato or Italian salad dressing, divided
1 Tablespoon of balsamic vinegar
2 tomato, finely chopped
1/2 cup shredded part-skim mozzarella cheese
1/4 cup chopped fresh basil or 1 tsp. dried basil leaves
Directions:
Place a large sheet of heavy-duty foil over half of grill grate; heat grill to medium heat. Meanwhile, place chicken in resealable plastic bag. Add 1/4 cup dressing and seal bag. Turn bag over several times to evenly coat chicken with dressing. Refrigerate 10 minutes (I marinate it all day if I remember in time). Remove chicken from bag; discard bag and dressing.
Grill chicken on uncovered side of grill for about 6 minutes. Meanwhile, combine remaining 1/4 dressing, balsamic vinegar, tomatoes, cheese, and basil.
Turn the chicken over and place cooked-side up, on foil on the grill. Top with tomato mixture. Close lid. Grill 8 minutes or until chicken is done.
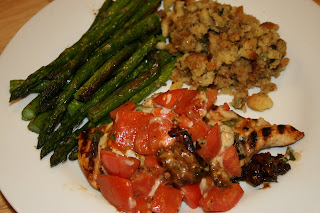
The Result:
Sooooo tasty and pretty easy to make! I used an indoor grill pan with a lid and it came together perfectly. We love, love, loved this dinner!
(Note: This is South Beach Diet phase 1 friendly as long as you keep the side dishes to legit SBD approved items. I wanted to get rid of a box of prepared stuffing, so ours was not SBD friendly. However, if I would have stuck to the veggies and chicken it would have been.)
This was a Pinterest recipe that I kept circling back to over and over again. I think I must have "pinned" it three or four times. I kept seeing it and thinking I needed to try it, but then I would get busy and forget about it. Well, the stars aligned and I found it again and decided to make it this past weekend. Also, it helped that I needed a "healthy" dinner to make since I'm back on the running/working out/eating right bandwagon. Healthy or not, this meal was pretty awesome. We all loved this chicken dish, kids included, which makes it a win in my book.
Grilled Bruschetta Chicken
Adapted From: the Kraft Foods website via The Girl Who Ate Everything
Ingredients:
4 small boneless skinless chicken breast halves
1/2 cup of Sun-Dried Tomato or Italian salad dressing, divided
1 Tablespoon of balsamic vinegar
2 tomato, finely chopped
1/2 cup shredded part-skim mozzarella cheese
1/4 cup chopped fresh basil or 1 tsp. dried basil leaves
Directions:
Place a large sheet of heavy-duty foil over half of grill grate; heat grill to medium heat. Meanwhile, place chicken in resealable plastic bag. Add 1/4 cup dressing and seal bag. Turn bag over several times to evenly coat chicken with dressing. Refrigerate 10 minutes (I marinate it all day if I remember in time). Remove chicken from bag; discard bag and dressing.
Grill chicken on uncovered side of grill for about 6 minutes. Meanwhile, combine remaining 1/4 dressing, balsamic vinegar, tomatoes, cheese, and basil.
Turn the chicken over and place cooked-side up, on foil on the grill. Top with tomato mixture. Close lid. Grill 8 minutes or until chicken is done.
The Result:
Sooooo tasty and pretty easy to make! I used an indoor grill pan with a lid and it came together perfectly. We love, love, loved this dinner!
(Note: This is South Beach Diet phase 1 friendly as long as you keep the side dishes to legit SBD approved items. I wanted to get rid of a box of prepared stuffing, so ours was not SBD friendly. However, if I would have stuck to the veggies and chicken it would have been.)
August 17, 2011
Slow Cooker Hungarian Pot Roast with Sour Cream and Paprika Gravy
Pot roast is one of my favorite comfort meals. It automatically brings me back to my childhood and family dinners with my grandparents. I usually make my mom's, or my grandma's, standard version of pot roast; never really venturing out to try new flavors. I figure the original is such a hit, why mess with what works???? Well, that was the old pot roast philosophy, at least. I think I may have a new way of thinking about it, thanks to this dish.
I think what caught my attention about this recipe, was the gravy. You see, I love paprika gravy. Actually, I love paprika in general. The color, the smell, the flavor...it's my favorite spice. I know I've shared this before but, if I had a prison/death row "last meal" request situation it would be for my mom's version of a childhood dish we call "Chicken Paprika"...mainly for the paprika gravy in that recipe. So, when I found a pot roast version with paprika gravy I knew I had to try it immediately.
Slow Cooker Hungarian Pot Roast with Sour Cream and Paprika Gravy
From: Kalyn's Kitchen website
Ingredients:
2 tsp. + 1 T olive oil
1 rump roast, about 2.5 pounds (trim visible fat if there is any)
generous amount of steak seasoning (about 1 T) to rub on roast before browning
4 large yellow onions, cut into slices at least 1/2 inch thick
2 T sweet Hungarian or Spanish paprika (or more)
1/2 tsp. sharp Hungarian paprika or smoked Spanish paprika (optional, but good)
1 jar (12 oz.) roasted red bell peppers
1 can (14.5 oz.) diced tomatoes with juice (I like petite dice for this)
2 cups homemade beef stock or low-sodium beef broth
fresh ground black pepper to taste
1 1/2 cups sour cream (I used light sour cream, do not use fat-free)
Directions:
Trim any visible fat from rump roast, then rub roast on all sides with steak seasoning. Heat 2 tsp. olive oil in heavy frying pan, add roast and brown well on all sides. (Don't rush this step., it may take 15-20 minutes to get the roast nicely browned.) When roast is well-browned, place in crockpot.
While roast browns, peel onions and cut into slices at least 1/2 inch thick. Heat additional 1 T olive oil in pan, then add onions and paprika and saute onions until lightly browned, turning often to brown all the onion slices. Put onions in crockpot on top of and around the roast. Add 2 cups beef stock to frying pan, scraping off any browned bits and simmering until beef stock is reduced to about 1 cup.
While onions brown and stock reduces, drain jar of roasted red peppers, then cut into lengthwise slices about 1/2 inch thick. Put sliced peppers and canned tomatoes into crockpot, seasoning with black pepper. When stock has reduced to about 1 cup, pour over top of crockpot ingredients.
Cook on high for about 4 hours, or until roast feels tender when pierced with a fork. When roast is tender, remove meat, let cool a few minutes, and then cut into thick slices. While meat cools enough to handle, strain liquid into a saucepan (catching the vegetables) and simmer over medium high heat to reduce for gravy. Add sliced meat and vegetables back into crockpot and keep warm.
****HERE IS WHERE I DEVIATED FROM THE RECIPE****SEE BELOW FOR MY VERSION****
When liquid has reduced by about half, whisk in sour cream. (Edit: A reader named Ned left the suggestion to add a small amount of the liquid to the sour cream and whisk together, then whisk that mixture back into the juice in the pan for easier combining without lumps. I think that sounds like a great idea.) Pour sour cream gravy back over meat and vegetables in crockpot and cook about 20-30 minutes more, or until heated through. Serve hot.

The Result:
The gravy was orgasmic. The husband and I were literally taking turns licking the empty saucepan as we were cleaning up the dinner dishes. The pot roast itself was delicious enough, with all the onions, peppers, and tomatoes...but that gravy pushed it over the top to awesome. Honestly, this was a little labor-intensive at first. There is a lot of prep work involved to just get this into the slow cooker, and then the gravy itself took awhile to make. However, it was sooooo fantastic! Totally worth the trouble!!!
I didn't follow the gravy instructions as written, but the rest of the recipe I followed as-is. I will note my difference below and in the directions with an asterisks.
This pot roast made me very happy!
****ALTERNATE METHOD FOR GRAVY:****
I let the pot roast liquid reduce by half (from 2 cups to 1 cup) and removed to a separate bowl. Temper in the container of light sour cream with the liquid and set the mixture aside.
In the saucepan, melt 2 tablespoons of butter. Sprinkle two tablespoons of AP flour over the melted butter and whisk to combine turning into a thick paste. Let flour/butter mixture cook for a couple of minutes. Continually whisk in the pot roast liquid and bring to a boil. Turn down the heat, while still whisking and let the gravy thicken to desired consistency. Season with salt and pepper to taste. Serve gravy on the side or pour gravy over meat in the slow cooker and serve immediately.
I think what caught my attention about this recipe, was the gravy. You see, I love paprika gravy. Actually, I love paprika in general. The color, the smell, the flavor...it's my favorite spice. I know I've shared this before but, if I had a prison/death row "last meal" request situation it would be for my mom's version of a childhood dish we call "Chicken Paprika"...mainly for the paprika gravy in that recipe. So, when I found a pot roast version with paprika gravy I knew I had to try it immediately.
Slow Cooker Hungarian Pot Roast with Sour Cream and Paprika Gravy
From: Kalyn's Kitchen website
Ingredients:
2 tsp. + 1 T olive oil
1 rump roast, about 2.5 pounds (trim visible fat if there is any)
generous amount of steak seasoning (about 1 T) to rub on roast before browning
4 large yellow onions, cut into slices at least 1/2 inch thick
2 T sweet Hungarian or Spanish paprika (or more)
1/2 tsp. sharp Hungarian paprika or smoked Spanish paprika (optional, but good)
1 jar (12 oz.) roasted red bell peppers
1 can (14.5 oz.) diced tomatoes with juice (I like petite dice for this)
2 cups homemade beef stock or low-sodium beef broth
fresh ground black pepper to taste
1 1/2 cups sour cream (I used light sour cream, do not use fat-free)
Directions:
Trim any visible fat from rump roast, then rub roast on all sides with steak seasoning. Heat 2 tsp. olive oil in heavy frying pan, add roast and brown well on all sides. (Don't rush this step., it may take 15-20 minutes to get the roast nicely browned.) When roast is well-browned, place in crockpot.
While roast browns, peel onions and cut into slices at least 1/2 inch thick. Heat additional 1 T olive oil in pan, then add onions and paprika and saute onions until lightly browned, turning often to brown all the onion slices. Put onions in crockpot on top of and around the roast. Add 2 cups beef stock to frying pan, scraping off any browned bits and simmering until beef stock is reduced to about 1 cup.
While onions brown and stock reduces, drain jar of roasted red peppers, then cut into lengthwise slices about 1/2 inch thick. Put sliced peppers and canned tomatoes into crockpot, seasoning with black pepper. When stock has reduced to about 1 cup, pour over top of crockpot ingredients.
Cook on high for about 4 hours, or until roast feels tender when pierced with a fork. When roast is tender, remove meat, let cool a few minutes, and then cut into thick slices. While meat cools enough to handle, strain liquid into a saucepan (catching the vegetables) and simmer over medium high heat to reduce for gravy. Add sliced meat and vegetables back into crockpot and keep warm.
****HERE IS WHERE I DEVIATED FROM THE RECIPE****SEE BELOW FOR MY VERSION****
When liquid has reduced by about half, whisk in sour cream. (Edit: A reader named Ned left the suggestion to add a small amount of the liquid to the sour cream and whisk together, then whisk that mixture back into the juice in the pan for easier combining without lumps. I think that sounds like a great idea.) Pour sour cream gravy back over meat and vegetables in crockpot and cook about 20-30 minutes more, or until heated through. Serve hot.
The Result:
The gravy was orgasmic. The husband and I were literally taking turns licking the empty saucepan as we were cleaning up the dinner dishes. The pot roast itself was delicious enough, with all the onions, peppers, and tomatoes...but that gravy pushed it over the top to awesome. Honestly, this was a little labor-intensive at first. There is a lot of prep work involved to just get this into the slow cooker, and then the gravy itself took awhile to make. However, it was sooooo fantastic! Totally worth the trouble!!!
I didn't follow the gravy instructions as written, but the rest of the recipe I followed as-is. I will note my difference below and in the directions with an asterisks.
This pot roast made me very happy!
****ALTERNATE METHOD FOR GRAVY:****
I let the pot roast liquid reduce by half (from 2 cups to 1 cup) and removed to a separate bowl. Temper in the container of light sour cream with the liquid and set the mixture aside.
In the saucepan, melt 2 tablespoons of butter. Sprinkle two tablespoons of AP flour over the melted butter and whisk to combine turning into a thick paste. Let flour/butter mixture cook for a couple of minutes. Continually whisk in the pot roast liquid and bring to a boil. Turn down the heat, while still whisking and let the gravy thicken to desired consistency. Season with salt and pepper to taste. Serve gravy on the side or pour gravy over meat in the slow cooker and serve immediately.
August 14, 2011
Grilled Pork Chops with Asian Black Bean-Garlic Marinade
This pork chop recipe had been on my menu plan for a couple of weeks now. I originally slated it when we were doing SBD phase 1, but I kept pushing it back because I couldn't find the black bean-garlic sauce. I finally got the chance to try a different grocery store and I was able to purchase the key ingredient. All in all, this marinade was really easy to whip up and was soooo tasty. The flavor was reminiscent of the Saito Chicken marinade we love, but a little more intense (which is a good thing). There is a high sodium content in the black bean-garlic sauce which, along with the other ingredients, basically brined our pork chops. I was afraid that the sodium was going to be too much, but it wasn't. (PS-don't taste the marinade beforehand...just trust me on this.) The meat turned out to be flavorful and juicy, not overly salty. Hooray! We served our chops with some steamed green beans and broccoli mixed together and had a very yummy dinner.
Grilled Pork Chops with Asian Black Bean-Garlic Marinade
Adapted from: The Bon Appetit Cookbook: Fast Easy Fresh via the Kalyn's Kitchen website
Ingredients:
4-8 thick cut pork chops, preferably bone-in (mine were boneless)
olive oil, for oiling grill grates
3 T Black Bean Garlic Sauce
2 tsp. minced garlic
1 1/2 T soy sauce
2 tsp. sesame seed oil
3 T fresh lime juice (I used my fresh-frozen lime juice)
1 T ginger puree
3 T peanut oil
Directions:
Trim any excess fat off the pork chops (leave a little bit on, but not much). Combine marinade ingredients. Put pork chops into a Ziploc bag (or a plastic container with a snap-tight lid) and pour marinade over. Let pork marinate in the refrigerator for 4-6 hours (or longer if you're away from home all day.)
When you're ready to cook the pork chops, remove the meat from the refrigerator and let it come to room temperature. Oil the grill grates with a paper towel dipped in olive oil, then preheat gas or charcoal grill to medium-high. (You can only hold your hand there for 2-3 seconds at that heat.) Lay pork chops on the grill at a diagonal to grill grates and cook 3-4 minutes or until grill marks appear, then rotate a quarter-turn and cook 3-4 minutes more to get second set of grill marks.
Turn pork chops over and cook 6-8 minutes more, or until internal temperature is about 145F on an instant-read meat thermometer. (I use my Polder Meat Thermometer with Probe and Timer to get the temperature just right.) If you don't have a meat thermometer, the pork should feel firm but not hard to the touch. You can cut a piece open to check and it should be barely pink inside. (For years I cooked pork to 160F, but now I like it only cooked to medium; if you want it more well done, cook just slightly longer.) Serve hot.

The Result:
So good! I actually made 8 boneless pork chops for this quantity of marinade, although the original recipe suggests a serving of only 4 chops. I think the marinade recipe is flexible enough to where it worked, but I don't think I would have stretched it anymore than that. This is another grilling favorite!
Grilled Pork Chops with Asian Black Bean-Garlic Marinade
Adapted from: The Bon Appetit Cookbook: Fast Easy Fresh via the Kalyn's Kitchen website
Ingredients:
4-8 thick cut pork chops, preferably bone-in (mine were boneless)
olive oil, for oiling grill grates
3 T Black Bean Garlic Sauce
2 tsp. minced garlic
1 1/2 T soy sauce
2 tsp. sesame seed oil
3 T fresh lime juice (I used my fresh-frozen lime juice)
1 T ginger puree
3 T peanut oil
Directions:
Trim any excess fat off the pork chops (leave a little bit on, but not much). Combine marinade ingredients. Put pork chops into a Ziploc bag (or a plastic container with a snap-tight lid) and pour marinade over. Let pork marinate in the refrigerator for 4-6 hours (or longer if you're away from home all day.)
When you're ready to cook the pork chops, remove the meat from the refrigerator and let it come to room temperature. Oil the grill grates with a paper towel dipped in olive oil, then preheat gas or charcoal grill to medium-high. (You can only hold your hand there for 2-3 seconds at that heat.) Lay pork chops on the grill at a diagonal to grill grates and cook 3-4 minutes or until grill marks appear, then rotate a quarter-turn and cook 3-4 minutes more to get second set of grill marks.
Turn pork chops over and cook 6-8 minutes more, or until internal temperature is about 145F on an instant-read meat thermometer. (I use my Polder Meat Thermometer with Probe and Timer to get the temperature just right.) If you don't have a meat thermometer, the pork should feel firm but not hard to the touch. You can cut a piece open to check and it should be barely pink inside. (For years I cooked pork to 160F, but now I like it only cooked to medium; if you want it more well done, cook just slightly longer.) Serve hot.
The Result:
So good! I actually made 8 boneless pork chops for this quantity of marinade, although the original recipe suggests a serving of only 4 chops. I think the marinade recipe is flexible enough to where it worked, but I don't think I would have stretched it anymore than that. This is another grilling favorite!
August 7, 2011
Quick and Easy Spicy Broiled Shrimp
My son is starting Kindergarten tomorrow, and I am waaaaayyyy more nervous about it than he is. I feel like it's my first day of school or something. We have everything all ready to go, but I'm still anxious/weepy/excited/happy/sad/hormonal about the whole situation. I can't believe my baby is so grown up!!! Where did the time go??? He was just born, wasn't he???? I'm a mess. Anyway, we are trying to have a relaxing last weekend before the school year kicks into full gear. We had this really easy shrimp dinner the other night; right smack-dab in the middle of all the back to school chaos. As the title promises, it really is a quick and easy shrimp recipe. What the title doesn't tell you is that it's also darn tasty. A perfect meal to put together if your mind is, oh say, preoccupied on things like Kindergarten; but you still would like a yummy, fuss-free dinner on the table.
Quick and Easy Spicy Broiled Shrimp
From: Kalyn's Kitchen website
Ingredients:
1/2 lb. frozen shrimp peeled and deveined with tails left on, thawed overnight in refrigerator
2 tsp. extra virgin olive oil (use your best olive oil for this)
1 lemon, cut in half
2 tsp. Worcestershire sauce
1/2 - 1 tsp. Tony Chachere's Creole Seasoning (or make your own Creole Seasoning Blend)
salt and fresh ground pepper to taste (NOTE: don't add salt if you're using Tony Chachere's seasoning that has salt)
Directions:
Thaw shrimp overnight in the refrigerator (or thaw in the bag in lukewarm water if you forget to plan ahead.) I used 31-40 count shrimp, so if you're lucky enough to find larger shrimp, increase the cooking time a tiny bit.
When you're ready to cook, remove shrimp from the refrigerator and drain in a colander placed in the sink, then use a paper towel to pat shrimp dry if they still seem wet. Preheat broiler and put the rack so it's as close to the broiler as possible.
Arrange the shrimp in a single layer on a baking sheet (or in two individual casserole dishes if you want to get a bit fancier.) I sprayed the casserole dishes with non-stick spray but it's probably not essential.
Once shrimp are arranged in a single layer, add seasonings in this order:
~drizzle shrimp with olive oil
~squeeze lemon juice over the shrimp (I used a squeezer that catches the seeds)
~sprinkle Worcestershire sauce over the shrimp
~sprinkle Creole Seasoning over the shrimp
~season with salt and fresh ground black pepper (skip the salt if you use Tony Chachere's Creole Seasoning which has salt)
Put shrimp under the broiler and cook for 7-8 minutes, or just until the shrimp turn pink and feel barely firm to the touch. Don't overcook. If your shrimp are larger than 31-40 count they may take a minute or two longer to cook, but not much.
Serve hot, with 100% whole wheat bread to mop up the juices if desired.
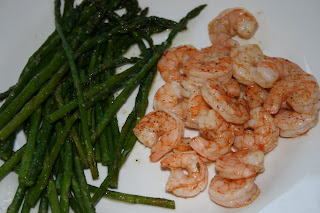
The Result:
I ended up making 2 lbs. of shrimp, since we had 5 people eating and I wanted some for leftover lunches the next day. I really love the Kalyn's Kitchen website...it really has some great recipes on it. This dish made the shrimp lovers in my house happy campers!
Quick and Easy Spicy Broiled Shrimp
From: Kalyn's Kitchen website
Ingredients:
1/2 lb. frozen shrimp peeled and deveined with tails left on, thawed overnight in refrigerator
2 tsp. extra virgin olive oil (use your best olive oil for this)
1 lemon, cut in half
2 tsp. Worcestershire sauce
1/2 - 1 tsp. Tony Chachere's Creole Seasoning (or make your own Creole Seasoning Blend)
salt and fresh ground pepper to taste (NOTE: don't add salt if you're using Tony Chachere's seasoning that has salt)
Directions:
Thaw shrimp overnight in the refrigerator (or thaw in the bag in lukewarm water if you forget to plan ahead.) I used 31-40 count shrimp, so if you're lucky enough to find larger shrimp, increase the cooking time a tiny bit.
When you're ready to cook, remove shrimp from the refrigerator and drain in a colander placed in the sink, then use a paper towel to pat shrimp dry if they still seem wet. Preheat broiler and put the rack so it's as close to the broiler as possible.
Arrange the shrimp in a single layer on a baking sheet (or in two individual casserole dishes if you want to get a bit fancier.) I sprayed the casserole dishes with non-stick spray but it's probably not essential.
Once shrimp are arranged in a single layer, add seasonings in this order:
~drizzle shrimp with olive oil
~squeeze lemon juice over the shrimp (I used a squeezer that catches the seeds)
~sprinkle Worcestershire sauce over the shrimp
~sprinkle Creole Seasoning over the shrimp
~season with salt and fresh ground black pepper (skip the salt if you use Tony Chachere's Creole Seasoning which has salt)
Put shrimp under the broiler and cook for 7-8 minutes, or just until the shrimp turn pink and feel barely firm to the touch. Don't overcook. If your shrimp are larger than 31-40 count they may take a minute or two longer to cook, but not much.
Serve hot, with 100% whole wheat bread to mop up the juices if desired.
The Result:
I ended up making 2 lbs. of shrimp, since we had 5 people eating and I wanted some for leftover lunches the next day. I really love the Kalyn's Kitchen website...it really has some great recipes on it. This dish made the shrimp lovers in my house happy campers!
Grilled Halibut with Garlic, Basil, and Lemon
The best thing about summer, in my opinion, is grilled food. Give me something from the grill, and I am a happy woman. These halibut steaks are no exception. Really, this is a tasty way to prepare any grilled white fish; but I decided to experiment with the thick, "meaty"-like texture of halibut steaks. Halibut is a firm, mild fish that holds up really well on the hot grates of a barbeque. It's one of my favorite grillin' fish around (maybe I like swordfish better, but it's in the top two). This recipe was simple and delicious. We paired our fish with a Caprese salad and a glass of white wine after our kids were in bed for the evening. (It's not that they wouldn't have enjoyed our fish dinner, it's just that we decided to feed them early so we could enjoy our fish dinner by ourselves.) Yum!
Grilled Halibut with Garlic, Basil, and Lemon
From: Kalyn's Kitchen website
Ingredients:
4-6 halibut steaks
3/4 cup olive oil
1/4 cup lemon juice
2 tsp. coarse ground black pepper
2 tsp. Spike Seasoning (optional, but good)
2 T garlic puree (or slightly less garlic powder but I think the garlic puree from a jar gives better flavor)
1 T dried basil
Directions:
Thaw the fish completely in refrigerator if frozen. Mix marinade ingredients (oil through basil). Put fish in Zip-loc bag or plastic container with a snap-tight lid, arranging it in a single layer. Pour marinade over and marinate in refrigerator for 2-3 hours. (Turn it over a few times if you're home. Don't marinate it too much longer than this or the marinade will start to "cook" the fish.)
When you're ready to cook, take the fish out of the fridge and let it come to room temperature. Oil the grill grates generously with oil poured on to a paper towel, or use a non-stick spray made for the grill. Turn grill on to high and preheat while the fish comes to room temperature.
Turn the grill to medium-high when you are ready to put the fish on (or for a charcoal grill, you can only hold your hand there for a few seconds when it's hot enough to cook fish.) To get grill marks, lay the fish diagonally across grill grates; after first grill marks appear (about 3 minutes) rotate fish so it's laying diagonally the other way. After about 6 minutes carefully turn fish over to cook the other side.
Total cooking time for grilled fish is about 10 minutes per inch of thickness, but the best way to test is by lightly pressing on the fish with your finger; it should feel firm but not hard to the touch when it's done.
This marinade would also be good on shrimp, scallops, or chicken. Chicken could be marinated quite a bit longer; I would marinate shrimp or scallops for only about 2 hours.

The Result:
This was a really light and flavorful meal. The marinade was delicious, however mine got a little watered down since my fish wasn't thawed all the way in the middle. Also, I don't think my grill was nearly hot enough. Oops! Sometimes, the grill can be a fickle beast. Even with those little snafus, this recipe was great and SBD phase 1 friendly.
Grilled Halibut with Garlic, Basil, and Lemon
From: Kalyn's Kitchen website
Ingredients:
4-6 halibut steaks
3/4 cup olive oil
1/4 cup lemon juice
2 tsp. coarse ground black pepper
2 tsp. Spike Seasoning (optional, but good)
2 T garlic puree (or slightly less garlic powder but I think the garlic puree from a jar gives better flavor)
1 T dried basil
Directions:
Thaw the fish completely in refrigerator if frozen. Mix marinade ingredients (oil through basil). Put fish in Zip-loc bag or plastic container with a snap-tight lid, arranging it in a single layer. Pour marinade over and marinate in refrigerator for 2-3 hours. (Turn it over a few times if you're home. Don't marinate it too much longer than this or the marinade will start to "cook" the fish.)
When you're ready to cook, take the fish out of the fridge and let it come to room temperature. Oil the grill grates generously with oil poured on to a paper towel, or use a non-stick spray made for the grill. Turn grill on to high and preheat while the fish comes to room temperature.
Turn the grill to medium-high when you are ready to put the fish on (or for a charcoal grill, you can only hold your hand there for a few seconds when it's hot enough to cook fish.) To get grill marks, lay the fish diagonally across grill grates; after first grill marks appear (about 3 minutes) rotate fish so it's laying diagonally the other way. After about 6 minutes carefully turn fish over to cook the other side.
Total cooking time for grilled fish is about 10 minutes per inch of thickness, but the best way to test is by lightly pressing on the fish with your finger; it should feel firm but not hard to the touch when it's done.
This marinade would also be good on shrimp, scallops, or chicken. Chicken could be marinated quite a bit longer; I would marinate shrimp or scallops for only about 2 hours.
The Result:
This was a really light and flavorful meal. The marinade was delicious, however mine got a little watered down since my fish wasn't thawed all the way in the middle. Also, I don't think my grill was nearly hot enough. Oops! Sometimes, the grill can be a fickle beast. Even with those little snafus, this recipe was great and SBD phase 1 friendly.
August 1, 2011
Grilled Chicken Salad with Rustic Guacamole, Romaine and Queso Anejo
Why, hello there. Have you missed me? I've missed all of you. Once again, life has been hectic around these parts. We are in the middle of some major real estate juggling, and that is no easy feat with three kids in tow. Also, my son is gearing up to start kindergarten in less than a week; so in addition to moving/packing, we are in full "yikes,school is starting soon" mode. Basically, I have been doing some fly-by-the-seat-of-my-pants cooking. Nothing exciting to post...unless you want to know exactly how I manage to whip up scrambled eggs for dinner.
I started South Beach Diet Phase 1 again, too. Well, I did. I lasted a week, and then I broke down and had some carbs (and alcohol). I needed to shed a few pounds fast before my 1/2 marathon in (eek!) 5 weeks. I took off 5 of the 8 pounds I set for my goal pre-race weight. Then, I caved in to temptation. I decided from now until the race I am going to try to stick with SBD phase 1, but if I have carbs now and again no biggie. I should still be able to lose the 3 extra pounds on a low/modified carb intake.
Enough about me. Let's talk about Rick Bayless...
I heart Rick Bayless (as I've mentioned several times). Every recipe just reconfirms my adoration. Someday I hope to eat at all of his restaurants...do a food vacation centered around Rick Bayless. That may sound a little extreme, but that is how much I l-o-v-e him. This chicken salad was fantastic. My BFF Claire made it last week, and reminded me of it in the Mexican Everyday cookbook. It is SBD Phase 1 friendly and it was delicious. RB took the pedestrian chicken Caesar salad and made it sing. Rick B. rocks!
Grilled Chicken Salad with Rustic Guacamole, Romaine and Queso Anejo
From: Mexican Everyday by: Rick Bayless
Ingredients:
DRESSING:
½ cup vegetable or olive oil, plus a little more for onion
4 garlic cloves, peeled and halved
Fresh hot green chiles to taste (I like 2 serranos or 1 large jalapeno), stemmed and halved
½ cup fresh lime juice
¾ cup (loosely packed) cilantro, roughly chopped
Salt
¼ teaspoon ground black pepper
GRILLED CHICKEN SALAD:
4 medium (about 1¼ pounds total) boneless, skinless chicken breast halves
1 medium white onion, cut into ½-half-inch slices
2 ripe avocados
8 cups romaine hearts, sliced crosswise at ½-inch thick
1/3 cup grated Mexican queso anejo or other garnishing cheese (Romano or Parmesan)
Directions:
Heat oil in small skillet over medium heat. Add garlic and chiles; cook, stirring frequently, until garlic is soft and lightly browned (usually 1 to 2 minutes). Pour oil, garlic and chiles into blender jar or food processor. Add lime juice, cilantro, black pepper, and 1 scant teaspoon salt. Process garlic mixture until smooth.
Pour 1/3 of garlic mixture over chicken breasts, spreading it evenly over all sides.
Heat a grill pan or gas grill to medium to medium-high heat (or start a charcoal fire and let it burn until coals are medium hot and covered with white ash). Lightly brush or spray onion slices with oil; sprinkle with salt. Lay chicken and onion on grill pan or grill. Cook until chicken is just cooked through and onion is well browned (3 to 4 minutes on each side). Chop onion into small pieces and scoop into bowl. Set the chicken aside to cool.
Pit and peel avocados, scooping flesh into bowl with onion. Add another 1/3 of garlic mixture, then coarsely mash everything together with old-fashioned potato masher, large fork or back of spoon. Taste and season with salt (usually about ½ teaspoon).
Scoop the sliced romaine into large bowl. Drizzle on remaining 1/3 of garlic mixture and toss to combine. Divide between 4 dinner plates. Scoop a portion of guacamole into center of each plate. Cut each breast into cubes and arrange over guacamole. Sprinkle each plate with garnishing cheese. Serve.

The Result:
It. was. awesome. I followed the recipe to the letter, and it was soooooo tasty. Each component was perfectly complimented by the next. It was very filling and satisfying; and I just love the idea of the salad dressing being used for the chicken marinade and in the guacamole. Yum. Try this salad...it will make you happy.
I started South Beach Diet Phase 1 again, too. Well, I did. I lasted a week, and then I broke down and had some carbs (and alcohol). I needed to shed a few pounds fast before my 1/2 marathon in (eek!) 5 weeks. I took off 5 of the 8 pounds I set for my goal pre-race weight. Then, I caved in to temptation. I decided from now until the race I am going to try to stick with SBD phase 1, but if I have carbs now and again no biggie. I should still be able to lose the 3 extra pounds on a low/modified carb intake.
Enough about me. Let's talk about Rick Bayless...
I heart Rick Bayless (as I've mentioned several times). Every recipe just reconfirms my adoration. Someday I hope to eat at all of his restaurants...do a food vacation centered around Rick Bayless. That may sound a little extreme, but that is how much I l-o-v-e him. This chicken salad was fantastic. My BFF Claire made it last week, and reminded me of it in the Mexican Everyday cookbook. It is SBD Phase 1 friendly and it was delicious. RB took the pedestrian chicken Caesar salad and made it sing. Rick B. rocks!
Grilled Chicken Salad with Rustic Guacamole, Romaine and Queso Anejo
From: Mexican Everyday by: Rick Bayless
Ingredients:
DRESSING:
½ cup vegetable or olive oil, plus a little more for onion
4 garlic cloves, peeled and halved
Fresh hot green chiles to taste (I like 2 serranos or 1 large jalapeno), stemmed and halved
½ cup fresh lime juice
¾ cup (loosely packed) cilantro, roughly chopped
Salt
¼ teaspoon ground black pepper
GRILLED CHICKEN SALAD:
4 medium (about 1¼ pounds total) boneless, skinless chicken breast halves
1 medium white onion, cut into ½-half-inch slices
2 ripe avocados
8 cups romaine hearts, sliced crosswise at ½-inch thick
1/3 cup grated Mexican queso anejo or other garnishing cheese (Romano or Parmesan)
Directions:
Heat oil in small skillet over medium heat. Add garlic and chiles; cook, stirring frequently, until garlic is soft and lightly browned (usually 1 to 2 minutes). Pour oil, garlic and chiles into blender jar or food processor. Add lime juice, cilantro, black pepper, and 1 scant teaspoon salt. Process garlic mixture until smooth.
Pour 1/3 of garlic mixture over chicken breasts, spreading it evenly over all sides.
Heat a grill pan or gas grill to medium to medium-high heat (or start a charcoal fire and let it burn until coals are medium hot and covered with white ash). Lightly brush or spray onion slices with oil; sprinkle with salt. Lay chicken and onion on grill pan or grill. Cook until chicken is just cooked through and onion is well browned (3 to 4 minutes on each side). Chop onion into small pieces and scoop into bowl. Set the chicken aside to cool.
Pit and peel avocados, scooping flesh into bowl with onion. Add another 1/3 of garlic mixture, then coarsely mash everything together with old-fashioned potato masher, large fork or back of spoon. Taste and season with salt (usually about ½ teaspoon).
Scoop the sliced romaine into large bowl. Drizzle on remaining 1/3 of garlic mixture and toss to combine. Divide between 4 dinner plates. Scoop a portion of guacamole into center of each plate. Cut each breast into cubes and arrange over guacamole. Sprinkle each plate with garnishing cheese. Serve.
The Result:
It. was. awesome. I followed the recipe to the letter, and it was soooooo tasty. Each component was perfectly complimented by the next. It was very filling and satisfying; and I just love the idea of the salad dressing being used for the chicken marinade and in the guacamole. Yum. Try this salad...it will make you happy.
May 20, 2011
Almond and Parmesan Tilapia
My enthusiasm for SBD Phase 1 is pretty much gone. I caved and had some yummy whole wheat toast this morning. I swear after almost two weeks of carb deprivation, I almost felt drunk from the carb high. I think I am just going to progress to Phase 2 and call it good. Phase 2 is simply adding back carbs slowly, at first once a day then so on. I lost 6 pounds total on Phase 1, which is not too shabby. It got me past my plateau, which is what I really wanted. We still had this Phase 1 friendly dinner last night and it was really satisfying. I love tilapia. I will say I have gotten a lot of keeper recipes through this whole experience, which is a reward in itself.
Almond and Parmesan Tilapia
Adapted From: the Kalyn's Kitchen website
Ingredients:
3-4 Tilapia filets, thawed if frozen (This recipe will work best with pieces that are at least 1/2 inch thick.)
1/4 cup melted butter
1/2 cup almond meal (such as Bob's Red Mill Almond Meal) OR ground raw almonds (SEE NOTES)
2 T finely grated Parmesan or Asiago cheese
1 tsp. garlic
1 tsp. lemon pepper
tsp. Old Bay seasoning
salt and pepper to taste
wedges of fresh lemon, for garnish
Directions:
Preheat oven to 425. Place baking rack on half sheet pan and spray with non stick spray. Set aside.
Melt the butter in the microwave for 30 seconds. Mix almond meal (or ground almonds--see notes), cheese, garlic powder, lemon pepper,Old Bay seasoning, and salt and pepper to taste, in a flat dish.
Dip each fish filet in butter, turning to coat both sides, then into almond mixture. Try to get as much of the almond mixture to stick to the fish as you can. (I pressed it down with a fork.) Place each coated fillet on prepared baking rack.
Bake 25 minutes or until fish is firm to the touch and coating is golden brown. The baking time will depend on the thickness of the fish, so watch it carefully. Serve with a squeeze of fresh lemon and enjoy!
NOTES: I could not find almond meal, so I put a handful of raw almonds in the food processor, and ground finely. This worked as a great substitution and gave a nice crunch to the fish.

The Result:
This was really yummy and everyone in my family loved it. My kids breezed through the fish and asked for seconds. I don't know why it didn't occur to me earlier in the whole Phase 1 process to plan more fish items. Oh well...live and learn. This tilapia dish is a keeper that we really enjoyed.
Almond and Parmesan Tilapia
Adapted From: the Kalyn's Kitchen website
Ingredients:
3-4 Tilapia filets, thawed if frozen (This recipe will work best with pieces that are at least 1/2 inch thick.)
1/4 cup melted butter
1/2 cup almond meal (such as Bob's Red Mill Almond Meal) OR ground raw almonds (SEE NOTES)
2 T finely grated Parmesan or Asiago cheese
1 tsp. garlic
1 tsp. lemon pepper
tsp. Old Bay seasoning
salt and pepper to taste
wedges of fresh lemon, for garnish
Directions:
Preheat oven to 425. Place baking rack on half sheet pan and spray with non stick spray. Set aside.
Melt the butter in the microwave for 30 seconds. Mix almond meal (or ground almonds--see notes), cheese, garlic powder, lemon pepper,Old Bay seasoning, and salt and pepper to taste, in a flat dish.
Dip each fish filet in butter, turning to coat both sides, then into almond mixture. Try to get as much of the almond mixture to stick to the fish as you can. (I pressed it down with a fork.) Place each coated fillet on prepared baking rack.
Bake 25 minutes or until fish is firm to the touch and coating is golden brown. The baking time will depend on the thickness of the fish, so watch it carefully. Serve with a squeeze of fresh lemon and enjoy!
NOTES: I could not find almond meal, so I put a handful of raw almonds in the food processor, and ground finely. This worked as a great substitution and gave a nice crunch to the fish.
The Result:
This was really yummy and everyone in my family loved it. My kids breezed through the fish and asked for seconds. I don't know why it didn't occur to me earlier in the whole Phase 1 process to plan more fish items. Oh well...live and learn. This tilapia dish is a keeper that we really enjoyed.
May 18, 2011
Mediterranean Meatballs
I think this may be my favorite recipe from SBD, so far. The flavor in these meatballs really resonated with me. Best of all, they were fairly easy and quick to get together; so it was a perfect dinner for a busy weeknight.
Mediterranean Meatballs
Adapted From: Lucullian Delights-An Italian Experience website
Ingredients:
1 lb. lean ground beef
1/4 cup egg whites
1/2 cup minced, dried onions
2 garlic cloves, minced
3 Tablespoons of capers, drained and rinsed
6 whole sun dried tomatoes, drained of oil
1 tsp dried oregano
1 tsp dried thyme
1 tsp dried basil
salt and pepper to taste
1 cup of mozzarella shredded OR mozzarella diced into cubes (you could even use the small, fresh mozzarella balls)
Directions:
Prepare a small bowl with tepid water and put the sun-dried tomatoes and capers in until covered. Leave to soak for 20-30 minutes.
Position an oven rack in the lower 1/3 of the oven. Preheat the oven to 400 degrees F. Line a baking sheet with parchment paper.
Drain the sun-dried tomato/caper mixture of water, and place on a cutting board. Chop the tomatoes/capers finely and place in a large bowl. Add ground beef, minced onions, garlic, oregano, thyme, basil, egg whites, and salt and pepper to taste. Mix until all ingredients are well combined.
Take a palm full of meat and create a divot in the middle of the meat patty. Add a pinch of shredded cheese (or a piece of cheese if not using shredded) and form the meat around the cheese. Repeat until all your meat and cheese is used. Place formed meatballs onto the prepared baking sheet. Bake the meatballs for 15 minutes, or until fully cooked through.

The Result:
These were fantastic! We loved these meatballs and literally ate them all up. I was sad that there were not any leftovers for my lunch today.
Mediterranean Meatballs
Adapted From: Lucullian Delights-An Italian Experience website
Ingredients:
1 lb. lean ground beef
1/4 cup egg whites
1/2 cup minced, dried onions
2 garlic cloves, minced
3 Tablespoons of capers, drained and rinsed
6 whole sun dried tomatoes, drained of oil
1 tsp dried oregano
1 tsp dried thyme
1 tsp dried basil
salt and pepper to taste
1 cup of mozzarella shredded OR mozzarella diced into cubes (you could even use the small, fresh mozzarella balls)
Directions:
Prepare a small bowl with tepid water and put the sun-dried tomatoes and capers in until covered. Leave to soak for 20-30 minutes.
Position an oven rack in the lower 1/3 of the oven. Preheat the oven to 400 degrees F. Line a baking sheet with parchment paper.
Drain the sun-dried tomato/caper mixture of water, and place on a cutting board. Chop the tomatoes/capers finely and place in a large bowl. Add ground beef, minced onions, garlic, oregano, thyme, basil, egg whites, and salt and pepper to taste. Mix until all ingredients are well combined.
Take a palm full of meat and create a divot in the middle of the meat patty. Add a pinch of shredded cheese (or a piece of cheese if not using shredded) and form the meat around the cheese. Repeat until all your meat and cheese is used. Place formed meatballs onto the prepared baking sheet. Bake the meatballs for 15 minutes, or until fully cooked through.
The Result:
These were fantastic! We loved these meatballs and literally ate them all up. I was sad that there were not any leftovers for my lunch today.
Chicken Capri
What type of meat and cheese did we have last night, you ask???? It was chicken and cheese. Honestly, I think I am going to take a meat and cheese sabbatical when Phase 1 of SBD is over. Be prepared for some vegetarian, pasta, and seafood goodies next week, people. Despite the fact that I am getting a little tired of meat and cheese, this chicken was really good. I think my favorite part of this meal was the yummy roasted asparagus. The SBD has really made me appreciate fruits and vegetables.
Chicken Capri
Adapted From: fatsecret.com; By: anicolet via The South Beach Diet Cookbook
Ingredients:
4 slices mozzarella cheese or 1 cup of shredded mozzerella
1 cup ricotta, skim
1 tablespoon garlic powder (more if needed)
1 tsp ground oregano
1/2 cup fresh basil leaves
salt and pepper to taste
2 tablespoons of olive oil or any neutral-flavored oil (I used grapeseed)
4 breasts, bone and skin removed chicken breasts
1 cup chopped or sliced tomatoes
Directions:
Preheat the oven to 350 degrees.
In a blender or food processor, combine the ricotta with the oregano, basil leaves, and a pinch of salt and pepper. Process to blend and set aside.
Rub the chicken with the garlic powder. Heat the oil in a large skillet over medium-high heat. Add the chicken and cook for 6 minutes per side, or until browned.
Place the chicken breasts, side by side, in a large baking dish, let cool slightly.
Spoon 1/4 cup of the cheese mixture and 1/4 cup tomatoes onto each chicken breast. Top each chicken breast with 1 slice mozzarella (or 1/4 cup of mozzarella if you are using shredded).
Bake for 20 minutes, or until a thermometer inserted in the thickest portion of a breast registers 170° F (75° C) and the juices run clear.


The Result:
This was tasty, and it probably would have gone over a little better if I wasn't doing SBD Phase 1. As I mentioned above, the overload of meat and cheese is getting to me. I am usually not a huge ricotta fan, but I think it worked well in this application (although, I did add some fresh basil to it). This would be something I would make again...but only after I have been meat and cheese-free for awhile.
Chicken Capri
Adapted From: fatsecret.com; By: anicolet via The South Beach Diet Cookbook
Ingredients:
4 slices mozzarella cheese or 1 cup of shredded mozzerella
1 cup ricotta, skim
1 tablespoon garlic powder (more if needed)
1 tsp ground oregano
1/2 cup fresh basil leaves
salt and pepper to taste
2 tablespoons of olive oil or any neutral-flavored oil (I used grapeseed)
4 breasts, bone and skin removed chicken breasts
1 cup chopped or sliced tomatoes
Directions:
Preheat the oven to 350 degrees.
In a blender or food processor, combine the ricotta with the oregano, basil leaves, and a pinch of salt and pepper. Process to blend and set aside.
Rub the chicken with the garlic powder. Heat the oil in a large skillet over medium-high heat. Add the chicken and cook for 6 minutes per side, or until browned.
Place the chicken breasts, side by side, in a large baking dish, let cool slightly.
Spoon 1/4 cup of the cheese mixture and 1/4 cup tomatoes onto each chicken breast. Top each chicken breast with 1 slice mozzarella (or 1/4 cup of mozzarella if you are using shredded).
Bake for 20 minutes, or until a thermometer inserted in the thickest portion of a breast registers 170° F (75° C) and the juices run clear.
The Result:
This was tasty, and it probably would have gone over a little better if I wasn't doing SBD Phase 1. As I mentioned above, the overload of meat and cheese is getting to me. I am usually not a huge ricotta fan, but I think it worked well in this application (although, I did add some fresh basil to it). This would be something I would make again...but only after I have been meat and cheese-free for awhile.
May 17, 2011
Mexican Jumping Beans
I going to try and keep this post short, since I only have a small window of time to complete my update. All three of my kids are momentarily entertaining themselves and I know it won't last very long.
The title of this recipe piqued my curiosity. For the record, these beans don't really "jump"...but they sure were a tasty side dish with our Quick and Easy Mexican Chicken last night!
Mexican Jumping Beans
Adapted From: Food.com; By: TheDancingCook on November 10, 2004
Ingredients:
1 small onion, chopped
1 green pepper, chopped
2 cloves garlic, minced
1 teaspoon olive oil
2 (15 ounce) cans red kidney beans, drained and rinsed
1 cup water
1 tablespoons chili powder
1 tablespoon taco seasoning
low-fat Mexican cheese blend, for topping
diced green onions, for garnish (optional)
chopped fresh cilantro, for garnish (optional)
Directions:
In a medium saucepan, saute the pepper, onion and garlic in olive oil until crisp-tender.
Add beans, water and seasoning; simmer on low to medium heat until thickened (about 10 minutes).
Top with cheese, cilantro, and green onions. Serve and enjoy!

The Result:
This was a tasty bean side dish that is SBD Phase 1-friendly. My kids really loved it and it was fast to put together. Score!!!!
The title of this recipe piqued my curiosity. For the record, these beans don't really "jump"...but they sure were a tasty side dish with our Quick and Easy Mexican Chicken last night!
Mexican Jumping Beans
Adapted From: Food.com; By: TheDancingCook on November 10, 2004
Ingredients:
1 small onion, chopped
1 green pepper, chopped
2 cloves garlic, minced
1 teaspoon olive oil
2 (15 ounce) cans red kidney beans, drained and rinsed
1 cup water
1 tablespoons chili powder
1 tablespoon taco seasoning
low-fat Mexican cheese blend, for topping
diced green onions, for garnish (optional)
chopped fresh cilantro, for garnish (optional)
Directions:
In a medium saucepan, saute the pepper, onion and garlic in olive oil until crisp-tender.
Add beans, water and seasoning; simmer on low to medium heat until thickened (about 10 minutes).
Top with cheese, cilantro, and green onions. Serve and enjoy!
The Result:
This was a tasty bean side dish that is SBD Phase 1-friendly. My kids really loved it and it was fast to put together. Score!!!!
Subscribe to:
Posts (Atom)