I bet you thought I forgot about my casserole series, didn't you???? Well, I didn't. We just hadn't had any good casseroles pop up on the menu plan lately. I decided to bust this one out just in time for Thanksgiving. You're welcome!!!
This is my favorite green bean casserole recipe. It is traditional enough to satisfy the typical, holiday green bean casserole requirement...but with a twist. I loosely based this concoction on a side dish recipe that my friend, Dani gave to me a few years ago. I say loosely because I meant to follow Dani's recipe, but I got a little sidetracked. Usually, when preparing something from an actual recipe, I start out with the right intention. I want to make the dish as it is written--I really do---but it sometimes doesn't work out that way. I don't have patience for reading directions or ingredients lists thoroughly. I typically miss something, or I don't have something I need on hand, or I have something else that needs to be used up. Yeah, that's just how it goes most of the time, AND that is exactly what happened in this case. I had the caramelized onions to use up and I was out of some of the other "casserole" ingreidents. I decided to go ahead and make my own spin on this classic recipe and, thankfully, it was delicious. Whew!
Casserole Series #2: Holiday Green Bean Casserole
Ingredients:
2 tablespoons butter
2 tablespoons AP flour
1 cup milk (more if needed to thin the sauce)
salt and pepper to taste
1/2 lb. of shredded Swiss or Gruyere cheese (I used a combo of both)
1 cup of sour cream
1 cup of caramelized onions
2-3 small bags of frozen green beans, thawed
1 tablespoon butter
1/2 cup cracker crumbs (I used butter crackers, such as Ritz)
1 cup of fried, dried onion topping
cooking spray
Directions:
Preheat oven to 400 degrees and spray a 9 x 13 casserole dish with cooking spray. Set aside.
In a small microwave safe bowl, melt 1 tablespoon of butter. Mix in cracker crumbs, until all are coated. Set aside.
Melt 2 tablespoons of butter in a saucepan over medium high heat. Add 2 tablespoons of AP flour. Cook for a couple of minutes, until the flour is starting to turn a light beige color. Add milk and whisk continually until thickened, making a roux. Reduce heat to low and stir in cheese. Once cheese is melted, remove from heat and stir in the sour cream. Add additional milk if needed to thin out a bit. Season with salt and pepper to taste.
Add thawed green beans to a large bowl. Combine with caramelized onions. Add cheese sauce. Top with cracker crumb mixture. Add an additional layer of dried/fried onion topping over the cracker crumbs. Bake at 400 degrees for 20 minutes or until heated through. Serve and enjoy!
The Result:
Yummy green bean casserole goodness!
Showing posts with label traditional. Show all posts
Showing posts with label traditional. Show all posts
November 27, 2011


October 22, 2011
Egg-in-a-Hole
Or, if you prefer, "Toad in the Hole"...that's what we called this breakfast when I was a kid. I made these for another "breakfast for dinner" treat and my whole family gobbled 'em up. I guess the classics never go out of style.
Egg-in-a-Hole
From: The Pioneer Woman website
Ingredients:
1 slice Of Your Favorite Kind Of Bread
1 Tablespoon Butter
1 whole Egg
Salt To Taste
Pepper To Taste
Directions:
With a biscuit cutter or the rim of a glass, press a hole in the center of the slice of bread.
Next, heat a skillet over medium-low heat and melt a Tablespoon of butter in it. When the butter is all spread out, place the piece of bread in the skillet and crack the egg straight into the center of hole.
Cook for at least 30 seconds or so before attempting to move the bread or things could get messy. Sprinkle the egg with salt and pepper to taste. After about a minute, flip it over with a spatula and salt and pepper the other side.
Now move the whole piece of toast around the skillet, soaking up all of the glorious butter. Let it cook until the yolk feels, to the touch, still soft without feeling over-jiggly. Here’s the key: golden brown toast, white (not brown/burned) whites, soft unbroken yolk.
This yields one serving. Repeat the process for additional portions.
Egg-in-a-Hole
From: The Pioneer Woman website
Ingredients:
1 slice Of Your Favorite Kind Of Bread
1 Tablespoon Butter
1 whole Egg
Salt To Taste
Pepper To Taste
Directions:
With a biscuit cutter or the rim of a glass, press a hole in the center of the slice of bread.
Next, heat a skillet over medium-low heat and melt a Tablespoon of butter in it. When the butter is all spread out, place the piece of bread in the skillet and crack the egg straight into the center of hole.
Cook for at least 30 seconds or so before attempting to move the bread or things could get messy. Sprinkle the egg with salt and pepper to taste. After about a minute, flip it over with a spatula and salt and pepper the other side.
Now move the whole piece of toast around the skillet, soaking up all of the glorious butter. Let it cook until the yolk feels, to the touch, still soft without feeling over-jiggly. Here’s the key: golden brown toast, white (not brown/burned) whites, soft unbroken yolk.
This yields one serving. Repeat the process for additional portions.
October 9, 2011
Pretzel Dessert
This is one of my favorite "old fashioned" dessert recipes from my childhood. My mom and grandma used to make this all the time, and I would request it for my birthday in lieu of cake. It's very simple to make, and it is a great "take along" dessert for a potluck.
Pretzel Dessert
Ingredients:
1 1/2 sticks butter
3 tbsp. sugar
8 oz. chopped pretzels
8 oz. cream cheese, softened
1 c. sugar
2 pkgs. Dream Whip, prepared
Cherry pie filling
(NOTE: The Dream Whip will require vanilla extract and low-fat or fat-free milk, according to package directions.)
Directions:
Melt 1 1/2 sticks butter; add sugar. Pour over pretzels in 9x13 pan. Bake 10 minutes at 400 degrees. Cool. Blend cream cheese with 1 cup sugar. Whip Dream Whip according to package directions; add to cheese mixture. Spread cherry pie filling over pretzels. Cover with cream cheese mixture. Top with whole pretzels in a decorative pattern. Keep refrigerated until ready to serve.
The Result:
Simple. Classic. Delicious. I heart pretzel dessert!
Pretzel Dessert
Ingredients:
1 1/2 sticks butter
3 tbsp. sugar
8 oz. chopped pretzels
8 oz. cream cheese, softened
1 c. sugar
2 pkgs. Dream Whip, prepared
Cherry pie filling
(NOTE: The Dream Whip will require vanilla extract and low-fat or fat-free milk, according to package directions.)
Directions:
Melt 1 1/2 sticks butter; add sugar. Pour over pretzels in 9x13 pan. Bake 10 minutes at 400 degrees. Cool. Blend cream cheese with 1 cup sugar. Whip Dream Whip according to package directions; add to cheese mixture. Spread cherry pie filling over pretzels. Cover with cream cheese mixture. Top with whole pretzels in a decorative pattern. Keep refrigerated until ready to serve.
The Result:
Simple. Classic. Delicious. I heart pretzel dessert!
August 25, 2011
Hot Crossed Tuna Casserole
Typically, I am not a fan of Tuna Casserole. It's always seemed, well, strange to me. Maybe it's because I was scarred as a child. One of my neighborhood friend's mother always made it when I was invited to their family dinner. It was gloppy and gloopy, with an overwhelming sense of tuna-ishness. It was not good.
My friend,Claire Gertrude recently made this version of tuna casserole that she remembered from her childhood. She assured me that it was not your typical tuna casserole mess, and let me sample some. She was right! It was yummy...especially with the sauce. It totally reminded me of a deconstructed tuna melt sandwich (which I love) and the cucumber dill sauce gave it just the right balance. If you are tuna-casserole adverse, this may be the recipe to make you reconsider how you feel about them.
Hot Crossed Tuna Casserole
From: Cooking Claire blog
Ingredients:
3 or 4 cans tuna, drained
1 16 oz. package frozen peas, thawed (I put mine in frozen)
1 c. shredded cheddar cheese
1 c. celery, sliced
1/2 c. bread crumbs
1/4 c. chopped onion
1/4 tsp. salt
1/8 tsp. pepper
1 cup mayonnaise
1 tube crescent roll dough
Cucumber Sauce:
1/2 c. chopped cucumbers
1 T. chives, chopped
1 T. chopped parsley
1/4 t. salt
1/4 t. dill weed
1/2 c. mayo
1/2 c. sour cream
Directions:
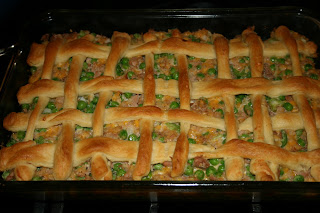
Combine tuna, peas, cheese, celery, bread crumbs, onion, seasonings, and mayonnaise; mix well. Spoon into a baking dish. Separate crescent roll dough into 2 rectangles. Press perforations to seal. Cut dough into 4 long and 8 short strips. Place strips over casserole in lattice design. Bake at 350 for 35 to 40 minutes or until crust is brown. Serve with cucumber sauce.
To make sauce, combine all ingredients and mix well. Chill. Pour over top of each serving.
The Result:
Easy, comforting, and family-friendly. My kids loved this, and it was even better the next day for leftover lunch. The lattice crust makes it visually appealing, as well. I don't think "visually appealing" is an adjective used to often describe tuna casserole, so that is definitely a check in the "pro" column for this recipe. More tuna casserole...yes, please.
My friend,
Hot Crossed Tuna Casserole
From: Cooking Claire blog
Ingredients:
3 or 4 cans tuna, drained
1 16 oz. package frozen peas, thawed (I put mine in frozen)
1 c. shredded cheddar cheese
1 c. celery, sliced
1/2 c. bread crumbs
1/4 c. chopped onion
1/4 tsp. salt
1/8 tsp. pepper
1 cup mayonnaise
1 tube crescent roll dough
Cucumber Sauce:
1/2 c. chopped cucumbers
1 T. chives, chopped
1 T. chopped parsley
1/4 t. salt
1/4 t. dill weed
1/2 c. mayo
1/2 c. sour cream
Directions:
Combine tuna, peas, cheese, celery, bread crumbs, onion, seasonings, and mayonnaise; mix well. Spoon into a baking dish. Separate crescent roll dough into 2 rectangles. Press perforations to seal. Cut dough into 4 long and 8 short strips. Place strips over casserole in lattice design. Bake at 350 for 35 to 40 minutes or until crust is brown. Serve with cucumber sauce.
To make sauce, combine all ingredients and mix well. Chill. Pour over top of each serving.
The Result:
Easy, comforting, and family-friendly. My kids loved this, and it was even better the next day for leftover lunch. The lattice crust makes it visually appealing, as well. I don't think "visually appealing" is an adjective used to often describe tuna casserole, so that is definitely a check in the "pro" column for this recipe. More tuna casserole...yes, please.
July 14, 2011
Herb Crusted Pork Loin
This is one of my favorite ways to make a pork loin roast. I've made this recipe several times in the past; it's very easy to put together and delicious. Given that this recipe is my favorite pork loin application, I was quite surprised to see that I hadn't ever posted it here on the ol' blog. Very strange. I could have sworn that I had updated it here long ago, but I could not find it anywhere. Huh. Maybe I have amnesia??? Maybe there is a huge pork loin conspiracy afoot and it was secretly removed from my blog after I had posted it the first time??? Both scenarios are totally plausible. (No, I have not been drinking.)
Anyway, this is a Paula Deen recipe from waaaay back in 2007. I am typically not a Paula Deen fan, but she hit the ball out of the park with this one. (I think it's her blue hair and smoker's rasp that bothers me.)(Sorry, Paula fans...I'm sure she is a lovely woman.) I served our roast with some ooey-gooey Jen's Top Secret Cheesy Potatoes and steamed green beans. It was a perfect Sunday night dinner that felt really special, but did not require a lot of fuss to put together.
Herb Crusted Pork Loin
From: Paula Deen, 2007
Ingredients:
1 (4-pound) boneless pork loin, with fat left on
1 tablespoon salt
2 tablespoons olive oil
4 cloves garlic, minced
1 teaspoon dried thyme or 2 teaspoons minced fresh thyme leaves
1 teaspoon dried basil or 2 teaspoons fresh basil leaves
1 teaspoon dried rosemary or 2 teaspoons minced fresh rosemary
Directions:
Preheat oven to 475 degrees F.
Place the pork loin on a rack in a roasting pan, fat side up. Combine the remaining ingredients in a small bowl. With your fingers, massage the mixture onto the pork loin, covering all of the meat and fat.
Roast the pork FAT SIDE UP for 30 minutes, then reduce the heat to 425 degrees F and roast for an additional hour.
Test for doneness using an instant-read thermometer. When the internal temperature reaches 155 degrees F, remove the roast from the oven. Allow it to sit for about 20 minutes before carving. It will continue to cook while it rests.

The Result:
I should clarify something. The cook time on this dish is total 1 1/2 hours. Yes, that is a long cook time. However, that time is inactive on your part. It takes about 10 minutes of actual prep, and then you stick it in the oven and manage the temperature changes after the 1/2 hour cooking time mark. It is really easy, just time consuming. I just wanted to make sure to point that out, because the long cooking time caught me off guard the first time I made this roast.
With that said, it is a delicious roast. I have made it with both dried and fresh herbs, and it really doesn't make a whole lot of difference. Usually, I do make it with the dried herbs. I always have dried herbs on hand, so it's just hassle-free for me to go the dried herb route. Either way, it makes for a very special, traditional meal that is good enough for company. I highly recommend this recipe on a night that you don't mind dinner taking an hour and a half to cook. Trust me, it's worth the time!
Anyway, this is a Paula Deen recipe from waaaay back in 2007. I am typically not a Paula Deen fan, but she hit the ball out of the park with this one. (I think it's her blue hair and smoker's rasp that bothers me.)(Sorry, Paula fans...I'm sure she is a lovely woman.) I served our roast with some ooey-gooey Jen's Top Secret Cheesy Potatoes and steamed green beans. It was a perfect Sunday night dinner that felt really special, but did not require a lot of fuss to put together.
Herb Crusted Pork Loin
From: Paula Deen, 2007
Ingredients:
1 (4-pound) boneless pork loin, with fat left on
1 tablespoon salt
2 tablespoons olive oil
4 cloves garlic, minced
1 teaspoon dried thyme or 2 teaspoons minced fresh thyme leaves
1 teaspoon dried basil or 2 teaspoons fresh basil leaves
1 teaspoon dried rosemary or 2 teaspoons minced fresh rosemary
Directions:
Preheat oven to 475 degrees F.
Place the pork loin on a rack in a roasting pan, fat side up. Combine the remaining ingredients in a small bowl. With your fingers, massage the mixture onto the pork loin, covering all of the meat and fat.
Roast the pork FAT SIDE UP for 30 minutes, then reduce the heat to 425 degrees F and roast for an additional hour.
Test for doneness using an instant-read thermometer. When the internal temperature reaches 155 degrees F, remove the roast from the oven. Allow it to sit for about 20 minutes before carving. It will continue to cook while it rests.
The Result:
I should clarify something. The cook time on this dish is total 1 1/2 hours. Yes, that is a long cook time. However, that time is inactive on your part. It takes about 10 minutes of actual prep, and then you stick it in the oven and manage the temperature changes after the 1/2 hour cooking time mark. It is really easy, just time consuming. I just wanted to make sure to point that out, because the long cooking time caught me off guard the first time I made this roast.
With that said, it is a delicious roast. I have made it with both dried and fresh herbs, and it really doesn't make a whole lot of difference. Usually, I do make it with the dried herbs. I always have dried herbs on hand, so it's just hassle-free for me to go the dried herb route. Either way, it makes for a very special, traditional meal that is good enough for company. I highly recommend this recipe on a night that you don't mind dinner taking an hour and a half to cook. Trust me, it's worth the time!
May 21, 2011
Ihop Buttermilk Pancakes
The seal has been broken...I have really embraced carbs again. Not just carbs; but simple, evil carbs. Refined white flour and processed sugar??? Yes, please! Actually, there has been a lot of crazy talk about the end of the world lately. I figured that if there was a miniscule chance for the rumors to be true (fat chance) I figured I might as well go to heaven happy. Other than red wine and some alone time with the husband, I couldn't think of a better way to celebrate the impending rapture than with yummy, buttery pancakes. Handy excuse???? Yes, please!
Ihop Buttermilk Pancakes
From: Food.com; by: x0xMandYx0x on August 24, 2004
Ingredients:
1 1/4 cups all-purpose flour
1 egg
1 1/4 cups buttermilk
1/4 cup granulated sugar
1 teaspoon baking powder
1 teaspoon baking soda
1/4 cup cooking oil
1 pinch salt
splash of milk (if needed)
Directions:
Preheat a skillet over medium heat. Mix all of the ingredients until combined. (Optional: If the batter is too thick add a splash of milk to thin out a bit.)
Melt a little bit of butter in the pan. Pour the batter by spoonfuls into the hot pan, forming 5-inch circles.When the edges appear to harden, flip the pancakes.
They should be golden brown. Cook the pancakes on the other side until they are also golden brown.
The Result:
These were excellent. Sometimes I just get a hankerin' for good ol' buttermilk pancakes, and this was a great version. I must confess, Ihop buttermilk pancakes are my favorite. When I was at the end of my pregnancy with the twins, I would stop at Ihop on the way back from my check-ups and get 'all-you-can-eat' pancakes. Let me tell you, a pregnant mama can really put away the pancakes! Shameful, I know. Anyway, these were a pretty accurate version of the chain restaurant; maybe even a little better. We don't eat this way very often, so it's a real splurge when we do. These pancakes totally hit the spot!
Ihop Buttermilk Pancakes
From: Food.com; by: x0xMandYx0x on August 24, 2004
Ingredients:
1 1/4 cups all-purpose flour
1 egg
1 1/4 cups buttermilk
1/4 cup granulated sugar
1 teaspoon baking powder
1 teaspoon baking soda
1/4 cup cooking oil
1 pinch salt
splash of milk (if needed)
Directions:
Preheat a skillet over medium heat. Mix all of the ingredients until combined. (Optional: If the batter is too thick add a splash of milk to thin out a bit.)
Melt a little bit of butter in the pan. Pour the batter by spoonfuls into the hot pan, forming 5-inch circles.When the edges appear to harden, flip the pancakes.
They should be golden brown. Cook the pancakes on the other side until they are also golden brown.
The Result:
These were excellent. Sometimes I just get a hankerin' for good ol' buttermilk pancakes, and this was a great version. I must confess, Ihop buttermilk pancakes are my favorite. When I was at the end of my pregnancy with the twins, I would stop at Ihop on the way back from my check-ups and get 'all-you-can-eat' pancakes. Let me tell you, a pregnant mama can really put away the pancakes! Shameful, I know. Anyway, these were a pretty accurate version of the chain restaurant; maybe even a little better. We don't eat this way very often, so it's a real splurge when we do. These pancakes totally hit the spot!
April 19, 2011
Jen's Italian Herb-Roasted Chicken & Potatoes
This. was. awesome. Probably the best whole roasted chicken I have ever made. It was seriously delicious, and the recipe was quite a fluke. I knew I wanted to make a whole-roasted chicken for dinner this evening, so I just started throwing stuff together like a mad scientist. The result was post-worthy, and this version is something that I will duplicate again. The recipe takes some time, but it is worth the effort. Did I mention the gravy??? Oh yes, there is gravy. Yum!
Jen's Italian Herb-Roasted Chicken & Potatoes
Ingredients:
grapeseed oil
1 whole chicken (mine was about 4 pounds)
1 onion, cut into large diced
2 teaspoon dried thyme
2 teaspoon dried oregano
2 teaspoon dried basil
1 teaspoon crushed red pepper flakes
salt and pepper to taste
3 Tablespoons lemon juice
6 small potatoes with the skin left on, scrubbed clean, & cut into quarters(I used regular baking potatoes)
1 cup of water
2/3 cup of white wine (I used a chardonnay I had already opened)
For the gravy:
2 tablespoons butter
2 tablespoons flour
1 cup water
cooked chicken drippings
Directions:
Preheat oven to 450 degrees. Rinse chicken and thoroughly dry inside and out with paper towels. Sprinkle salt inside the cavern of the chicken. Tuck wings behind the bird and truss the chicken. (If you are not sure how to do it, just look it up on the Internet. There are tons of videos out there to show you how it's done.) Place the trussed bird on a rack in a roasting pan, breast side up. Set aside.
In a large bowl toss onions and potatoes with 2 tablespoon of oil and 1 teaspoon of the following dried herbs: thyme, basil, oregano, and crushed red pepper flakes. Season with salt generously and toss to combine so everything is well coated. Set aside.
In a small bowl, mix 1 teaspoon of the following dried herbs: oregano, thyme, and basil. Add 1/4 cup of oil, and salt and pepper to taste. Add 3 tablespoons of lemon juice and whisk to combine. Set aside.
Combine white wine and water in a large measuring cup. Set aside.
Pour your chicken marinade mixture over the bird making sure all sides are well coated. Arrange potato and onion mixture in the roasting pan, around the chicken. Roast for 50 minutes uncovered, or until onions are caramelized at the very bottom of the roasting pan and chicken is browned.
Remove the chicken and potatoes from oven and pour wine/water mixture on the bottom of the roasting pan. This should deglaze all the caramelized bits stuck to the bottom of the pan. Return the pan back to the oven for another 20 minutes, or until the juices run clear at the thigh joint, and an internal cooking temperature of 160 degrees is reached.
Remove the chicken from the oven to a cutting board and tent with foil. Let the chicken rest for 10 minutes before carving. Scoop the roasted onions and potatoes into a separate bowl and set aside, reserving the juices and cooking liquid at the bottom of the pan.
To make gravy:
Pour the reserved chicken drippings into a fat separator. Discard fat and save the leftover juices. Melt 2 tablespoons of butter in a large sauce pan. When butter is melted, add 2 tablespoons of flour and whisk to combine. Let flour mixture cook for 1-2 minutes. Add chicken drippings and liquid to the pan with an additional 1 cup of water. Whisk continuously until combined and gravy is formed. Season gravy with salt and pepper to taste.
Cut chicken and serve with potatoes, onions, and gravy.

The Result:
As I said, this was fan-freakin'-tastic! I think my husband wanted to marry me all over again after eating this dish. We were actually arguing over who got to lick the gravy spoon after dinner. It was so good!
There is a fairly long prep and cooking time for this chicken, so I recommend that you start this a few hours before dinnertime or make it on a weekend. Since I was making this up as I went, I opted to start early. I must have been in the mood to cook or something, because spending a few hours in the kitchen usually does not happen for me anymore. Thankfully, my kids took a great afternoon nap so I had some time to develop a game plan. It all worked out, and this is a chicken recipe that I will keep.
Jen's Italian Herb-Roasted Chicken & Potatoes
Ingredients:
grapeseed oil
1 whole chicken (mine was about 4 pounds)
1 onion, cut into large diced
2 teaspoon dried thyme
2 teaspoon dried oregano
2 teaspoon dried basil
1 teaspoon crushed red pepper flakes
salt and pepper to taste
3 Tablespoons lemon juice
6 small potatoes with the skin left on, scrubbed clean, & cut into quarters(I used regular baking potatoes)
1 cup of water
2/3 cup of white wine (I used a chardonnay I had already opened)
For the gravy:
2 tablespoons butter
2 tablespoons flour
1 cup water
cooked chicken drippings
Directions:
Preheat oven to 450 degrees. Rinse chicken and thoroughly dry inside and out with paper towels. Sprinkle salt inside the cavern of the chicken. Tuck wings behind the bird and truss the chicken. (If you are not sure how to do it, just look it up on the Internet. There are tons of videos out there to show you how it's done.) Place the trussed bird on a rack in a roasting pan, breast side up. Set aside.
In a large bowl toss onions and potatoes with 2 tablespoon of oil and 1 teaspoon of the following dried herbs: thyme, basil, oregano, and crushed red pepper flakes. Season with salt generously and toss to combine so everything is well coated. Set aside.
In a small bowl, mix 1 teaspoon of the following dried herbs: oregano, thyme, and basil. Add 1/4 cup of oil, and salt and pepper to taste. Add 3 tablespoons of lemon juice and whisk to combine. Set aside.
Combine white wine and water in a large measuring cup. Set aside.
Pour your chicken marinade mixture over the bird making sure all sides are well coated. Arrange potato and onion mixture in the roasting pan, around the chicken. Roast for 50 minutes uncovered, or until onions are caramelized at the very bottom of the roasting pan and chicken is browned.
Remove the chicken and potatoes from oven and pour wine/water mixture on the bottom of the roasting pan. This should deglaze all the caramelized bits stuck to the bottom of the pan. Return the pan back to the oven for another 20 minutes, or until the juices run clear at the thigh joint, and an internal cooking temperature of 160 degrees is reached.
Remove the chicken from the oven to a cutting board and tent with foil. Let the chicken rest for 10 minutes before carving. Scoop the roasted onions and potatoes into a separate bowl and set aside, reserving the juices and cooking liquid at the bottom of the pan.
To make gravy:
Pour the reserved chicken drippings into a fat separator. Discard fat and save the leftover juices. Melt 2 tablespoons of butter in a large sauce pan. When butter is melted, add 2 tablespoons of flour and whisk to combine. Let flour mixture cook for 1-2 minutes. Add chicken drippings and liquid to the pan with an additional 1 cup of water. Whisk continuously until combined and gravy is formed. Season gravy with salt and pepper to taste.
Cut chicken and serve with potatoes, onions, and gravy.
The Result:
As I said, this was fan-freakin'-tastic! I think my husband wanted to marry me all over again after eating this dish. We were actually arguing over who got to lick the gravy spoon after dinner. It was so good!
There is a fairly long prep and cooking time for this chicken, so I recommend that you start this a few hours before dinnertime or make it on a weekend. Since I was making this up as I went, I opted to start early. I must have been in the mood to cook or something, because spending a few hours in the kitchen usually does not happen for me anymore. Thankfully, my kids took a great afternoon nap so I had some time to develop a game plan. It all worked out, and this is a chicken recipe that I will keep.
December 14, 2010
Chicken "Pot Pie" with Crunchy Brown Rice Crust
We have had several dinner 'fails' lately. Certainly, nothing that I've considered to be post-worthy. This was the one exception to the many stinkers that have not worked out for me. My friend, Claire and I must have both bookmarked this recipe around the same time; but she ended up making it before I got around to it. I needed something that I knew was going to help get us out of our dinner rut, so I turned to her blog for ideas. I figured if her family liked it, then mine would too. When I saw this recipe posted on her website, I remembered I wanted to try this dish and decided to give it a go. I am glad I did, because it was really yummy...just what I needed to get back on track in my kitchen.
Chicken "Pot Pie" with Crunchy Brown Rice Crust
From: the Whole Foods iPhone app, also available on the Whole Foods website
Ingredients:
1 tablespoon vegetable oil, plus more for greasing
1 tablespoon butter
1 pound boneless, skinless chicken breasts, cut into 1-inch pieces
1/4 pound sliced button mushrooms
2 teaspoons chopped thyme, divided
1 large carrot, chopped
1 rib celery, thinly sliced
1 small yellow onion, chopped
Salt and pepper to taste
1/4 cup brown rice flour
1 1/2 cups low-sodium gluten-free chicken broth
1 cup whole milk
1 cup cooked brown rice or brown and wild rice blend
1/4 cup shredded Parmesan cheese
1/2 teaspoon sweet paprika
1/2 cup frozen peas
Directions:
Preheat oven to 400°F. Lightly grease a 9-inch pie dish with oil; set aside.
Heat oil and butter in a large skillet over medium high heat. Add chicken and cook, stirring occasionally, until no longer pink, 4 to 5 minutes. Add mushrooms, 1 teaspoon of the thyme, carrots, celery, onions, salt and pepper and cook until just tender, 6 to 8 minutes. Add flour and cook, stirring constantly, for 1 minute. Add broth and milk, stir well and bring to a simmer. Reduce heat to medium low and simmer until very thick, about 10 minutes. Meanwhile, combine rice, cheese, paprika, remaining 1 teaspoon thyme, salt and pepper in a medium bowl.
Stir peas into chicken mixture then season with salt and pepper and transfer to prepared dish. Scatter rice mixture evenly over the top then arrange dish on a baking sheet to catch any drips. Bake until bubbly and crust is crisp, about 30 minutes.
Nutritional Info:
Per serving (about 9oz/256g-wt.): 240 calories (80 from fat), 9g total fat, 3.5g saturated fat, 55mg cholesterol, 370mg sodium, 20g total carbohydrate (2g dietary fiber, 4g sugar), 21g protein


The Result:
This was really, really good. Not really a "pot pie", but more like a casserole with a homey, comforting feel to it. We all really loved this dish, and it will be one that I make again.
Chicken "Pot Pie" with Crunchy Brown Rice Crust
From: the Whole Foods iPhone app, also available on the Whole Foods website
Ingredients:
1 tablespoon vegetable oil, plus more for greasing
1 tablespoon butter
1 pound boneless, skinless chicken breasts, cut into 1-inch pieces
1/4 pound sliced button mushrooms
2 teaspoons chopped thyme, divided
1 large carrot, chopped
1 rib celery, thinly sliced
1 small yellow onion, chopped
Salt and pepper to taste
1/4 cup brown rice flour
1 1/2 cups low-sodium gluten-free chicken broth
1 cup whole milk
1 cup cooked brown rice or brown and wild rice blend
1/4 cup shredded Parmesan cheese
1/2 teaspoon sweet paprika
1/2 cup frozen peas
Directions:
Preheat oven to 400°F. Lightly grease a 9-inch pie dish with oil; set aside.
Heat oil and butter in a large skillet over medium high heat. Add chicken and cook, stirring occasionally, until no longer pink, 4 to 5 minutes. Add mushrooms, 1 teaspoon of the thyme, carrots, celery, onions, salt and pepper and cook until just tender, 6 to 8 minutes. Add flour and cook, stirring constantly, for 1 minute. Add broth and milk, stir well and bring to a simmer. Reduce heat to medium low and simmer until very thick, about 10 minutes. Meanwhile, combine rice, cheese, paprika, remaining 1 teaspoon thyme, salt and pepper in a medium bowl.
Stir peas into chicken mixture then season with salt and pepper and transfer to prepared dish. Scatter rice mixture evenly over the top then arrange dish on a baking sheet to catch any drips. Bake until bubbly and crust is crisp, about 30 minutes.
Nutritional Info:
Per serving (about 9oz/256g-wt.): 240 calories (80 from fat), 9g total fat, 3.5g saturated fat, 55mg cholesterol, 370mg sodium, 20g total carbohydrate (2g dietary fiber, 4g sugar), 21g protein
The Result:
This was really, really good. Not really a "pot pie", but more like a casserole with a homey, comforting feel to it. We all really loved this dish, and it will be one that I make again.
April 21, 2010
Grandma's Beef Roast
My mom came to our house for quick overnight visit and decided to make my grandma's beef roast. I didn't remember this recipe until she started cooking it and the smell brought back happy food memories. It is pretty easy to put together, with really yummy results. We served our roast with some mashed potatoes and fresh green beans. I also made a quick gravy from the drippings. The whole meal was soooo homey and comforting! I forgot to take a photo of the finished dish, but I thought I could at least post the recipe so I have it recorded. I have another beef roast stored in my freezer, so I think I will attempt this dish on my own very soon (now that I know how).
Grandma's Beef Roast
Ingredients:
2 tablespoons canola oil
1 2-4 lb. beef roast, tied
2 whole onions, peeled
salt and pepper to taste
onion and garlic powder to taste
3/4 cup of apple cider vinegar
water (Start with 2 cups, and add more if needed)
3 tablespoons of butter
3 tablespoons of flour
reserved beef drippings
Directions:
Season beef roast with salt, pepper, onion and garlic powder to taste. In a heavy bottom pot (make sure the pot has a tight fitting lid), brown beef roast on all sides in canola oil over high heat. Once roast is browned, secure whole peeled onions to top of roast with toothpicks. Deglaze pot with apple cider vinegar and reduce until almost all the liquid is gone. Add water and turn heat down to medium. Secure lid onto the pot and braise over medium heat for 1-2 hours, depending on the size of the roast (keep checking to make sure there is enough liquid in the pot. The water should come halfway up the roast. Add more during the cooking process if needed).
Once roast is finished cooking, remove to a cutting board and let rest for 5-10 minutes. Reserve drippings in a separate bowl and set aside. In the bottom of the same pot (now empty but still hot) melt butter over medium high heat. Then, sprinkle in flour once butter is melted. Combine butter and flour for a few minutes, until flour is starting to cook. Add beef drippings back into the pot, while whisking continuously over heat. Bring to boil. Reduce heat until mixture thickens to proper gravy consistency. Slice roast and onions and serve. Then, put the gravy in a bowl and serve over roast and mashed potatoes.
Grandma's Beef Roast
Ingredients:
2 tablespoons canola oil
1 2-4 lb. beef roast, tied
2 whole onions, peeled
salt and pepper to taste
onion and garlic powder to taste
3/4 cup of apple cider vinegar
water (Start with 2 cups, and add more if needed)
3 tablespoons of butter
3 tablespoons of flour
reserved beef drippings
Directions:
Season beef roast with salt, pepper, onion and garlic powder to taste. In a heavy bottom pot (make sure the pot has a tight fitting lid), brown beef roast on all sides in canola oil over high heat. Once roast is browned, secure whole peeled onions to top of roast with toothpicks. Deglaze pot with apple cider vinegar and reduce until almost all the liquid is gone. Add water and turn heat down to medium. Secure lid onto the pot and braise over medium heat for 1-2 hours, depending on the size of the roast (keep checking to make sure there is enough liquid in the pot. The water should come halfway up the roast. Add more during the cooking process if needed).
Once roast is finished cooking, remove to a cutting board and let rest for 5-10 minutes. Reserve drippings in a separate bowl and set aside. In the bottom of the same pot (now empty but still hot) melt butter over medium high heat. Then, sprinkle in flour once butter is melted. Combine butter and flour for a few minutes, until flour is starting to cook. Add beef drippings back into the pot, while whisking continuously over heat. Bring to boil. Reduce heat until mixture thickens to proper gravy consistency. Slice roast and onions and serve. Then, put the gravy in a bowl and serve over roast and mashed potatoes.
January 13, 2010
Loaded Baked Potato Soup
I think my pregnancy cravings are really starting to get aggressive. All I can think about lately is restaurant-style, dairy-laden, baked potato soup. You know...the kind with cheese, bacon, green onions, and sour cream for "garnish". Dairy products are not my friend these days, so I am not sure why I want a soup completely chock full o' lactose so badly. The only explanation is pregnancy cravings. I searched around on the Internet and finally found a soup that promises to fulfill all my starchy/creamy/soupy desires. I am going to make a quick salad to go along side of our yummy soup, and dinner will be served!
Loaded Baked Potato Soup
From: Cooking During Stolen Moments
Ingredients:
1 lb. bacon, diced (See Results below: I used a lot less)
1 onion, diced
5 large Russet potatoes, peeled and cubed
3 cups chicken stock
3 Tablespoons butter
3 Tablespoons flour
1 1/2 cups milk
3 green onions, sliced
3/4 cup shredded cheddar cheese, divided
1/2 teaspoons black pepper
Sour cream for garnish, optional
(***Add a few sprinkles of white wine vinegar to balance the dish before serving.***)
Directions:
1. In a large stock pot, cook bacon until crisp. Remove with a slotted spoon to drain and set aside. Drain all but 2 T. of bacon grease from the pot. Cook the onions in the remaining bacon grease for about 5 minutes, until tender.
2. Add potatoes and chicken stock to pot. Bring to a boil, reduce heat to medium and simmer about 20 minutes, until potatoes are tender. With a slotted spoon, remove a few scoops of potatoes. Place in a bowl and mash with a fork. Set aside.
3. In a small sauce pan, melt butter. Stir in flour and cook for 2 minutes. Whisk in milk, bring to a boil and simmer until thickened. Slowly stir in to stock pot. Bring to a boil, reduce heat to low and simmer. Stir mashed potatoes back into pot.
4. Add 1/2 c. shredded cheese, three-fourths of the bacon and half the sliced green onions to pot. Add pepper. Stir to combine. Cook an additional 5 minutes.
5. To serve, ladle soup into individual bowls and top with some shredded cheese, bacon, green onions and optional sour cream.

The Result:
This was exactly what I wanted in a Baked Potato Soup. It was so satisfying!
I did make a couple of little changes, but nothing too major. For example, I used 4 potatoes instead of 5. Then, I only had Monterrey Jack cheese on hand (not cheddar), so that is what I used. I mixed half of the cheese I had (about 1/2 cup) into the sauce pan with the milk, to make the cheese melt better and the overall dish more cohesive. I only used 6 slices of bacon, and not the full pound recommended. A pound of bacon just seemed unnecessary. I cooked the full strips until crisp, and then crumbled them on top for garnish. It still turned out savory and bacony, and we didn't miss the extra fat/calories from the superfluous meat.
Lastly, I sprinkled some white wine vinegar into the soup right before serving. Maybe about a teaspoon or so total. It was a little too creamy and dull, so it really needed a small hit of acid to balance the flavors. The white wine vinegar was perfect...it gave the dish a tiny bit of brightness that it otherwise did not have. I would definitely not skip the vinegar.*** In the end, I totally forgot about the sour cream as a garnish. It was still great soup; so really the sour cream would have been just a little added touch, not a major flavor component.
This soup was a hit with my family, and this recipe is a keeper!
Loaded Baked Potato Soup
From: Cooking During Stolen Moments
Ingredients:
1 lb. bacon, diced (See Results below: I used a lot less)
1 onion, diced
5 large Russet potatoes, peeled and cubed
3 cups chicken stock
3 Tablespoons butter
3 Tablespoons flour
1 1/2 cups milk
3 green onions, sliced
3/4 cup shredded cheddar cheese, divided
1/2 teaspoons black pepper
Sour cream for garnish, optional
(***Add a few sprinkles of white wine vinegar to balance the dish before serving.***)
Directions:
1. In a large stock pot, cook bacon until crisp. Remove with a slotted spoon to drain and set aside. Drain all but 2 T. of bacon grease from the pot. Cook the onions in the remaining bacon grease for about 5 minutes, until tender.
2. Add potatoes and chicken stock to pot. Bring to a boil, reduce heat to medium and simmer about 20 minutes, until potatoes are tender. With a slotted spoon, remove a few scoops of potatoes. Place in a bowl and mash with a fork. Set aside.
3. In a small sauce pan, melt butter. Stir in flour and cook for 2 minutes. Whisk in milk, bring to a boil and simmer until thickened. Slowly stir in to stock pot. Bring to a boil, reduce heat to low and simmer. Stir mashed potatoes back into pot.
4. Add 1/2 c. shredded cheese, three-fourths of the bacon and half the sliced green onions to pot. Add pepper. Stir to combine. Cook an additional 5 minutes.
5. To serve, ladle soup into individual bowls and top with some shredded cheese, bacon, green onions and optional sour cream.
The Result:
This was exactly what I wanted in a Baked Potato Soup. It was so satisfying!
I did make a couple of little changes, but nothing too major. For example, I used 4 potatoes instead of 5. Then, I only had Monterrey Jack cheese on hand (not cheddar), so that is what I used. I mixed half of the cheese I had (about 1/2 cup) into the sauce pan with the milk, to make the cheese melt better and the overall dish more cohesive. I only used 6 slices of bacon, and not the full pound recommended. A pound of bacon just seemed unnecessary. I cooked the full strips until crisp, and then crumbled them on top for garnish. It still turned out savory and bacony, and we didn't miss the extra fat/calories from the superfluous meat.
Lastly, I sprinkled some white wine vinegar into the soup right before serving. Maybe about a teaspoon or so total. It was a little too creamy and dull, so it really needed a small hit of acid to balance the flavors. The white wine vinegar was perfect...it gave the dish a tiny bit of brightness that it otherwise did not have. I would definitely not skip the vinegar.*** In the end, I totally forgot about the sour cream as a garnish. It was still great soup; so really the sour cream would have been just a little added touch, not a major flavor component.
This soup was a hit with my family, and this recipe is a keeper!
October 13, 2009
Jen's Chicken Noodle Soup
I have been craving homemade chicken noodle soup lately, and I thought that tonight would be a good night to experiment with a recipe. I think I will play around with the flavors until I come up with what I want. After all, I know approximately what goes into chicken noodle soup...how difficult could it be, really?!?
I don't have traditional egg noodles stocked in my pantry, but I do have fun alphabet shaped pasta from Trader Joe's. I figure the boy will like the letter shapes, and I will have a better chance of escaping dinner time without an ensuing battle. I think I will keep things simple and just bake up some canned biscuits to go on the side. Yum...comfort food at it's best!
I will have to post a recipe after our meal, since I am not exactly sure how I am going to put the soup together. Wish me luck...I will let you know how it all turns out later!
********************************************************
Here is the final product!
Jen’s Chicken Noodle Soup
Ingredients:
2 Tablespoons Canola oil, more if needed
2 chicken breasts, cubed
½ cup of flour
1 small onion, diced finely
2 stalks of celery, diced finely
1-2 cups of cooked, sliced carrots (I used leftovers)
2 cloves of garlic, minced finely
2 teaspoons paprika, divided
Salt and pepper, to taste
1 teaspoon Onion powder, divided
1 teaspoon Garlic powder, divided
½ teaspoon of Dried thyme
6 cups of homemade chicken stock
1 teaspoon of white wine vinegar
Pasta of your choice (I used organic alphabet pasta,but egg noodles would be ideal)
Directions:
In a Dutch oven, heat oil over medium high heat. While oil is heating, combine flour, 1 tsp paprika, salt, pepper, ½ tsp onion powder, 1/2 tsp garlic powder in a shallow bowl. Pat chicken dry with paper towels and dredge in flour mixture, shaking off any excess. Brown chicken pieces in oil and remove to a separate dish. Add a little more oil, if needed. Sauté onions, carrots, and celery until soft. Using a wooden spoon, scrape up any brown bits stuck on the bottom of the pan and mix in with the vegetables. Make a spot in bottom of pan and add garlic. Sauté garlic for 1-2 minutes, or until fragrant (do not brown or burn garlic). Season with salt and pepper. Add chicken back to the pot, and stir to combine. Add chicken stock. Add remaining paprika, onion powder, garlic powder, and dried thyme. Taste and adjust seasonings if needed. Add white wine vinegar. Bring to boil, reduce to simmer for 15-20 minutes.
While soup is simmering, bring a pot full of salted water to a boil and cook desired pasta. When pasta is cooked al dente, add to soup mixture. Stir to combine. Serve with hot buttered biscuits and enjoy!

The Result:
This was soooooo freakin' yummy! My soup turned out exactly how I wanted it...I love it when that happens! This was a hearty, comforting soup that went perfect with our buttered biscuits. Again, yum. I am debating if I want to have the leftovers for lunch this week, or freeze them for an other meal. Hmmmm... either way, this soup was delish.
I don't have traditional egg noodles stocked in my pantry, but I do have fun alphabet shaped pasta from Trader Joe's. I figure the boy will like the letter shapes, and I will have a better chance of escaping dinner time without an ensuing battle. I think I will keep things simple and just bake up some canned biscuits to go on the side. Yum...comfort food at it's best!
I will have to post a recipe after our meal, since I am not exactly sure how I am going to put the soup together. Wish me luck...I will let you know how it all turns out later!
********************************************************
Here is the final product!
Jen’s Chicken Noodle Soup
Ingredients:
2 Tablespoons Canola oil, more if needed
2 chicken breasts, cubed
½ cup of flour
1 small onion, diced finely
2 stalks of celery, diced finely
1-2 cups of cooked, sliced carrots (I used leftovers)
2 cloves of garlic, minced finely
2 teaspoons paprika, divided
Salt and pepper, to taste
1 teaspoon Onion powder, divided
1 teaspoon Garlic powder, divided
½ teaspoon of Dried thyme
6 cups of homemade chicken stock
1 teaspoon of white wine vinegar
Pasta of your choice (I used organic alphabet pasta,but egg noodles would be ideal)
Directions:
In a Dutch oven, heat oil over medium high heat. While oil is heating, combine flour, 1 tsp paprika, salt, pepper, ½ tsp onion powder, 1/2 tsp garlic powder in a shallow bowl. Pat chicken dry with paper towels and dredge in flour mixture, shaking off any excess. Brown chicken pieces in oil and remove to a separate dish. Add a little more oil, if needed. Sauté onions, carrots, and celery until soft. Using a wooden spoon, scrape up any brown bits stuck on the bottom of the pan and mix in with the vegetables. Make a spot in bottom of pan and add garlic. Sauté garlic for 1-2 minutes, or until fragrant (do not brown or burn garlic). Season with salt and pepper. Add chicken back to the pot, and stir to combine. Add chicken stock. Add remaining paprika, onion powder, garlic powder, and dried thyme. Taste and adjust seasonings if needed. Add white wine vinegar. Bring to boil, reduce to simmer for 15-20 minutes.
While soup is simmering, bring a pot full of salted water to a boil and cook desired pasta. When pasta is cooked al dente, add to soup mixture. Stir to combine. Serve with hot buttered biscuits and enjoy!
The Result:
This was soooooo freakin' yummy! My soup turned out exactly how I wanted it...I love it when that happens! This was a hearty, comforting soup that went perfect with our buttered biscuits. Again, yum. I am debating if I want to have the leftovers for lunch this week, or freeze them for an other meal. Hmmmm... either way, this soup was delish.
October 2, 2009
Jen's Double Breaded Pork Chops and Favorite Mac & Cheese
Here is the dinner that I intended for last night, but couldn't pull together. As promised, I feel better today...thanks to my little medical miracle pill. I still could not stand to handle the raw meat, so the hubs took care of making the pork chops while the boy and I made the mac and cheese. Steamed broccoli will round out our meal, and fulfill the much needed vegetable requirement at our house. I love this dinner! It definitely falls under the category of comfort food.
Here are the previous links to tonight's recipes:
Jen's Double Breaded Pork Chops
Favorite Mac and Cheese
Jen's Notes:
I did not make the full recipe of mac & cheese tonight. I only had half a bag of elbow macaroni left in my pantry, so I just decided to halve the whole dish. As it turns out, half of the recipe is still plenty for our little family. I am already looking forward to the leftovers tomorrow.
Here are the previous links to tonight's recipes:
Jen's Double Breaded Pork Chops
Favorite Mac and Cheese
Jen's Notes:
I did not make the full recipe of mac & cheese tonight. I only had half a bag of elbow macaroni left in my pantry, so I just decided to halve the whole dish. As it turns out, half of the recipe is still plenty for our little family. I am already looking forward to the leftovers tomorrow.
October 1, 2009
Jen's Chicken Pot Pie
I had a late afternoon doctor's appointment yesterday, and got home just in time to throw this pot pie together for our dinner. The good news is that my babies are doing great and growing like little weeds inside their haven. They were both hiding the "goods" so we couldn't tell what gender either of them are, but hopefully we will be able to try and peek again at my next appointment. I am always relieved when I get a good report from the doctor!
Since this was not a new dish, I am just going to post the link to my previous recipe. This is another family favorite, so I always look forward to having it.
Jen's Chicken Pot Pie
The only issue I ever have with this dish is that it is hard to get slices of pie out of the pan. It inevitably ends up getting mangled and never looks like a piece of "pie". The family and I decided we don't care what it ends up looking like on the plate, since it tastes so darn yummy. I guess you could avoid the mess by making individual pot pies. Either way, this pot pie recipe is fantastically comforting and delish!
Since this was not a new dish, I am just going to post the link to my previous recipe. This is another family favorite, so I always look forward to having it.
Jen's Chicken Pot Pie
The only issue I ever have with this dish is that it is hard to get slices of pie out of the pan. It inevitably ends up getting mangled and never looks like a piece of "pie". The family and I decided we don't care what it ends up looking like on the plate, since it tastes so darn yummy. I guess you could avoid the mess by making individual pot pies. Either way, this pot pie recipe is fantastically comforting and delish!
July 19, 2009
Pork Schnitzel
I made this dish one other time, and we really liked it. Based on my previous comments, I need to tweak the cooking method a little bit. I think I might just partially cook the chops on the stove top and then finish them in a 350 degree oven. Other than that, I think I will stick to the ingredients list. I plan on serving this dish with some steamed veggies, and baked potatoes. This is a yummy, traditional meal that I am looking forward to having again!
Pork Schnitzel
This sounds so good to me!!! I can't wait to eat!
Pork Schnitzel
This sounds so good to me!!! I can't wait to eat!
July 15, 2009
Jen's Swiss Steak and Garlic Mashed Potatoes with Steamed Broccoli
I made one of our traditional, family favorites last night for dinner. I was too worn out to do a post, so I am playing catch up this morning. This is a comforting, familiar dish that I served with some garlic mashed potatoes and steamed broccoli. Yum! I love this meal! It just reminds me of my grandma and good childhood memories.
Jen's Swiss Steak
And don't forget the mashed potatoes...
Jen's Garlic Mashed Potatoes
Comfort food is sooooo my friend!
Jen's Swiss Steak
And don't forget the mashed potatoes...
Jen's Garlic Mashed Potatoes
Comfort food is sooooo my friend!
June 18, 2009
Claire's Pot Roast: A Variation
I needed a day at home this week to get some chores done. It seems we have been going, going, going, all month long; and my house is starting to show signs of neglect. I decided to do an easy, slow-cooker meal so I could focus on getting my house in order and not have to worry about dinner. This dish is always easy, delicious, and comforting. I love the yummy smells that fill the house when a pot roast is cooking away. This dish is a low maintenance masterpiece...perfect for a day of cleaning and organizing.
Claire's Pot Roast: A Variation
This is one of those meals that I imagine when people talk about "home-cooking". It is a traditional stand-by that everyone seems to love. Family food at it's finest!
Claire's Pot Roast: A Variation
This is one of those meals that I imagine when people talk about "home-cooking". It is a traditional stand-by that everyone seems to love. Family food at it's finest!
June 12, 2009
Jen's Double Breaded Pork Chops and Top Secret Cheesy Potatoes
Here are two recipes that have not been in the rotation for awhile. Both are beloved in our house, so I am not sure why I don't make them more often. Granted, neither recipe is all that healthy; but sometimes it is just nice to have comfort food and not worry about it. My logic is that this meal will still be more nutritious than a lot of the garbage that is served at some chain restaurants; fast food or otherwise. I think I will steam some veggies to go with this meal and prepare a side salad, as usual.
Jen's Double Breaded Pork Chops
Jen's Top Secret Cheesy Potatoes
I am excited to have some more family favorites this evening!
Jen's Double Breaded Pork Chops
Jen's Top Secret Cheesy Potatoes
I am excited to have some more family favorites this evening!
June 3, 2009
Tater Tot Casserole
I am going to keep this short and sweet today, since my nieces are in town and we are busy having fun. We are going to have this dish for dinner....yada, yada, yada...here is the recipe.
Tater Tot Casserole
This is a great kid-friendly meal; one that I hope both my sweet, little, nieces enjoy. Yeah...that's about all I have to say about that. Catch ya later!
Tater Tot Casserole
This is a great kid-friendly meal; one that I hope both my sweet, little, nieces enjoy. Yeah...that's about all I have to say about that. Catch ya later!
May 29, 2009
Jen's Baked Buffalo Chicken Tenders with Ranch Dipping Sauce & Beth's Broccoli Slaw
I love Friday! It is all about the promise of a fun weekend that I look forward to with child-like enthusiasm. Also, I really look forward to having the husband home for a couple days. Since Friday night is typically fun, I like to serve something for dinner that reflects the mood. I think Buffalo Chicken Tenders does just that. After all, it is a fun dish and not too much of a hassle to make. Hooray for Friday!
Jen's Baked Buffalo Chicken Tenders with Ranch Dipping Sauce
I think I will serve this dish with my friend, Beth's Broccoli Slaw recipe. Yum!!!
Beth's Broccoli Slaw
Both dishes are Friday night winners, for sure.
Jen's Baked Buffalo Chicken Tenders with Ranch Dipping Sauce
I think I will serve this dish with my friend, Beth's Broccoli Slaw recipe. Yum!!!
Beth's Broccoli Slaw
Both dishes are Friday night winners, for sure.
May 26, 2009
Cooking Light's Pan Fried Chicken
When I got my current June issue of Cooking Light magazine, I knew I would have to try the cover recipe pronto. It looks absolutely mouth-watering, and I was intrigued by the mix of spices in the breading. Also, I could definitely use a good recipe for a healthy version of fried chicken.
I did have something completely different planned for tonight's dinner, but I needed to scrap it, anyway. My other recipe used dried and soaked beans, but I totally forgot that I needed to do that last night. Darn dried beans!!! I love that they are so cheap and flavorful, but I hate the soaking time (or lack there of). Oh well, I will get my beans soaking now, so they will be ready for tomorrow night's meal. This chicken recipe was actually slotted for later in the week, but I am excited to try this dish sooner than I anticipated.
I think I will serve my chicken with some leftover pasta salad and a side of veggies. This meal should be perfect summertime fare.
Cooking Light's Pan Fried Chicken
adapted from June 2009 issue
Ingredients:
4-5 chicken thighs, skin removed
1/4 cup of canola oil
1 cup all-purpose flour
1/2 cup whole-wheat flour
1 teaspoon ground ginger
1/2 teaspoon hot paprika
1/2 teaspoon ground cinnamon
1/2 teaspoon freshly ground nutmeg
1/2 teaspoon fine sea salt
Directions:
Remove skin from chicken (if needed), and set aside.
Sift together first 6 ingredients; place mixture in a large zip-top plastic bag. Sprinkle salt evenly over chicken. Add chicken, one piece at a time, to bag; seal. Shake bag to coat chicken. Remove chicken from bag, shaking off excess flour. Place chicken on a cooling rack; place rack in a jelly-roll pan. Reserve remaining flour mixture. Loosely cover chicken; chill 1 1/2 hours.
Take chicken out and let chicken stand at room temperature 30 minutes. Return chicken, one piece at a time, to flour mixture, shaking bag to coat chicken. Discard excess flour mixture.
Heat oil in a large skillet over medium-high heat. Add chicken to pan. Reduce heat to medium-low, and cook 25 minutes or until done, carefully turning every 5 minutes.
Line a clean cooling rack with brown paper bags; arrange chicken in a single layer on bags. Let stand for 5 minutes.
Jen's Notes:
Here are the recipe notes from the magazine:
Also, I think I read that the paper bags are a must. If you line the drain tray with anything else, the oil could get reabsorbed by the chicken. The brown paper bags wick the oil away from the meat.
I needed to change up a couple items from the original recipe, so the version above has some minor changes. Most notably, the original recipe calls for peanut oil and I don't have any. I am substituting canola oil instead.

The Result:
Well, this looked a lot better than it actually tasted. I am a little disappointed! The chicken was bland, bland, bland. I think there were several issues with this recipe that all contributed to the flavor problems of the results.
First, I think that the ratio of spices to flour was way off. The amount of each of the spices needed to be increased to make a bigger impression. Otherwise, it was just flat and boring. Seriously, nothing special. I think if the spices were more pronounced, then this would have been a better recipe.
Another issue was this: fried chicken without skin is just weird. I understand that they were trying to make fried chicken healthier. I also understand the idea of cutting fat and calories by getting rid of the skin. However, I firmly believe that removing the skin, even in a healthy recipe, is a big mistake. The top of the chicken that had direct contact with the pan was very dry. There was just not a buffer from the heat to keep the meat juicy. The underside of the chicken was cooked okay, but the best part of the meat was tasteless and had a 'stick-in-the-throat' type of texture. I think in order to get a brown crust AND keep the chicken moist, the skin is necessary. Maybe some recipes are not meant for a healthy make over...ummmmm...like FRIED CHICKEN !?!?!?!?!?
(PS-I followed the instructions, and monitored the oil carefully, so I am confident I didn't screw it up.) (Could not having peanut oil have made that big of a difference??? My oil kept temp and did not burn, so I can't imagine that it would have mattered.)
Finally, I think that this particular technique is a pain. There are two different rest periods during the cooking process. During the first period, the chicken rests for 1 1/2 hours in the fridge. Okay...why???? Maybe so the breading adheres better, is my guess???? But is that step necessary???? I don't think so. Then there is a second rest period where it rests for an additional 1/2 hour so the chicken can come to room temperature. I understand why a protein item would need to be brought to room temperature before cooking (I usually do that anyway), but two different, long rest periods seemed excessive. I just don't have the patience for that.
Overall, I don't think I even care enough to try and "fix" this recipe...so I don't think I will be making it again. I am really surprised that a Cooking Light cover recipe would be so underwhelming!!!
I did have something completely different planned for tonight's dinner, but I needed to scrap it, anyway. My other recipe used dried and soaked beans, but I totally forgot that I needed to do that last night. Darn dried beans!!! I love that they are so cheap and flavorful, but I hate the soaking time (or lack there of). Oh well, I will get my beans soaking now, so they will be ready for tomorrow night's meal. This chicken recipe was actually slotted for later in the week, but I am excited to try this dish sooner than I anticipated.
I think I will serve my chicken with some leftover pasta salad and a side of veggies. This meal should be perfect summertime fare.
Cooking Light's Pan Fried Chicken
adapted from June 2009 issue
Ingredients:
4-5 chicken thighs, skin removed
1/4 cup of canola oil
1 cup all-purpose flour
1/2 cup whole-wheat flour
1 teaspoon ground ginger
1/2 teaspoon hot paprika
1/2 teaspoon ground cinnamon
1/2 teaspoon freshly ground nutmeg
1/2 teaspoon fine sea salt
Directions:
Remove skin from chicken (if needed), and set aside.
Sift together first 6 ingredients; place mixture in a large zip-top plastic bag. Sprinkle salt evenly over chicken. Add chicken, one piece at a time, to bag; seal. Shake bag to coat chicken. Remove chicken from bag, shaking off excess flour. Place chicken on a cooling rack; place rack in a jelly-roll pan. Reserve remaining flour mixture. Loosely cover chicken; chill 1 1/2 hours.
Take chicken out and let chicken stand at room temperature 30 minutes. Return chicken, one piece at a time, to flour mixture, shaking bag to coat chicken. Discard excess flour mixture.
Heat oil in a large skillet over medium-high heat. Add chicken to pan. Reduce heat to medium-low, and cook 25 minutes or until done, carefully turning every 5 minutes.
Line a clean cooling rack with brown paper bags; arrange chicken in a single layer on bags. Let stand for 5 minutes.
Jen's Notes:
Here are the recipe notes from the magazine:
The key to success with this recipe is even heat. If the oil gets too hot, the chicken may brown too quickly before fully cooking. You can lower the heat, or brown the chicken on the stove top and then cook in a 350° oven until done. If the oil is not hot enough, the chicken will absorb too much of it. Omit spices in the breading, if you prefer.
Also, I think I read that the paper bags are a must. If you line the drain tray with anything else, the oil could get reabsorbed by the chicken. The brown paper bags wick the oil away from the meat.
I needed to change up a couple items from the original recipe, so the version above has some minor changes. Most notably, the original recipe calls for peanut oil and I don't have any. I am substituting canola oil instead.
The Result:
Well, this looked a lot better than it actually tasted. I am a little disappointed! The chicken was bland, bland, bland. I think there were several issues with this recipe that all contributed to the flavor problems of the results.
First, I think that the ratio of spices to flour was way off. The amount of each of the spices needed to be increased to make a bigger impression. Otherwise, it was just flat and boring. Seriously, nothing special. I think if the spices were more pronounced, then this would have been a better recipe.
Another issue was this: fried chicken without skin is just weird. I understand that they were trying to make fried chicken healthier. I also understand the idea of cutting fat and calories by getting rid of the skin. However, I firmly believe that removing the skin, even in a healthy recipe, is a big mistake. The top of the chicken that had direct contact with the pan was very dry. There was just not a buffer from the heat to keep the meat juicy. The underside of the chicken was cooked okay, but the best part of the meat was tasteless and had a 'stick-in-the-throat' type of texture. I think in order to get a brown crust AND keep the chicken moist, the skin is necessary. Maybe some recipes are not meant for a healthy make over...ummmmm...like FRIED CHICKEN !?!?!?!?!?
(PS-I followed the instructions, and monitored the oil carefully, so I am confident I didn't screw it up.) (Could not having peanut oil have made that big of a difference??? My oil kept temp and did not burn, so I can't imagine that it would have mattered.)
Finally, I think that this particular technique is a pain. There are two different rest periods during the cooking process. During the first period, the chicken rests for 1 1/2 hours in the fridge. Okay...why???? Maybe so the breading adheres better, is my guess???? But is that step necessary???? I don't think so. Then there is a second rest period where it rests for an additional 1/2 hour so the chicken can come to room temperature. I understand why a protein item would need to be brought to room temperature before cooking (I usually do that anyway), but two different, long rest periods seemed excessive. I just don't have the patience for that.
Overall, I don't think I even care enough to try and "fix" this recipe...so I don't think I will be making it again. I am really surprised that a Cooking Light cover recipe would be so underwhelming!!!
Subscribe to:
Posts (Atom)