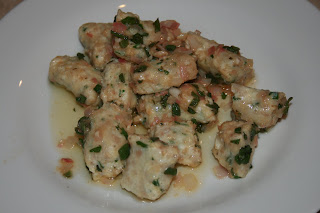
We are big Brussels sprouts fans at my house. It is the husband's favorite vegetable, and the kiddos and I gobble 'em up, too. I usually just cut them in halves, and roast them with olive oil, salt and pepper. Not terribly inventive, but tasty. Well, I found a new spin on roasted Brussels sprouts in the current issue of Cook's Illustrated magazine. The method is very similar to mine, but with a twist. Also, Cook's came up with a delicious garlic oil drizzle that put these Brussels sprouts over the top. They were pretty awesome! My husband said that he did not think that Brussels sprouts could get any better until he tried this version. I agree...these were easy and spectacular. Thanks Cook's Illustrated!
Roasted Brussels Sprouts with Garlic, Red Pepper Flakes, and Parmesan
From: Cook's Illustrated magazine, Nov. & Dec. 2011 issue, by: Andrea Geary
Ingredients:
2 1/4 pounds Brussels sprouts, trimmed and halved
3 tablespoons of olive oil
1 tablespoon water
salt and pepper to taste
For garlic oil:
3 tablespoons olive oil
2 minced garlic cloves
1/2 teaspoon of red pepper flakes
1/4 cup Parmesan, grated
Directions:
Adjust oven rack to upper-middle position and heat to 500 degrees. Toss Brussels sprouts, oil, water, 3/4 teaspoons of salt, and 1/4 teaspoons of black pepper in a large bowl until sprouts are coated. Transfer sprouts to a rimmed baking sheet and arrange so cut sides are facing down. Cover tightly with foil and roast for 10 minutes. Remove foil and continue to cook and additional 10-12 minutes, or until sprouts are browned and tender. Toss with prepared garlic oil and grated Parmesan. Transfer to a serving platter, season with additional salt and pepper if needed, and serve.
For garlic oil:
While Brussels sprouts are cooking, heat additional olive oil in a small sauce pan or skillet, over medium high heat or until oil is shimmering. Add minced garlic and red pepper flakes. Cook until garlic is golden and fragrant, about 1 minute. Remove from heat. Toss with Brussels sprouts and cheese, according to above directions.
Showing posts with label Cook's Illustrated. Show all posts
Showing posts with label Cook's Illustrated. Show all posts
May 15, 2011
Pimento Cheeseburgers
Remember when I said that the SBD should be renamed the "Cheese Lovers Diet"??? I wasn't kidding. Okay, so technically this is not a SBD recipe per se, but my friend Claire modified it by nixing the bun. The husband and I put the kids to be and then savored these burgers over a quiet dinner. We were both in love with the ooey-gooeyness of these yummy patties. The only word of caution that I care to mention about these burgers (or really South Beach in general) is make sure you are eating plenty of veggies with your meat and cheese. If you get my drift. Ahem. Also, make sure everything is lower in saturated fat to cancel out all of the guilt for eating tons of meat and cheese. We used low fat cheese and very lean meat for these, and they were still very decadent. These were fantastic!
Pimento Cheeseburgers
Adapted From: The Best of America's Test Kitchen 2011: The Year's Best Recipes, Equipment Reviews, and Tastings (Best of America's Test Kitchen Cookbook: The Year's Best Recipes)
Ingredients:
6 ounces extra-sharp 2% cheddar cheese, grated fine (about 1.5 cups)
1/3 cup drained jarred pimentos, chopped fine
2 ounces low-fat cream cheese, softened
1/2 tsp dry mustard
1/8 tsp cayenne pepper
1 tbsp mayonnaise
1/4 cup whole wheat panko bread crumbs
1/8 cup whole milk
1-1/2 pounds 93% percent lean ground beef
1 tbsp Worcestershire sauce
1/2 tsp salt
1/2 tsp black pepper
2 tablespoons grapeseed or any neutral oil
Directions:
Mix cheddar cheese, pimentos, cream cheese, mustard, and cayenne in bowl until well combined. Drop four 2-tablespoon portions of pimento cheese mixture on plate and cover tightly in plastic wrap. Freeze until firm, at least 2 hours. Combine remaining pimento cheese with mayonnaise, cover with plastic, and refrigerate.
Combine beef, Worcestershire, bread crumbs, milk, salt, and pepper in large bowl and gently knead until well combined. Divide meat into 4 equal -portions. Mold half of 1 portion of meat around 1 piece of the frozen cheese, then surround this mini-patty with the remaining half portion of meat. Repeat with the remaining frozen cheese and 3 portions meat to form 4 hamburgers.
Heat oil in large nonstick skillet over medium heat until just smoking. Add patties and cook until well browned, about 6 minutes. Flip burgers, cover skillet, and continue cooking until well done, about 6 minutes.
Distribute cheese-mayonnaise mixture evenly on top of burgers, cover, and cook until mixture is slightly melted, about 1 minute. Transfer to plate, tent with foil, and let rest 5 minutes. Serve.

The Result:
These. are. awesome. I can't wait to have the leftover burger for lunch today!
Pimento Cheeseburgers
Adapted From: The Best of America's Test Kitchen 2011: The Year's Best Recipes, Equipment Reviews, and Tastings (Best of America's Test Kitchen Cookbook: The Year's Best Recipes)
Ingredients:
6 ounces extra-sharp 2% cheddar cheese, grated fine (about 1.5 cups)
1/3 cup drained jarred pimentos, chopped fine
2 ounces low-fat cream cheese, softened
1/2 tsp dry mustard
1/8 tsp cayenne pepper
1 tbsp mayonnaise
1/4 cup whole wheat panko bread crumbs
1/8 cup whole milk
1-1/2 pounds 93% percent lean ground beef
1 tbsp Worcestershire sauce
1/2 tsp salt
1/2 tsp black pepper
2 tablespoons grapeseed or any neutral oil
Directions:
Mix cheddar cheese, pimentos, cream cheese, mustard, and cayenne in bowl until well combined. Drop four 2-tablespoon portions of pimento cheese mixture on plate and cover tightly in plastic wrap. Freeze until firm, at least 2 hours. Combine remaining pimento cheese with mayonnaise, cover with plastic, and refrigerate.
Combine beef, Worcestershire, bread crumbs, milk, salt, and pepper in large bowl and gently knead until well combined. Divide meat into 4 equal -portions. Mold half of 1 portion of meat around 1 piece of the frozen cheese, then surround this mini-patty with the remaining half portion of meat. Repeat with the remaining frozen cheese and 3 portions meat to form 4 hamburgers.
Heat oil in large nonstick skillet over medium heat until just smoking. Add patties and cook until well browned, about 6 minutes. Flip burgers, cover skillet, and continue cooking until well done, about 6 minutes.
Distribute cheese-mayonnaise mixture evenly on top of burgers, cover, and cook until mixture is slightly melted, about 1 minute. Transfer to plate, tent with foil, and let rest 5 minutes. Serve.
The Result:
These. are. awesome. I can't wait to have the leftover burger for lunch today!
November 15, 2010
Ricotta Gnocchi with Browned Butter and Sage Sauce
Gnocchi is one of my favorite pasta variations, although they are a bit temperamental to make from scratch. When done correctly, they are little pillows of joy. When done incorrectly, they are little gut-bombs. Fortunately, this recipe produced perfect gnocchi. I find that for the homemade version, I much prefer the ricotta gnocchi to the potato kind. It seems to me that the ricotta is easier to work with, and a little less labor-intensive. Paired with the browned butter sauce, this dish was absolutely phenomenal. I think it also helped that the husband and I fed the kiddos a separate dinner earlier in the evening then put them to bed, so we could relax and enjoy this meal without distraction.
Our dinnertime has become a little crazy since the twins have been born, so it is nice to take a "time out" now and then. Lately, I have been making an effort to have at least one meal a week where the husband and I can reconnect with dinner by ourselves. It's a trick I picked up from my friend, Claire. She and her husband call it "mini-date night"; and I think it is a good way to get some quality time with the spouse without the expense, fuss, and babysitting dilemma, of a real date night out. (Not that I would ever turn down a night out.) Anyway, this was a great recipe to serve for "mini-date night", and one that I will make again. A glass of white wine and a big green salad are just the right accompaniments to this yummy pasta meal.
Ricotta Gnocchi with Browned Butter and Sage Sauce
From: Cook's Illustrated Italian Favorites special issue, 2010
Ingredients:
Gnocchi:
1 Container Whole-milk Ricotta Cheese (15 – 16 oz.) (**SEE NOTES**)
2 Large Slices White Bread, crusts removed and bread torn into quarters (**SEE NOTES**)
1 Large Egg
2 Tablespoons Minced Fresh Basil
2 Tablespoons Minced Fresh Parsley
Table Salt
1/4 Teaspoon Ground Black Pepper
1/2 Grated Parmesan Cheese
6 Tablespoons All-purpose Flour (**SEE NOTES**)
Sauce:
4 Tablespoons Unsalted Butter, cut into 4 pieces
2 Tablespoons Minced Shallot
2 Teaspoons Minced Fresh Sage
1 Teaspoon Fresh Lemon Juice
1/8 Teaspoon Table Salt
Directions:
1. Line a fine-mesh strainer with 3 layers of paper towels and place over a bowl. Place the ricotta in the strainer and put it in the fridge for an hour to drain.
2. Preheat the oven to 300 F. Take bread pieces and place in a food processor and pulse for about 10 seconds. Spread the crumbs out on a half sheet pan and bake for about 10 minutes, or until golden brown. Let them cool to room temperature.
3. Put the ricotta into the food processor and process for eight, 1-second pulses and then place into a large bowl. Add the egg, basil, parsley, 1/2 teaspoon salt, and pepper to the bowl. Add the flour, Parmesan, and bread crumbs. Stir until combined and then place in the fridge for 15 minutes.
4. If the dough it too sticky, add a little bit of flour. Dust a surface with flour and take a lemon-sized piece of dough and roll it into a 3/4 inch thick rope. Cut the rope into 3/4 inch pieces and transfer to a baking sheet line with parchment paper. Repeat until all the dough is converted to small dumpling shapes.
5. Bring a large pot of water to a boil and the reduce to a SIMMER and start the sauce (see step 6). (If the water is boiling too harshly, then it may break the gnocchi apart). Add half of the gnocchi and cook until the gnocchi floats to the top. Then SIMMER the gnocchi for 2 more minutes longer and then remove with a slotted spoon. Let the water drain and add the gnocchi directly to the sauce.
6. Melt the butter in a 12 inch skillet over medium-high heat, swirling occasionally. Simmer until browned about 1 1/2 minutes and it will release a nice nutty aroma (a burning smell or black specks in the butter is bad, wipe out the pan and start over). Add the sage and shallot off heat and let it cook for a minute. Toss with the cooked gnocchi and serve immediately. Garnish with Parmesan cheese and enjoy!
Jen's Notes:
**I took a few liberties with this recipe. First, I did not make my own breadcrumbs. I omitted steps (1.) and (2.) and eliminated the two slices of white bread from the ingredients list. Instead, I substituted a 1/2 cup of whole wheat Panko bread crumbs. It worked out great, and saved a lot of time.**
**Next, to make the dish a little more healthful, I used 3 tablespoons of AP flour and 3 tablespoons of whole wheat flour for the gnocchi dough. (However, I did use AP flour for dusting the work surface.) Also, I used part-skim ricotta instead of whole milk ricotta. Again, my changes worked out great and will be substitutions I use again.**
This made a lot of gnocchi, so I ended up freezing about half of them for another meal. I just took the parchment-lined sheet pan and stuck it in my freezer. This allowed the gnocchi to flash-freeze individually (not in a big lump). Then, once frozen (I left them overnight), I took the frozen gnocchi pieces and put them in a zip top bag to store in the freezer for another use.
The Result:
This recipe was sinful! So freakin' delicious!!! I am just happy that I got a 4 mile run in before dinner, so I did not have to feel so guilty about basically eating cheese and butter for our evening meal. Yum!
November 11, 2010
Prosciutto-Wrapped Chicken and Green Beans
I have been pretty busy lately, and I have been using a lot of recipes from others and not my own. I just don't have the energy to do any creative cooking; and I don't particularly feel inspired, either. I must say, having three kids is kicking my ass a little bit lately. I am having a really hard time finding a balance between caring for my family, getting everything that needs to be done accomplished, spending time with the hubs, and carving out a little personal space for myself. I would like to make up more of my own dishes, and I sometimes find following a recipe a bit stifling. With that said, I just can't devote a whole lot of mental capacity to coming up with anything original in the kitchen. Sigh. Maybe when my girls get a little older and the boy is in school full-time, I can start cooking more "off the cuff" again.
Until then...this is another great recipe I found on my friend, Claire's blog. She turned my on to Cook's Illustrated special recipe issues (like the one this dish came from) which seem to always have a ton of good stuff to try. Anyway, her family loved it; so I knew it would be a tasty no-brainer. A great recipe without having to think too much about it...definitely up my alley.
Prosciutto-Wrapped Chicken with Green Beans
From: America's Test Kitchen 30-Minute Suppers Summer 2010
Ingredients:
4 Tbsp unsalted butter, softened
1/4 cup pitted mixed olives
1/4 cup lightly packed sage leaves
4 boneless, skinless chicken breasts
Salt and pepper
8 thin slices prosciutto
2 Tbsp olive oil
3 garlic cloves, sliced thin
1 pound green beans, stem ends trimmed
1/4 cup water
Directions:
Adjust oven rack to upper middle position and heat oven to 400 degrees. Process butter, olives, and sage in food processor until smooth.
Pat chicken dry with paper towels and season with salt and pepper. Spread butter mixture on 1 side of each chicken breast. Working with 1 breast at a time, slightly overlap 2 slices of prosciutto on work surface. Lay chicken, butter side down, in center of slices, then fold prosciutto over chicken. Repeat with remaining prosciutto and chicken.
Heat oil in large skillet over medium-high heat until just smoking. Add chicken, seam side down, and cook until well browned, about 2 minutes per side. Transfer chicken to baking sheet and bake until chicken registers 160 degrees, about 8 minutes. Transfer to platter and tent with foil.
Reduce heat to medium. Add garlic to skillet and cook until lightly browned, 1-2 minutes. Add green beans and toss to coat thoroughly. Add water, cover, and cook until bright green and tender, 8-10 minutes. Season with salt and pepper to taste. Serve chicken with green beans.

The Result:
This was really good. I used garlic green olives from my grocer's olive bar, and I just steamed a bag of frozen, whole green beans with some garlic salt to save some time. We all really liked this meal! The only word of caution I would like mention is to go lightly on the salt when seasoning the chicken. The prosciutto and olives are both fairly salty, and this can get outta hand with the salt pretty quick. Mine turned out fine, but was on the verge of being over-salted due to my heavy hand. I would definitley make this dish again, but I would just be more careful next time with the seasoning.
Until then...this is another great recipe I found on my friend, Claire's blog. She turned my on to Cook's Illustrated special recipe issues (like the one this dish came from) which seem to always have a ton of good stuff to try. Anyway, her family loved it; so I knew it would be a tasty no-brainer. A great recipe without having to think too much about it...definitely up my alley.
Prosciutto-Wrapped Chicken with Green Beans
From: America's Test Kitchen 30-Minute Suppers Summer 2010
Ingredients:
4 Tbsp unsalted butter, softened
1/4 cup pitted mixed olives
1/4 cup lightly packed sage leaves
4 boneless, skinless chicken breasts
Salt and pepper
8 thin slices prosciutto
2 Tbsp olive oil
3 garlic cloves, sliced thin
1 pound green beans, stem ends trimmed
1/4 cup water
Directions:
Adjust oven rack to upper middle position and heat oven to 400 degrees. Process butter, olives, and sage in food processor until smooth.
Pat chicken dry with paper towels and season with salt and pepper. Spread butter mixture on 1 side of each chicken breast. Working with 1 breast at a time, slightly overlap 2 slices of prosciutto on work surface. Lay chicken, butter side down, in center of slices, then fold prosciutto over chicken. Repeat with remaining prosciutto and chicken.
Heat oil in large skillet over medium-high heat until just smoking. Add chicken, seam side down, and cook until well browned, about 2 minutes per side. Transfer chicken to baking sheet and bake until chicken registers 160 degrees, about 8 minutes. Transfer to platter and tent with foil.
Reduce heat to medium. Add garlic to skillet and cook until lightly browned, 1-2 minutes. Add green beans and toss to coat thoroughly. Add water, cover, and cook until bright green and tender, 8-10 minutes. Season with salt and pepper to taste. Serve chicken with green beans.
The Result:
This was really good. I used garlic green olives from my grocer's olive bar, and I just steamed a bag of frozen, whole green beans with some garlic salt to save some time. We all really liked this meal! The only word of caution I would like mention is to go lightly on the salt when seasoning the chicken. The prosciutto and olives are both fairly salty, and this can get outta hand with the salt pretty quick. Mine turned out fine, but was on the verge of being over-salted due to my heavy hand. I would definitley make this dish again, but I would just be more careful next time with the seasoning.
September 25, 2010
Broiled Tilapia with Thai Coconut-Curry Sauce
Every year, some of our local restaurants participate in "Arizona Restaurant Week" in which they set a 'prix fixe' three course meal at a great price. It is really fabulous! So my post is going to be short today, since the husband and I are going out to dinner (--happy dance-- without children --happy dance--)in support of this awesome local deal.
So, here is what we had for dinner last night. I love curry flavors, and this was a great way to prepare tilapia!
Broiled Tilapia with Thai Coconut-Curry Sauce
From: Cooking Light, September 2002
Ingredients:
1 teaspoon dark sesame oil, divided
2 teaspoons minced peeled fresh ginger
2 garlic cloves, minced
1 cup finely chopped red bell pepper
1 cup chopped green onions
1 teaspoon curry powder
2 teaspoons red curry paste
1/2 teaspoon ground cumin
4 teaspoons low-sodium soy sauce
1 tablespoon brown sugar
1/2 teaspoon salt, divided
1 (14-ounce) can light coconut milk
2 tablespoons chopped fresh cilantro
4 (6-ounce) tilapia fillets
Cooking spray
3 cups hot cooked basmati rice (I used brown rice)
4 lime wedges
Directions:
Preheat broiler.
Heat 1/2 teaspoon oil in a large nonstick skillet over medium heat. Add ginger and garlic; cook 1 minute. Add pepper and onions; cook 1 minute. Stir in curry powder, curry paste, and cumin; cook 1 minute. Add soy sauce, sugar, 1/4 teaspoon salt, and coconut milk; bring to a simmer (do not boil). Remove from heat; stir in cilantro.
Brush fish with 1/2 teaspoon oil; sprinkle with 1/4 teaspoon salt. Place fish on a baking sheet coated with cooking spray. Broil 7 minutes or until fish flakes easily when tested with a fork. Serve fish with sauce, rice, and lime wedges.
Nutritional Info:
Yield: 4 servings (serving size: 1 fillet, 1/2 cup sauce, 3/4 cup rice, and 1 lime wedge)
Calories:506 (30% from fat)
Fat:17.1g (sat 5.9g,mono 6g,poly 2.5g)
Protein:29g
Carbohydrate:56.6g
Fiber:3.1g
Cholesterol:82mg
Iron:2.7mg
Sodium:616mg
Calcium:47mg

The Result:
I cooked my fish under the broiler for 5 minutes. It turned out perfectly cooked and flaky. This was a great twist on tilapia and one that I will make again. I added herbs,sauteed onions, and almond slivers to our brown rice for a little textural boost. Yum, yum, yum!
So, here is what we had for dinner last night. I love curry flavors, and this was a great way to prepare tilapia!
Broiled Tilapia with Thai Coconut-Curry Sauce
From: Cooking Light, September 2002
Ingredients:
1 teaspoon dark sesame oil, divided
2 teaspoons minced peeled fresh ginger
2 garlic cloves, minced
1 cup finely chopped red bell pepper
1 cup chopped green onions
1 teaspoon curry powder
2 teaspoons red curry paste
1/2 teaspoon ground cumin
4 teaspoons low-sodium soy sauce
1 tablespoon brown sugar
1/2 teaspoon salt, divided
1 (14-ounce) can light coconut milk
2 tablespoons chopped fresh cilantro
4 (6-ounce) tilapia fillets
Cooking spray
3 cups hot cooked basmati rice (I used brown rice)
4 lime wedges
Directions:
Preheat broiler.
Heat 1/2 teaspoon oil in a large nonstick skillet over medium heat. Add ginger and garlic; cook 1 minute. Add pepper and onions; cook 1 minute. Stir in curry powder, curry paste, and cumin; cook 1 minute. Add soy sauce, sugar, 1/4 teaspoon salt, and coconut milk; bring to a simmer (do not boil). Remove from heat; stir in cilantro.
Brush fish with 1/2 teaspoon oil; sprinkle with 1/4 teaspoon salt. Place fish on a baking sheet coated with cooking spray. Broil 7 minutes or until fish flakes easily when tested with a fork. Serve fish with sauce, rice, and lime wedges.
Nutritional Info:
Yield: 4 servings (serving size: 1 fillet, 1/2 cup sauce, 3/4 cup rice, and 1 lime wedge)
Calories:506 (30% from fat)
Fat:17.1g (sat 5.9g,mono 6g,poly 2.5g)
Protein:29g
Carbohydrate:56.6g
Fiber:3.1g
Cholesterol:82mg
Iron:2.7mg
Sodium:616mg
Calcium:47mg
The Result:
I cooked my fish under the broiler for 5 minutes. It turned out perfectly cooked and flaky. This was a great twist on tilapia and one that I will make again. I added herbs,sauteed onions, and almond slivers to our brown rice for a little textural boost. Yum, yum, yum!
September 9, 2010
Thai Chicken Skewers with Coconut Curry Dipping Sauce and Curried Rice Salad
The hubs got me a new phone yesterday, and I wanted to get dinner on the table fast so I could go play with it!!! Thankfully, this recipe totally worked out so I had plenty of phone time. :) This meal was super-flavorful and it came together pretty quickly. The chicken recipe actually came to me via Facebook, of all places. Since I follow Weight Watchers, this recipe popped right up on my feed. How convenient! The rice recipe is from the America's Test Kitchen Light & Healthy 2010 cookbook that I am holding hostage from the library. (Someday, I will return it...just not anytime soon!) I love both Indian and Thai curries, and this combination was totally satisfying.
Thai Chicken Skewers with Coconut Curry Dipping Sauce
From: weightwatchers.com via Facebook
Ingredients:
1 can(13 1/2 fl oz) light coconut milk, about (1 3/4 cups)
2 Tbsp cilantro, fresh, chopped, or to taste
1 Tbsp dark brown sugar
1 1/2 tsp red curry paste, Thai-variety
1 tsp ginger root, fresh, grated
1 tsp lime zest
3/4 tsp table salt
2 spray(s) cooking spray
1 pound(s) uncooked boneless, skinless chicken breast, pounded thin, cut crosswise on the diagonal into 16 strips
Directions:
In a medium bowl, whisk together coconut milk, cilantro, sugar, curry paste, ginger, lime zest and salt until blended; set 1 cup of coconut milk mixture aside for dipping sauce.
Transfer remaining coconut milk mixture to a resealable plastic food storage bag (or shallow glass container with cover). Add chicken to bag (or container), seal and turn to coat; refrigerate at least 1 hour or up to 3 hours.
Meanwhile, soak sixteen 18-inch wooden skewers in water for 20 to 30 minutes(to prevent scorching).
Preheat broiler. Line a broiler pan rack with nonstick aluminum foil (or use a nonstick baking sheet coated with cooking spray). Remove chicken from marinade; discard marinade. Thread one piece of chicken onto each skewer and place on prepared pan; coat with cooking spray. Broil, turning once, until chicken is cooked through, about 5 to 6 minutes.
(*****ALTERNATIVE METHOD: Cook the chicken on an outdoor grill or grill pan for attractive grill marks.******)
Meanwhile, bring reserved sauce to a boil in a small saucepan. Reduce heat and simmer, stirring occasionally, until slightly thickened and reduced to 1/2 cup, about 5 minutes. Arrange skewers on serving platter. Spoon sauce into a bowl for dipping. Yields 2 skewers and about 1 tablespoon of sauce per serving.
Jen's Notes:
I opted to cook my chicken on the gas grill. I think it only took about 5 minutes for perfectly cooked, juicy chicken.
***********************************************************
Curried Rice Salad
From: America's Test Kitchen Light & Healthy 2010 cookbook
Ingredients:
2/3 cup raisins
1/4 cup fresh lime juice (about 2 limes)
3/4 teaspoon sugar
1 1/2 cups of brown basmati or long-grain rice
salt and pepper to taste
1 onion, minced (about 1 cup)
1 jalapeno chile, stemmed, seeded, and minced
1 teaspoon canola oil
1 Tablespoon grated or minced fresh ginger
1 1/2 teaspoon curry powder
1 garlic clove, minced
3 Tablespoons chopped, fresh cilantro
Directions:
Combine the raisins, lime juice, and sugar in a small bowl and set aside. Cook rice according to package directions. Cool rice to room temperature and set aside.
Combine the onion, jalapeno, oil and 1/4 teaspoon of salt in a pot. Cover and cook over medium-low heat, stirring occasionally, until the veggies are softened; about 8 to 10 minutes. Stir in ginger, curry powder, and garlic, and cook until fragrant, about 30 seconds. Off the heat, stir in raisin mixture, then transfer to a large bowl and cool to room temperature. Add the rice and cilantro to the bowl with the raisin mixture and toss to combine. Season with salt and pepper to taste and serve.


(The dipping sauce...not the most attractive photo; but it was so yummy!)
The Result:
This was so tasty, and my whole family gave this meal a 'thumbs-up'. The chicken and dipping sauce was so yummy, and in no way a "healthy" sacrifice. I love recipes that are good for you, but still are enjoyable! The curried rice salad was also a big hit. It was tangy, spicy, sweet, tart, savory, and had great texture. It was the perfect side dish to our skewers.
Thai Chicken Skewers with Coconut Curry Dipping Sauce
From: weightwatchers.com via Facebook
Ingredients:
1 can(13 1/2 fl oz) light coconut milk, about (1 3/4 cups)
2 Tbsp cilantro, fresh, chopped, or to taste
1 Tbsp dark brown sugar
1 1/2 tsp red curry paste, Thai-variety
1 tsp ginger root, fresh, grated
1 tsp lime zest
3/4 tsp table salt
2 spray(s) cooking spray
1 pound(s) uncooked boneless, skinless chicken breast, pounded thin, cut crosswise on the diagonal into 16 strips
Directions:
In a medium bowl, whisk together coconut milk, cilantro, sugar, curry paste, ginger, lime zest and salt until blended; set 1 cup of coconut milk mixture aside for dipping sauce.
Transfer remaining coconut milk mixture to a resealable plastic food storage bag (or shallow glass container with cover). Add chicken to bag (or container), seal and turn to coat; refrigerate at least 1 hour or up to 3 hours.
Meanwhile, soak sixteen 18-inch wooden skewers in water for 20 to 30 minutes(to prevent scorching).
Preheat broiler. Line a broiler pan rack with nonstick aluminum foil (or use a nonstick baking sheet coated with cooking spray). Remove chicken from marinade; discard marinade. Thread one piece of chicken onto each skewer and place on prepared pan; coat with cooking spray. Broil, turning once, until chicken is cooked through, about 5 to 6 minutes.
(*****ALTERNATIVE METHOD: Cook the chicken on an outdoor grill or grill pan for attractive grill marks.******)
Meanwhile, bring reserved sauce to a boil in a small saucepan. Reduce heat and simmer, stirring occasionally, until slightly thickened and reduced to 1/2 cup, about 5 minutes. Arrange skewers on serving platter. Spoon sauce into a bowl for dipping. Yields 2 skewers and about 1 tablespoon of sauce per serving.
Jen's Notes:
I opted to cook my chicken on the gas grill. I think it only took about 5 minutes for perfectly cooked, juicy chicken.
***********************************************************
Curried Rice Salad
From: America's Test Kitchen Light & Healthy 2010 cookbook
Ingredients:
2/3 cup raisins
1/4 cup fresh lime juice (about 2 limes)
3/4 teaspoon sugar
1 1/2 cups of brown basmati or long-grain rice
salt and pepper to taste
1 onion, minced (about 1 cup)
1 jalapeno chile, stemmed, seeded, and minced
1 teaspoon canola oil
1 Tablespoon grated or minced fresh ginger
1 1/2 teaspoon curry powder
1 garlic clove, minced
3 Tablespoons chopped, fresh cilantro
Directions:
Combine the raisins, lime juice, and sugar in a small bowl and set aside. Cook rice according to package directions. Cool rice to room temperature and set aside.
Combine the onion, jalapeno, oil and 1/4 teaspoon of salt in a pot. Cover and cook over medium-low heat, stirring occasionally, until the veggies are softened; about 8 to 10 minutes. Stir in ginger, curry powder, and garlic, and cook until fragrant, about 30 seconds. Off the heat, stir in raisin mixture, then transfer to a large bowl and cool to room temperature. Add the rice and cilantro to the bowl with the raisin mixture and toss to combine. Season with salt and pepper to taste and serve.
(The dipping sauce...not the most attractive photo; but it was so yummy!)
The Result:
This was so tasty, and my whole family gave this meal a 'thumbs-up'. The chicken and dipping sauce was so yummy, and in no way a "healthy" sacrifice. I love recipes that are good for you, but still are enjoyable! The curried rice salad was also a big hit. It was tangy, spicy, sweet, tart, savory, and had great texture. It was the perfect side dish to our skewers.
August 30, 2010
Spinach & Mushroom Lasagna
I find spinach lasagna normally pretty heavy and flavorless. I have tried several different attempts and they all tend to turn out the same...very one-dimensional and ho-hum. It is hard to love white, gloppy, overly-creamy sauce, starchy noodles, and boring, blah, frozen spinach(*). The whole dish is usually just a bunch of superfluous calories without packing a true flavor punch.
(*Although, I will add a caveat here. I am not a fan of frozen spinach. While it is convenient, it just tastes very metallic to me.)
The bottom line is that I don't usually like to spend a lot of time on a labor-intensive dish--such as lasagna--and not have it be a totally rewarding dining experience. Until now, I had basically decided to write spinach lasagna off as a dish that was just not worth the effort. Thankfully, this recipe has restored my faith. I have finally found a version of this dish that my whole family loves, and that is everything I had hoped for in the flavor department.
Well, sort of...
I had to do some of my own tweaking to get it the way I wanted it, but the end result was spot-on. I started with America's Test Kitchen Light & Healthy 2010 cookbook's take on spinach lasagna. Then I made so many changes it barely resembled the original published recipe. I, more or less, used the cookbook recipe as a blueprint and then did my own thing. The result was by far my favorite version of a spinach lasagna to date. Finally, a winner!!!!
Spinach & Mushroom Lasagna
Adapted From: America's Test Kitchen Light & Healthy 2010 cookbook
Ingredients:
2 Tablespoons of olive oil
1 onion, diced
4 cloves of garlic, minced
1 package of sliced mushrooms
2 bags of fresh, baby spinach
3 cups of milk
3 Tablespoons of corn starch
salt and pepper to taste
1 teaspoon of fresh nutmeg, grated
2 bay leaves
1 cup of Parmesan cheese, divided
8 ounces of low-fat cottage cheese, small curd
1 egg
1 cup of shredded asiago cheese
1/2 cup of shredded fontina cheese
1/2 cup of shredded mozzarella cheese
1 box of your choice of lasagna noodles, cooked & drained
cooking spray
fresh basil, chiffonade
Directions:
Preheat oven to 425 degrees. Cook and drain the lasagna noodles as needed. Run noodles under cool water to prevent sticking and set aside.
In a large skillet over medium-high heat, saute onions and mushrooms until onions soften and are translucent and mushrooms are cooked. Add salt to taste. Add garlic and cook for another 30 seconds. Add grated nutmeg and bay leaves. Turn heat down to low, and add milk. Sprinkle in corn starch while whisking continuously. Turn heat back up, until milk mixture is simmering but not boiling (keep whisking during this step). When mixture thickens into a sauce, stir in the spinach leaves until they are wilted. Remove from the heat and add 1/2 cup of Parmesan cheese to the mixture. Season with salt and pepper, as needed. Set aside.
In a blender or food processor, combine the egg, cottage cheese, and a pinch of salt until smooth in consistency. Set aside.
To assemble the lasagna: Spray 9 x 13 casserole dish with cooking spray. Layer noodles on the bottom of the pan. Spread half of spinach/mushroom mixture on top of noodles. Sprinkle half of shredded asiago, mozzarella, and fontina cheeses. Add another layer of noodles. Top layer with cottage cheese mixture. Add another layer of noodles. Top with the remaining spinach/mushroom mixture, shredded cheeses, and Parmesan cheese. Bake for 20 minutes. At the end of the cook time, turn on the broiler on high to get the cheese brown and toasty for approximately 3-5 minutes. Remove from oven and let cool for 10 minutes before cutting into squares. Sprinkle with fresh basil. Serve and enjoy!

The Result:
This took a little time to put together, but it was well worth the effort. The husband and I both had seconds, and I could not stop taking bites out of the pan as I put away the leftovers. Needless to say, we all loved this dish, and it will be one that I make again.
(*Although, I will add a caveat here. I am not a fan of frozen spinach. While it is convenient, it just tastes very metallic to me.)
The bottom line is that I don't usually like to spend a lot of time on a labor-intensive dish--such as lasagna--and not have it be a totally rewarding dining experience. Until now, I had basically decided to write spinach lasagna off as a dish that was just not worth the effort. Thankfully, this recipe has restored my faith. I have finally found a version of this dish that my whole family loves, and that is everything I had hoped for in the flavor department.
Well, sort of...
I had to do some of my own tweaking to get it the way I wanted it, but the end result was spot-on. I started with America's Test Kitchen Light & Healthy 2010 cookbook's take on spinach lasagna. Then I made so many changes it barely resembled the original published recipe. I, more or less, used the cookbook recipe as a blueprint and then did my own thing. The result was by far my favorite version of a spinach lasagna to date. Finally, a winner!!!!
Spinach & Mushroom Lasagna
Adapted From: America's Test Kitchen Light & Healthy 2010 cookbook
Ingredients:
2 Tablespoons of olive oil
1 onion, diced
4 cloves of garlic, minced
1 package of sliced mushrooms
2 bags of fresh, baby spinach
3 cups of milk
3 Tablespoons of corn starch
salt and pepper to taste
1 teaspoon of fresh nutmeg, grated
2 bay leaves
1 cup of Parmesan cheese, divided
8 ounces of low-fat cottage cheese, small curd
1 egg
1 cup of shredded asiago cheese
1/2 cup of shredded fontina cheese
1/2 cup of shredded mozzarella cheese
1 box of your choice of lasagna noodles, cooked & drained
cooking spray
fresh basil, chiffonade
Directions:
Preheat oven to 425 degrees. Cook and drain the lasagna noodles as needed. Run noodles under cool water to prevent sticking and set aside.
In a large skillet over medium-high heat, saute onions and mushrooms until onions soften and are translucent and mushrooms are cooked. Add salt to taste. Add garlic and cook for another 30 seconds. Add grated nutmeg and bay leaves. Turn heat down to low, and add milk. Sprinkle in corn starch while whisking continuously. Turn heat back up, until milk mixture is simmering but not boiling (keep whisking during this step). When mixture thickens into a sauce, stir in the spinach leaves until they are wilted. Remove from the heat and add 1/2 cup of Parmesan cheese to the mixture. Season with salt and pepper, as needed. Set aside.
In a blender or food processor, combine the egg, cottage cheese, and a pinch of salt until smooth in consistency. Set aside.
To assemble the lasagna: Spray 9 x 13 casserole dish with cooking spray. Layer noodles on the bottom of the pan. Spread half of spinach/mushroom mixture on top of noodles. Sprinkle half of shredded asiago, mozzarella, and fontina cheeses. Add another layer of noodles. Top layer with cottage cheese mixture. Add another layer of noodles. Top with the remaining spinach/mushroom mixture, shredded cheeses, and Parmesan cheese. Bake for 20 minutes. At the end of the cook time, turn on the broiler on high to get the cheese brown and toasty for approximately 3-5 minutes. Remove from oven and let cool for 10 minutes before cutting into squares. Sprinkle with fresh basil. Serve and enjoy!
The Result:
This took a little time to put together, but it was well worth the effort. The husband and I both had seconds, and I could not stop taking bites out of the pan as I put away the leftovers. Needless to say, we all loved this dish, and it will be one that I make again.
August 29, 2010
Lighter Chicken Caesar Salad
Chicken Caesar salad is usually pretty high in calories (sometimes as many as a double cheeseburger), so I was pleased to find this more healthful version in the America's Test Kitchen Light & Healthy 2010 cookbook. I love a good classic Caesar, and this recipe does not disappoint!!! This dish delivered juicy, perfectly cooked chicken breast, homemade, garlicky croutons, and perfectly flavored Caesar dressing; all served over a bed of crisp romaine lettuce. Yum!
Lighter Chicken Caesar Salad
Adapted From: America's Test Kitchen Light & Healthy 2010 cookbook
Ingredients:
Dressing:
1/2 cup low-fat buttermilk
2 Tablespoons light mayo
2 Tablespoons fresh lemon juice
2 Tablespoons water
2 teaspoons Dijon mustard
1 teaspoon Worcestershire sauce
2 garlic cloves, minced
2 anchovy fillets, rinsed and patted dry (--OR--substitute 1 Tablespoon of anchovy paste)
1/2 teaspoon pepper
1/4 teaspoon salt
2 Tablespoons extra-virgin olive oil
1 ounce Parmesan cheese, grated (about 1/2 cup)
Salad:
2 slices of white sandwich bread, cut into 1 inch cubes (--OR--substitute 100% whole wheat bread)
cooking spray
salt to taste
1/2 teaspoon of garlic powder
4 (6 ounce) boneless, skinless chicken breasts, trimmed
1/2 teaspoon pepper
1 teaspoon canola oil
1/2 cup of water
3 romaine lettuce hearts (1 lb.), torn into bite sized pieces (about 12 cups)
Directions:
1. For the dressing: Process the buttermilk, mayo, lemon juice, water, mustard, Worcestershire, garlic, anchovy paste, pepper, and salt in a food processor. Pulse for 30 seconds. With the motor running, add the olive oil in a steady stream. Transfer the mixture to a bowl and mix in the Parmesan cheese (except for 1 Tablespoon, set aside).
2. For the salad: Heat oven to 350 degrees. Spread the bread cubes on baking sheet. Coat with cooking spray on both sides. Sprinkle with salt, pepper, and garlic powder. Mix with your clean hands, to make sure the bread cubes are well coated with spices. Bake for 10-20 minutes, until crisp and turning once during cooking. Set aside to cool.
3. Pat the chicken breasts dry with paper towel and sprinkle with salt and pepper. Heat canola oil in a skillet over medium-high heat. When oil is hot, add chicken seasoned side down. Brown chicken in the skillet for 5-7 minutes. Turn over and add 1/2 cup of water to the pan and cover. Cook for 5-7 minutes, or until chicken is cooked thoroughly. Remove cooked chicken from pan and rest for 5 minutes. Slice into strips.
4. Assemble salad as follows: Top a bed of romaine lettuce with cooked chicken, croutons, and salad dressing. Toss lightly to combine. Sprinkle additional Parmesan cheese on top for garnish. Serve and enjoy!
Nutritional Info:
Yield: Serves 4
Total Calories per serving: 410
Total Fat: 18g
Sat Fat: 4g
Cholesterol: 110 mg

The Result:
This was a perfect version of Chicken Caesar salad. I substituted whole wheat bread and anchovy paste to accomodate what I had on hand. Also, I cut the recipe in half for our family size. This salad was totally delicious!!!
Lighter Chicken Caesar Salad
Adapted From: America's Test Kitchen Light & Healthy 2010 cookbook
Ingredients:
Dressing:
1/2 cup low-fat buttermilk
2 Tablespoons light mayo
2 Tablespoons fresh lemon juice
2 Tablespoons water
2 teaspoons Dijon mustard
1 teaspoon Worcestershire sauce
2 garlic cloves, minced
2 anchovy fillets, rinsed and patted dry (--OR--substitute 1 Tablespoon of anchovy paste)
1/2 teaspoon pepper
1/4 teaspoon salt
2 Tablespoons extra-virgin olive oil
1 ounce Parmesan cheese, grated (about 1/2 cup)
Salad:
2 slices of white sandwich bread, cut into 1 inch cubes (--OR--substitute 100% whole wheat bread)
cooking spray
salt to taste
1/2 teaspoon of garlic powder
4 (6 ounce) boneless, skinless chicken breasts, trimmed
1/2 teaspoon pepper
1 teaspoon canola oil
1/2 cup of water
3 romaine lettuce hearts (1 lb.), torn into bite sized pieces (about 12 cups)
Directions:
1. For the dressing: Process the buttermilk, mayo, lemon juice, water, mustard, Worcestershire, garlic, anchovy paste, pepper, and salt in a food processor. Pulse for 30 seconds. With the motor running, add the olive oil in a steady stream. Transfer the mixture to a bowl and mix in the Parmesan cheese (except for 1 Tablespoon, set aside).
2. For the salad: Heat oven to 350 degrees. Spread the bread cubes on baking sheet. Coat with cooking spray on both sides. Sprinkle with salt, pepper, and garlic powder. Mix with your clean hands, to make sure the bread cubes are well coated with spices. Bake for 10-20 minutes, until crisp and turning once during cooking. Set aside to cool.
3. Pat the chicken breasts dry with paper towel and sprinkle with salt and pepper. Heat canola oil in a skillet over medium-high heat. When oil is hot, add chicken seasoned side down. Brown chicken in the skillet for 5-7 minutes. Turn over and add 1/2 cup of water to the pan and cover. Cook for 5-7 minutes, or until chicken is cooked thoroughly. Remove cooked chicken from pan and rest for 5 minutes. Slice into strips.
4. Assemble salad as follows: Top a bed of romaine lettuce with cooked chicken, croutons, and salad dressing. Toss lightly to combine. Sprinkle additional Parmesan cheese on top for garnish. Serve and enjoy!
Nutritional Info:
Yield: Serves 4
Total Calories per serving: 410
Total Fat: 18g
Sat Fat: 4g
Cholesterol: 110 mg
The Result:
This was a perfect version of Chicken Caesar salad. I substituted whole wheat bread and anchovy paste to accomodate what I had on hand. Also, I cut the recipe in half for our family size. This salad was totally delicious!!!
August 18, 2010
Indian-Style Vegetable Curry
I find it funny that most people either totally love or totally hate curry. There seems to be no middle ground. Just mention the word "curry" in mixed company and you will get quite a diverse range of reactions from the crowd. It is just one of those food categories that people have strong feelings about, on both sides of the spectrum. Personally, I fall into the first group...I am a huge fan of Indian curries. There is just something about the bold spices and savory sauces that is so completely comforting to me. Also, I truly appreciate that a 'curry' is such a unique food experience. There is nothing else like it; with the exception of more curry. I really do love it!
Needless to say, I was pleased to find this recipe in my borrowed copy of America's Test Kitchen Light & Healthy 2010. It took a little time to put together, but the effort was well worth it! This was a delicious vegetable curry dish that hit all the right notes. Best of all, it was healthy without sacrificing taste. Yum!
Indian-Style Vegetable Curry
From: America's Test Kitchen Light & Healthy 2010
Ingredients:
1 (14.5 oz.) can diced tomatoes, pulsed in a food processor until nearly smooth with 1/4-inch pieces visible
4 teaspoons mild curry powder
1 teaspoon garam masala
3 Tablespoons canola oil
2 onions, minced (about 2 cups)
12 oz. Red Bliss potatoes (about 2 medium), cut into 1/2-inch pieces
3 garlic cloves, minced
1 Tbsp. grated fresh ginger
1 serrano chile, stemmed and seeded,and minced
1 Tbsp. tomato paste
1/2 medium head cauliflower, trimmed, cored, and cut into 1-inch florets (about 4 cups)
1 1/4 cups water
1 (15-oz.) can chickpeas, drained and rinsed
Salt to taste
1 1/2 cups frozen peas (8 oz.)
1/2 cup of low-fat or fat-free, plain Greek-style yogurt
1/4 cup of chopped cilantro
cooked brown rice
Directions:
In a food processor, pulse diced tomatoes about 8 times, or until mostly smooth. Set aside.
Heat 2 Tbsp. of the oil in a large Dutch oven over medium-high heat until shimmering. Add the curry powder and garam masala, and cook until fragrant; about 10 seconds. Add the onions and potatoes and cook, stirring occasionally, until the onions are caramelized and the potatoes are golden brown on the edges, about 10 minutes. (Reduce the heat to medium if the onions darken too quickly.)
Reduce the heat to medium. Clear the center of the pan and add the remaining 1 Tbsp. oil and the garlic, ginger, chile and tomato paste; cook, stirring constantly, until fragrant, about 30 seconds. Add the cauliflower and cook, stirring constantly, until the spices coat the florets, about 2 minutes longer.
Add the processed tomatoes, water, chickpeas, and 1 tsp. salt; increase the heat to medium-high and bring the mixture to a boil, scraping the bottom of the pan with a spatula or wooden spoon to loosen the browned bits. Cover and reduce the heat to medium. Simmer briskly, stirring occasionally, until the vegetables are tender, 10 to 15 minutes. Stir in the peas and continue to cook until heated through, about 2 minutes longer. Remove from the heat and stir in the yogurt. Adjust the seasoning with salt to taste, and stir in the cilantro. Serve immediately over brown rice.

The Result:
This dish was a terrific vegetarian curry! Completely satisfying with perfectly balanced flavors. I am so glad I tried it!!!
August 17, 2010
Pesto Pasta Salad with Grilled Chicken
I have had some real stinker recipes lately. Stuff that was not even post-worthy. Thankfully, this was not one of those meals. I had a completely different dinner slotted for tonight's menu, but I did not want to chance another sucky experiment. I just didn't have it in me. I switched a few nights up, so we could have this dish instead. My friend, Claire told me about this pasta salad that she found in her copy of America's Test Kitchen "30-Minute Suppers Summer 2010" special issue magazine. They tried it and loved it, so I was pretty confident that it would be great. Sure enough, it was fantastic! Hooray!!! I think both Claire and America's Test Kitchen saved our dinner plans.
Pesto Pasta Salad with Grilled Chicken
From: America's Test Kitchen 30-Minute Suppers Summer 2010 Special Issue
Ingredients:
1/2 cup toasted pine nuts
1/2 cup grated Parmesan cheese
1 garlic clove, minced
1/2 cup chopped fresh basil
2 Tbsp juice from 1 lemon
2/3 cup plus 1 tablespoon extra virgin olive oil
2 boneless skinless chicken breasts (about 3/4 pound)
1 pound fusilli
1 pint cherry tomatoes, halved
3 ounces (about 4 1/2 cups) baby arugula
Directions:
Bring 4 quarts water to boil in large pot. Combine pine nuts, cheese, garlic, basil, and lemon juice in food processor and process until smooth, about 10 seconds. With processor running, slowly pour in 2/3 cup olive oil and process until smooth.
Brush chicken with remaining oil and season with salt and pepper. Grill over hot fire until browned and cooked through, about 5 minutes per side. Transfer to plate and tent with foil. When cool enough to handle, shred chicken.
Meanwhile, add 1 tablespoon salt and fusilli to boiling water and cook until al dente. Reserve 1/2 cup cooking water, drain fusilli, and rinse fusilli with cold water. Transfer cooked fusilli to large bowl.
Toss pesto, chicken, tomatoes, and arugula with fusilli, adding reserved cooking water as needed. Season with salt and pepper to taste. Serve.

The Result:
So, I cheated a little. I didn't make the pesto, but used good quality jarred pesto instead. It was just easier. I also used rotini whole wheat pasta, chopped heirloom tomatoes, and added some shredded asiago and sharp provolone cheese for fun. Come to think of it, I cheated a lot. It still turned out fabulous!!! We served it at room temperature, and the flavors were so refreshing. Our meal was certainly a tasty summertime treat. Yum! This recipe is another keeper!
Pesto Pasta Salad with Grilled Chicken
From: America's Test Kitchen 30-Minute Suppers Summer 2010 Special Issue
Ingredients:
1/2 cup toasted pine nuts
1/2 cup grated Parmesan cheese
1 garlic clove, minced
1/2 cup chopped fresh basil
2 Tbsp juice from 1 lemon
2/3 cup plus 1 tablespoon extra virgin olive oil
2 boneless skinless chicken breasts (about 3/4 pound)
1 pound fusilli
1 pint cherry tomatoes, halved
3 ounces (about 4 1/2 cups) baby arugula
Directions:
Bring 4 quarts water to boil in large pot. Combine pine nuts, cheese, garlic, basil, and lemon juice in food processor and process until smooth, about 10 seconds. With processor running, slowly pour in 2/3 cup olive oil and process until smooth.
Brush chicken with remaining oil and season with salt and pepper. Grill over hot fire until browned and cooked through, about 5 minutes per side. Transfer to plate and tent with foil. When cool enough to handle, shred chicken.
Meanwhile, add 1 tablespoon salt and fusilli to boiling water and cook until al dente. Reserve 1/2 cup cooking water, drain fusilli, and rinse fusilli with cold water. Transfer cooked fusilli to large bowl.
Toss pesto, chicken, tomatoes, and arugula with fusilli, adding reserved cooking water as needed. Season with salt and pepper to taste. Serve.
The Result:
So, I cheated a little. I didn't make the pesto, but used good quality jarred pesto instead. It was just easier. I also used rotini whole wheat pasta, chopped heirloom tomatoes, and added some shredded asiago and sharp provolone cheese for fun. Come to think of it, I cheated a lot. It still turned out fabulous!!! We served it at room temperature, and the flavors were so refreshing. Our meal was certainly a tasty summertime treat. Yum! This recipe is another keeper!
June 28, 2009
Grilled Lemon Parsley Chicken Breasts
I love grilled food. I simply cannot get enough of the grill flavor during the summertime. The family and I have an afternoon of swimming planned, and I thought this would be the perfect dinner to go with an afternoon by the pool (even though it is way too hot to eat outside). I am especially looking forward to trying this easy marinade, since I have heard positive things about it. My friend, Claire tried this chicken out last week with good results, so I am hoping to duplicate her efforts. This is another recipe from the Cook's Illustrated Summer Grilling issue. I am not sure what I am going to serve with it, but probably the standard veggies/salad and a starchy side dish.
Grilled Lemon Parsley Chicken Breasts
From: Cook's Illustrated Summer Grilling
Ingredients:
1 teaspoon Dijon mustard
2 tablespoons fresh lemon juice
6 tablespoons olive oil
1 tablespoon minced fresh parsley leaves
1 1/4 teaspoons sugar
table salt
fresh ground black pepper
3 medium garlic cloves, minced
2 tablespoons water
4 (8 ounce) boneless skinless chicken breasts
Directions:
1. Whisk together mustard, 1 tbsp lemon juice, 3 tablespoons olive oil, parsley, 1/4 teaspoons sugar, 1/4 teaspoons salt, and 1/4 teaspoons pepper in small bowl; set aside.
2. Whisk together remaining tablespoon lemon juice, remaining 3 tablespoons olive oil, remaining teaspoons of sugar, 1 1/2 teaspoons salt, 1/2 tsp pepper, garlic, and water in medium bowl. Place marinade and chicken in gallon-size zipper-lock bag and toss to coat; press out as much air as possible and seal bag. Refrigerate 30 minutes, flipping bag after 15 minutes.
3. Light large chimney starter filled with charcoal (6 quarts, about 100 briquettes) and allow to burn until coal are fully ignited and partially covered with thin layer of ash, about 20 minutes. Build modified 2 level fire by arranging all coals over half of grill, leaving the other half empty. Position cooking grate over coals, cover grill, and heat grate until hot, about 5 minutes; scrape grate clean. Dip wad of paper towels in oil, holding wad with tongs, wipe cooking grate. Grill is ready when you can hold your hand 5" above grate for 5 minutes.
4. Remove chicken from bag, allowing excess marinade to drip off. Place chicken on cooler side of grill, smooth-side down, with thicker side facing coals. Cover with disposable 9x13" aluminum pan and cook until bottom of chicken just begins to develop light rill marks and is no longer translucent, 6-9 minutes. Using tongs, flip chicken and rotate so that thinner side faces coals. Cover with disposable pan and continue to cook until chicken is opaque and firm to touch and instant read thermometer inserted into thickest part of chicken registers 140 degrees, 6-9 minutes longer.
5. Move chicken to hotter side of grill and cook,uncovered, until dark grill marks appear, 1-2 minutes. Using tongs, flip chicken and cook until dark grill marks appear and instant read thermometer inserted into thickest part of chicken registers 160 degrees, 1-2 minutes linger. Transfer chicken to cutting board, let rest, tented with foil, 5 minutes. Slice each breast on bias into 1/4" thick slices and transfer to individual plates.
6. Drizzle with reserved sauce to serve.
******************************************************
On gas grill: Turn all burners to high and heat with lid down until very hot, about 15 minutes. Scrape grill grate with grill brush to clean. Dip wad of paper towels in oil; holding wad with tongs, wipe cooking grate. Leave primary burner turned to high and turn off other burners. Proceed with recipe, grilling with lid down and omitting disposable pan. Increase browning time by 1-2 minutes.

The Result:
This chicken was sooooooo freakin' yummy! The grilling instructions were easy to follow, and the chicken cooked perfectly. The marinade and sauce made the chicken just sing...so very bright and fresh-tasting. It made the chicken both succulent and savory, with just the perfect hit of lemony goodness! Yum! Yum! Yum! I served some corn on the cob, salad, and a small baked potato, for side items. All were really tasty with our grilled chicken. Overall, this was a delicious and satisfying dinner! I am sure that we will be having this chicken again very soon.
On another note, I am pretty happy with all the dishes I have tried from Cook's Illustrated. So far, it has been an awesome resource for both technique and recipes. With each dish I try, I am falling more and more in love with the magazine! I will definitely be getting a subscription.
Grilled Lemon Parsley Chicken Breasts
From: Cook's Illustrated Summer Grilling
Ingredients:
1 teaspoon Dijon mustard
2 tablespoons fresh lemon juice
6 tablespoons olive oil
1 tablespoon minced fresh parsley leaves
1 1/4 teaspoons sugar
table salt
fresh ground black pepper
3 medium garlic cloves, minced
2 tablespoons water
4 (8 ounce) boneless skinless chicken breasts
Directions:
1. Whisk together mustard, 1 tbsp lemon juice, 3 tablespoons olive oil, parsley, 1/4 teaspoons sugar, 1/4 teaspoons salt, and 1/4 teaspoons pepper in small bowl; set aside.
2. Whisk together remaining tablespoon lemon juice, remaining 3 tablespoons olive oil, remaining teaspoons of sugar, 1 1/2 teaspoons salt, 1/2 tsp pepper, garlic, and water in medium bowl. Place marinade and chicken in gallon-size zipper-lock bag and toss to coat; press out as much air as possible and seal bag. Refrigerate 30 minutes, flipping bag after 15 minutes.
3. Light large chimney starter filled with charcoal (6 quarts, about 100 briquettes) and allow to burn until coal are fully ignited and partially covered with thin layer of ash, about 20 minutes. Build modified 2 level fire by arranging all coals over half of grill, leaving the other half empty. Position cooking grate over coals, cover grill, and heat grate until hot, about 5 minutes; scrape grate clean. Dip wad of paper towels in oil, holding wad with tongs, wipe cooking grate. Grill is ready when you can hold your hand 5" above grate for 5 minutes.
4. Remove chicken from bag, allowing excess marinade to drip off. Place chicken on cooler side of grill, smooth-side down, with thicker side facing coals. Cover with disposable 9x13" aluminum pan and cook until bottom of chicken just begins to develop light rill marks and is no longer translucent, 6-9 minutes. Using tongs, flip chicken and rotate so that thinner side faces coals. Cover with disposable pan and continue to cook until chicken is opaque and firm to touch and instant read thermometer inserted into thickest part of chicken registers 140 degrees, 6-9 minutes longer.
5. Move chicken to hotter side of grill and cook,uncovered, until dark grill marks appear, 1-2 minutes. Using tongs, flip chicken and cook until dark grill marks appear and instant read thermometer inserted into thickest part of chicken registers 160 degrees, 1-2 minutes linger. Transfer chicken to cutting board, let rest, tented with foil, 5 minutes. Slice each breast on bias into 1/4" thick slices and transfer to individual plates.
6. Drizzle with reserved sauce to serve.
******************************************************
On gas grill: Turn all burners to high and heat with lid down until very hot, about 15 minutes. Scrape grill grate with grill brush to clean. Dip wad of paper towels in oil; holding wad with tongs, wipe cooking grate. Leave primary burner turned to high and turn off other burners. Proceed with recipe, grilling with lid down and omitting disposable pan. Increase browning time by 1-2 minutes.
The Result:
This chicken was sooooooo freakin' yummy! The grilling instructions were easy to follow, and the chicken cooked perfectly. The marinade and sauce made the chicken just sing...so very bright and fresh-tasting. It made the chicken both succulent and savory, with just the perfect hit of lemony goodness! Yum! Yum! Yum! I served some corn on the cob, salad, and a small baked potato, for side items. All were really tasty with our grilled chicken. Overall, this was a delicious and satisfying dinner! I am sure that we will be having this chicken again very soon.
On another note, I am pretty happy with all the dishes I have tried from Cook's Illustrated. So far, it has been an awesome resource for both technique and recipes. With each dish I try, I am falling more and more in love with the magazine! I will definitely be getting a subscription.
June 20, 2009
Alabama Barbecued Chicken and Jen's Homemade Chicken Stock
Here is another recipe for the Cook's Illustrated Summer grilling issue. Again, this recipe caught my attention because of the unusual cooking method and the concept of a white BBQ sauce. Hmmmm. I decided to follow the instructions for the ingredients on both the chicken and the sauce, but do my own thing for the cooking technique. The original instructions ask you to cut up a whole chicken, but I am not going to bother with that. Instead, I am just going to follow my grilled whole chicken technique that I have done in the past (i.e. cutting out the backbone and flattening it on the grill). I think it is just an easier way to do it. I am going to serve this chicken dish with a side salad and the BBQ Macaroni Salad that I posted earlier today. Yum! I love trying new things, so I am really excited to see how this meal all works out.
Alabama Barbecued Chicken
Adapted from: Cook's Illustrated, Summer Grilling Issue 2009
Ingredients:
For chicken:
1 teaspoon of salt
1 teaspoon of black pepper
1/2 teaspoon of cayenne pepper
1 whole chicken (3-4 lbs.)
2 cups of hickory wood chips
Canola oil for the grill
White Barbecue Sauce (see below)
For White Barbecue Sauce:
3/4 cup of mayo
2 Tablespoons of cider vinegar
2 teaspoons of sugar
1/2 teaspoon of prepared horseradish
1/2 teaspoon of salt
1/2 teaspoon of black pepper
1/4 teaspoon of cayenne pepper
Directions:
If you have a grill with three burners, heat the outer two to medium, leaving the center one off. Or light a charcoal fire and let it burn until the charcoal is covered with white ash and about medium-hot; bank half the coals to one side of the grill, half to the other. Sprinkle wood chips, that have been soaked in water over the hot coals.
While the grill is heating, remove the giblets (if there are any) from the cavity of the chicken. Flip the chicken onto its breast. Using poultry shears, cut down both sides of the backbone from tail to neck; discard backbone. Or, if you don't have shears, lay the bird on its back, insert a long heavy knife into the body cavity and press down hard with a rocking motion to cut down through both sides of the backbone. Open the bird out onto your work surface, breast side up. Make sure that the legs are turned inward. Using your fist or a mallet, wallop the bird on the breast, hard enough to dislodge the center bones and flatten out the breast. Twist the last joint of the wings up over the breast and then down behind the "shoulders," tucking them in firmly to keep them in place during grilling.
Smear both sides of the chicken with the sauce. Lay in the center of the grill (it will not be over direct heat). Cook, without turning, basting from time to time with any remaining sauce, until the juices run clear when a thigh is pierced deeply with a fork (an instant-read thermometer should register about 160 degrees when inserted at the thickest part of the thigh), about 45 minutes. If you're cooking over charcoal, you'll want to add more charcoal to the fire after an hour or so - the internal temperature of the grill should stay at about 325 degrees. Remove the chicken to a cutting board. Baste one last time with the sauce. It will lose less juice if you cover it loosely with foil and let it rest for 5 to 10 minutes. Cut the chicken into quarters (or smaller pieces). Transfer a portion to each of four dinner plates and you're ready to serve.
Jen's Notes:
I am going to make some chicken stock with the leftover backbone and carcass. Below is the link for my stock recipe:
Jen's Homemade Chicken Stock
I am out of homemade stock, so this batch is desperately needed.


The Result:
Both of these recipes were awesome! The chicken was extraordinary. The white BBQ sauce was a unique flavor that somehow still embodied what BBQ is all about. The chicken was smoky, slightly spicy, and completely succulent. Yum! I am salivating, just thinking about it! The BBQ Macaroni Salad was a perfect compliment. Certainly, not the mainstay that we are all used to, when we think of macaroni salad. Overall, these recipes were fan-freakin'-tastic!
Alabama Barbecued Chicken
Adapted from: Cook's Illustrated, Summer Grilling Issue 2009
Ingredients:
For chicken:
1 teaspoon of salt
1 teaspoon of black pepper
1/2 teaspoon of cayenne pepper
1 whole chicken (3-4 lbs.)
2 cups of hickory wood chips
Canola oil for the grill
White Barbecue Sauce (see below)
For White Barbecue Sauce:
3/4 cup of mayo
2 Tablespoons of cider vinegar
2 teaspoons of sugar
1/2 teaspoon of prepared horseradish
1/2 teaspoon of salt
1/2 teaspoon of black pepper
1/4 teaspoon of cayenne pepper
Directions:
If you have a grill with three burners, heat the outer two to medium, leaving the center one off. Or light a charcoal fire and let it burn until the charcoal is covered with white ash and about medium-hot; bank half the coals to one side of the grill, half to the other. Sprinkle wood chips, that have been soaked in water over the hot coals.
While the grill is heating, remove the giblets (if there are any) from the cavity of the chicken. Flip the chicken onto its breast. Using poultry shears, cut down both sides of the backbone from tail to neck; discard backbone. Or, if you don't have shears, lay the bird on its back, insert a long heavy knife into the body cavity and press down hard with a rocking motion to cut down through both sides of the backbone. Open the bird out onto your work surface, breast side up. Make sure that the legs are turned inward. Using your fist or a mallet, wallop the bird on the breast, hard enough to dislodge the center bones and flatten out the breast. Twist the last joint of the wings up over the breast and then down behind the "shoulders," tucking them in firmly to keep them in place during grilling.
Smear both sides of the chicken with the sauce. Lay in the center of the grill (it will not be over direct heat). Cook, without turning, basting from time to time with any remaining sauce, until the juices run clear when a thigh is pierced deeply with a fork (an instant-read thermometer should register about 160 degrees when inserted at the thickest part of the thigh), about 45 minutes. If you're cooking over charcoal, you'll want to add more charcoal to the fire after an hour or so - the internal temperature of the grill should stay at about 325 degrees. Remove the chicken to a cutting board. Baste one last time with the sauce. It will lose less juice if you cover it loosely with foil and let it rest for 5 to 10 minutes. Cut the chicken into quarters (or smaller pieces). Transfer a portion to each of four dinner plates and you're ready to serve.
Jen's Notes:
I am going to make some chicken stock with the leftover backbone and carcass. Below is the link for my stock recipe:
Jen's Homemade Chicken Stock
I am out of homemade stock, so this batch is desperately needed.
The Result:
Both of these recipes were awesome! The chicken was extraordinary. The white BBQ sauce was a unique flavor that somehow still embodied what BBQ is all about. The chicken was smoky, slightly spicy, and completely succulent. Yum! I am salivating, just thinking about it! The BBQ Macaroni Salad was a perfect compliment. Certainly, not the mainstay that we are all used to, when we think of macaroni salad. Overall, these recipes were fan-freakin'-tastic!
BBQ Macaroni Salad
On a recent trip to Sprout's, Claire and I found the Summer grilling issue of Cook's Illustrated magazine. The places where I usually shop don't carry this publication, so I was tickled pink to find it. Subscription prices are pretty reasonable, so I think I may just start getting it in the mail. I have been dying to try some of the recipes from this current issue; since I am all about grilling lately. This featured side dish sounded very intriguing to me. Not the normal, boring, traditional, macaroni salad that is for sure. Claire recently posted this dish on her blog as well, and they really like this salad's unusual flavor. I hope it goes well with the chicken I have slotted for tonight's dinner. Ahhhh...I love summertime foods!!!
BBQ Macaroni Salad
Adapted from: Cook's Illustrated, Summer Grilling Issue 2009
Ingredients:
1/2 lb elbow macaroni (8 oz.)
1/2 of a red bell pepper, seeded and chopped fine
1/2 celery rib, chopped fine
1/4 of a red onion, diced finely
1 tablespoons cider vinegar
1/2 teaspoon hot sauce (I used Frank's)
1/2 teaspoon chili powder
1/8 teaspoon garlic powder
1 pinch cayenne pepper
1/2 cup mayonnaise
1/4 cup your favorite barbecue sauce
salt & fresh ground pepper, to taste
Directions:
Bring 4 quarts water to boil in large pot. Add 1 tablespoon salt and macaroni and cook until nearly tender, about 5 minutes. Drain in colander and rinse with cold water until cool, then drain once more, briefly, so that pasta is still moist; transfer to large bowl. Stir in bell pepper, celery, scallions, vinegar, hot sauce, chili powder, garlic powder, and cayenne pepper, and let sit until flavors are absorbed, about 2 minutes. Stir in mayonnaise and barbecue sauce and let sit until salad is no longer watery, about 5 minutes. Season with salt and pepper and serve.
(The salad can be covered and refrigerated for up to 2 days. Check seasonings before serving.)
Jen's Notes:
I halved the recipe from the original quantities published. The above ingredients list reflects my changes.
The Result:
I just finished making a batch of this up to go with our dinner tonight, and I snuck a taste or two. It did not disappoint! It's tangy, with just the right amount of BBQ flavor. Overall, this is a great recipe and one that I will make again. (I think I will just post a photo of our whole dinner later tonight.)
Subscribe to:
Posts (Atom)