Showing posts with label Claire. Show all posts

March 26, 2013

GG's Lasagna


My friend, Claire has been telling me about her grandma's lasagna for years now. I've always wanted to try it, but alas, she has never posted the recipe until recently. It's always good to have a couple of good lasagna recipes in your back pocket, and until this one, I've always just stuck with my mom's recipe. Well, once Claire updated her blog with GG's recipe, I knew lasagna was going to be on our table posthaste. Let me tell you, GG did not disappoint. It. was. fantastic. My kids loved it, and my husband said that it was one of his favorites (Secretly, I think he liked GG's lasagna better than my mom's version, but he knew better than to say that out loud.) The best news is that I now have a second lasagna recipe to alternate between my mom's. If you are in the market to try an awesome lasagna, this one is highly recommended!!!

GG's Lasagna
From: Claire's grandma GG (as posted on Cooking Claire blog)

Sauce:
1-1/2 lb. ground beef
1 small onion, chopped
2 cloves garlic, minced
2 8-ounce cans tomato sauce
1 cup water
1 T. dried parsley
1 t. oregano
3/4 t. salt
1/4 t. thyme
1 bay leaf

Simmer. Remove bay leaf before using sauce.

Other ingredients:
1 cup sour cream
8 ounces cream cheese
8 ounces lasagna noodles, cooked
2 cups shredded mozzarella cheese

Mix together sour cream and cream cheese.

Assemble in a flat baking dish and layer:
1/3 cup sauce, noodles, cream cheese and sour cream, mozzarella. Keep layering until mozzarella cheese is on top.

Bake 45 minutes at 350.

March 12, 2013

Pesto Pasta with Chicken Sausage and Roasted Brussels Sprouts


My friend, Claire was telling me about this dinner that they had recently. Oddly, I'd not seen it before--even though she blogged about it a year ago and had it saved on Pinterest. I follow her boards fairly closely, and I don't know how I missed it! We were randomly talking about dinner ideas and she suggested this again. She sent me a link to the recipe from her blog, and I still didn't make it for a whole extra week. Yeesh. I don't know why I stalled, because I had both the Brussels Sprouts and chicken sausage on hand. Roasted Brussels sprouts are one of our favorite veggies and anything with pesto usually gets devoured around here. It is definitely a recipe that should have caught my attention!

Well, we finally got around to trying this meal and it was fantastic. Everyone loved it, including the kids. My son asked for the leftovers to go in his lunchbox to take to school the next day. I don't think he's ever done that before!!! I liked that it was super-delicious and basically a balanced meal in one with the pasta, veggies, and sausage. I doubled the amount of Brussels Sprouts and used a mild Italian chicken sausage. Also, I did save a cup of pasta water, which made the pesto more of a sauce consistancy and let me get away with using less than I probably would have normally. All in all, I highly recommend this one and I'm kicking myself for not finding it sooner!

Pesto Pasta with Chicken Sausage and Brussels Sprouts
Adapted From: Cooking Claire blog


Ingredients:
2 lb fresh Brussels sprouts, ends trimmed and sliced in half
3 Tbsp. olive oil, divided
1/2 tsp. Kosher salt
1/2 tsp. freshly-ground black pepper
1 lb orecchiette pasta
5 mild Italian chicken sausage links
5 cloves garlic, peeled and thinly sliced
1/3 cup pesto (I used half of a fairly small jar)
Parmesan cheese, for serving
1 cup of cooked pasta water

Directions:
Preheat oven to 400 degrees. Spread brussels sprouts on a rimmed baking sheet. Drizzle with 2 Tbsp olive oil, salt, and pepper. Stir around until well combined. Roast for about 20-30 minutes, stirring once partway through, or until they are crispy on the outside and cooked on the inside. Remove from oven and set aside.

Meanwhile, heat the remaining olive oil in a skillet over medium-high heat. Add the sausage and cook, turning occasionally, until nearly-browned, about 6-8 minutes. Remove from pan, slice, and add back into skillet to brown sliced sides. Add the garlic, and continue cooking for another 1-2 minutes until the garlic is fragrant and the sausage is browned.

Cook the pasta according to the package directions. Once the pasta is cooked, drain the water (reserving 1/4 cup pasta water), and then toss together the pasta, pesto, cooked sausage and garlic, and brussels sprouts. Add in some of the reserved pasta water if needed for extra moisture.

Serve warm, and sprinkle with freshly-grated Parmesan cheese.

March 8, 2013

Honey Sesame Chicken


It's a rainy day and my kiddos and I are snuggled up on the couch watching a Mickey Mouse movie. Since the movie is more suited for the 3-year-old set, I figured I'd do some multitasking and get some blogging done at the same time. Sorry, Mickey.

I really have no earthly idea when we had this dinner; I think it may have been back in January. I remember it was really tasty and easy, as it was done in the slow cooker. Other than that, I've got nothing. I really need to get recipe updates on here closer to when we actually have the meal. I've noticed that if I don't my mommy-brain kicks in and I don't have any remnant details of the dinner stored in my recent (or not-so-recent) memory. Not to mention, trying to identify and track down a recipe from an old photo is a pain in the buttocks. Thankfully, this one is from my friend Claire's blog so it's was bit easier to track down. It looks like this was originally adapted from a blog found through Pinterest, but I pretty much just followed what Claire did and copied her version.

Honey Sesame Chicken
From: Cooking Claire blog


Ingredients:
1 to 1.5 lb. boneless, skinless chicken breasts
Salt and pepper
3/4 cup of honey
1/2 cup of low sodium soy sauce
1/2 cup ketchup
2 tbsp. vegetable oil
1/2 tsp garlic powder
1 tsp onion powder
1/4 tsp. red pepper flakes
Cornstarch
Sesame seeds

Directions:
Place the chicken breasts in the crockpot insert and sprinkle salt and pepper on both sides.
In a medium sized bowl, combine honey, soy sauce, ketchup, oil, garlic powder, onion powder, and red pepper flakes. Stir to combine well. Pour over the chicken in the crockpot.

Cook on low for 3-4 hours or high for 1 1/2-2 1/2 hours.

When done, remove chicken and cut into chunks. Prior to putting the chicken back in the stockpot, combine some cornstarch in water and whisk it into the crockpot to thicken up the sauce a bit. Throw the chicken back in and stir around to recoat the chicken in the sauce.
Serve hot over a bed of white rice or quinoa (optional) and sprinkle some sesame seeds on top.

December 7, 2012

Honey Sesame Chicken and Quinoa


I had grilled chicken breasts slated for dinner last night, but when I got around to prepping/marinating the chicken I realized I didn't really feel like having grilled chicken. Normally I love grilled chicken, but for some reason it just seemed like a mundane meal to have yesterday. Not only that, but my chicken was still partially frozen at 3pm. I remembered reading that my friend, Claire did this recipe in the slow cooker and she used frozen chicken breasts. Also, I remembered that it didn't take that long to cook (a couple of hours versus all day). Thankfully, I had all the ingredients in my pantry and I even had some additional veggies to add to the party. Score! It ended up turning out perfectly. The chicken and sauce were delicious (Claire was right...the chicken didn't dry out at all), and the quinoa was a perfect compliment. Yum! Hubby and kiddos all happily munched this down and it really didn't take all that much effort on my part. I love it when that happens!

Honey Sesame Chicken and Quinoa
From: Cooking Claire blog

Ingredients:
1 to 1.5 pounds of chicken breasts (this was 2 very large pieces of chicken for me)
Salt and pepper
3/4 cup of honey
1/2 cup of low sodium soy sauce
1/2 cup ketchup
2 tbsp. vegetable oil
1/2 tsp garlic powder
1 tsp onion powder
1/4 tsp. red pepper flakes
Cornstarch
Sesame seeds
1 bag of frozen broccoli, steamed in the microwave
quinoa (see below)

For Quinoa:
2 cups of quinoa, rinsed
4 cups of water
1/2 red onion, sliced
1 red bell pepper, sliced
olive oil


Directions:
Place the chicken breasts in the slow cooker insert and sprinkle salt and pepper on both sides.
In a medium sized bowl, combine honey, soy sauce, ketchup, oil, garlic powder, onion powder, and red pepper flakes. Stir to combine well. Pour over the chicken in the slow cooker.

Cook on low for 3-4 hours or high for 1 1/2-2 1/2 hours.

When done, remove chicken and cut into chunks. Prior to putting the chicken back in the stockpot, combine some cornstarch in water and whisk it into the slow cooker to thicken up the sauce a bit. Throw the chicken back in and stir around to re-coat the chicken in the sauce. Add the steamed broccoli and sesame seeds, stir to combine.

Serve hot over a bed of quinoa (or rice) and sprinkle some more sesame seeds on top, if desired.

For quinoa:
Rinse quinoa according to package directions. Get as much of the water out as possible and let drain on a kitchen towel while still in the strainer. Set aside.

Add 2 tablespoons of olive oil to a large sauce pan over medium high heat. When oil is hot, add sliced peppers and onions. Saute until soft and onions are translucent. Add quinoa and toast for an additional 1-2 minutes. Add water and simmer quinoa according to packaged directions (about 20-25 minutes or until all the water is absorbed). Add salt to taste. Add bed of quinoa to plates and serve it with chicken, sauce, and broccoli (see above) over top.

NOTE: This is a lot of quinoa. I have 5 people to feed and I wanted leftovers for lunches the next day. If you are not feeding a smallish army, then you can safely cut the quinoa and water amounts in half.

November 26, 2012

Chicken Alfredo Roll Ups


My friend, Claire recently made this dinner and said it was delicious. Well, Claire has an excellent track record with recommending recipes, so I was totally on board. She included the caveat that the homemade sauce recipe had to be made, since it was freakin' fantastic. Of course, I trust Claire--especially when food is involved--so I made both the roll ups and the accompanying sauce. Let me tell you, the sauce was drinkable. Seriously, sooooo fantastic! Really, make the sauce. It would be a crime to skip it for a store-bought version. (Yes, it is THAT good!) The Alfredo rolls were also quite awesome, but the sauce really took it to the next level of yum.

Chicken Alfredo Roll Ups
Adapted from: The Recipe Critic blog

Ingredients:


9-12 lasagna noodles (I used whole wheat)
2 ½ cups Alfredo sauce (RECOMMENDED: homemade recipe below)
2 cups cooked, shredded chicken
oregano
garlic salt
3 cups shredded Mozzarella, or cheese of your choice

Directions:
Spray an 8x8 pan with non-stick spray and pour ½ cup alfredo sauce, or just enough to cover the bottom of the pan. Boil 8-10 cups water in a large pan, cook lasagne noodles until al dente. (I usually cook 1 or 2 extra just because lasagna noodles always seem to break on me when I am stirring them.)
Now this is the important part! Drain and rinse the noodles with cold water to prevent them from sticking to each other. Then, lay out each noodle individually and blot dry with a paper towel.

Spread about 2 Tbs. Alfredo sauce over each noodle. (if there is too much sauce you will have a big mess on your hands!) Sprinkle oregano and garlic salt on top of sauce. Take 1/9 of the shredded chicken and spread it out evenly over each noodle. Add approx. 3 Tbs. cheese. To roll up, start at one end and roll the noodle over the toppings. You will need to lift the noodle a little to prevent squishing out the inside ingredients while rolling.

Place the roll-ups in the pan, one by one, seam-side down so they don't come undone. Once they are all in the pan, pour the remaining Alfredo sauce over the top. Top with remaining cheese. Bake at 350 degrees for about 30 minutes, or until the cheese is completely melted on top.

Serves 3, 3 roll-ups each

****************************

The Best Garlic Alfredo Sauce

Ingredients:
½ cup butter
2 ounces cream cheese
2 cups heavy cream (or substitute half and half)
2 teaspoon garlic powder
½ tsp. fresh minced garlic
salt and freshly ground black pepper
½ tsp dried oregano
⅔ cup Parmesan cheese

Directions:
In a medium to large saucepan melt the butter over medium heat. Add fresh minced garlic and cook for 1 minute, or until fragrant. Add the cream cheese and whisk to smooth and melted. Whisk in the heavy cream.
Season with the garlic powder, salt and pepper. Bring to a simmer and whisk frequently until sauce thickens, around 15 minutes. Stir in the cheese and when melted, remove from heat and serve.

Makes 2 1/2 cups

September 17, 2012

Buffalo Chicken Dip

I don't remember the main ingredient being crack in this dip, but it sure seemed like it was. I made this for a football gathering at a friends house and it got devoured! Then, I hid the few leftovers in the back of my fridge so I could snack on it the next day (tee-hee). (Sorry, husband!!!) This dip is awesome. Seriously, awesome. Try it.

Buffalo Chicken Dip
Adapted From: Cooking Claire blog

Ingredients:
4 green onions, white and green diced finely
2 celery stalks, diced finely
2-3 cups shredded cooked chicken
8 oz cream cheese, softened
3/4 cup ranch dressing
3/4 cup Frank's hot sauce
1 cup sharp cheddar cheese, shredded
salt and pepper to taste

Directions:
Preheat oven to 350 degrees. Combine first four ingredients and spread in 8x12 baking dish. Top with shredded cheese. Bake for 30 minutes or until cheese is melted and dip is bubbly. Serve with tortilla chips and/or celery sticks, or just eat with a freaking spoon.

[Sorry, no photo.]

Pesto Chicken Salad


I've been sick with an awful head cold, so I haven't been able to (a) go grocery shopping in over a week, (b) cook anything new and exciting, & (c) update the few recipes I did try over the past couple weeks on the blog here. I'm going to have to go back and see if I can track down photos, but I have three posts I can remember making recently that need to be cataloged. I guess I'll start with the most recent one first (the one for our dinner this evening) and then back track.

Sooooo, as I mentioned, I am really, ridiculously low on groceries. We even ran out of coffee for goodness sake! That hardly ever happens!!! I think this has been the emptiest my stores have been ever. All I have in the pantry is some dried beans and other snack-y type food for the boy's lunch box treats. My fridge and freezer are also in a similar, sorry state. Sadly, I'm not going to have time to get to the store for at least another day, so I needed to forage for something for us to eat tonight. My first thought was breakfast for dinner. Then I realized that's not gonna happen, since I only have a few, hard-boiled eggs left in the deli drawer. (I think my family would riot if I gave them hard-boiled eggs for dinner.) My next thought was Nutella straight outta the jar for everyone...but then I wouldn't be nominated mother of the year :::snort:::.

(Although, Nutella sounds like a perfectly reasonable dinner idea.)

Me: "Hey kids, grab a spoon...it's Nutella time. Pass the jar this way!"
Family: "Yay, mommy is the coolest mom ever!!!!! Daddy should buy her diamonds!"

(Anyway...that was a total tangent.)

I did have a store-bought partially-devoured roasted chicken leftover, along with one cooked/grilled chicken thigh from last night's meal. The thighs and legs were in tact on the whole chicken, and the separate grilled thigh was a decent size. My bff, Claire mentioned that she was making a pesto chicken salad for dinner one night this week. I thought that would be a pretty clever use for my sparse chicken meat, and I was pleasantly surprised to find a frozen container of store-bought pesto in the waaaaay back of my freezer. Woot! (I didn't know I had it, and I'm happy I went exploring in there. Now I'm in business!!!) I scrounged together a few small celery stalks from the center of the bunch, a half an onion (of the very last onion in the house), and scraped out the final bits of mayo and plain yogurt from their containers. I don't know if I'm going to serve my pesto chicken salad with a singular sliced tomato over salad greens (fingers crossed they are not wilted and gross) or if I'm going to make the hubs stop on the way home for a loaf of bread to tide us over and make sandwiches. Either way, I'm able to pull a meal together with hardly any ingredients and I don't need to serve dried beans or hard-boiled eggs for dinner. Whew! Crisis averted!

Pesto Chicken Salad

Ingredients:
2 cups of cooked, diced chicken (I didn't measure)
1/2 diced onion
1-2 celery stalks, diced finely
1/2 cup of mayo
1/3 cup of Greek non-fat plain yogurt
1 (6 oz.) container of store-bought pesto
salt and pepper to taste

Directions:
Combine all ingredients into a large bowl and stir to mix thoroughly. Refrigerate until ready to use. Serve on salad greens or as a sandwich with sliced tomatoes on toasted bread.

NOTE: This was easy, inexpensive, and very yummy.

February 29, 2012

Sarah's Muffin Mix


My friend, Claire got this recipe from our friend, Sarah. I didn't pay much attention to it at first, because I thought that muffin recipes were all pretty much the same. Well, Claire brought some of these muffins to our bible study and showed me how wrong I truly was...these muffins were delicious! After hearing how easy it was to put the mix together and bake fresh muffins in the morning for breakfast, I was convinced that all muffins were not created equal. These. are. awesome.

Sarah's Muffin Mix
Adapted From: Cooking Claire blog

Ingredients:(*)
4 cups AP flour
4 cups whole wheat flour
2 1/2 cups sugar
1/2 cup flax meal
3 T. baking powder
2 t. salt
2 t. cinnamon
2 t. nutmeg

Combine above ingredients. Store in pantry or freezer up to six months.

For each batch of muffins:

2-3/4 cups muffin mix
1 egg
1 cup milk
1/2 cup butter, melted

Directions:
Place muffin mix in bowl. Whisk egg, milk, and butter together and stir into dry ingredients. Include whichever mix-ins below (mix any dry ingredients in with mix, wet ingredients or fruit into wet ingredients or at the end). Fill muffin cups 3/4 full. Bake at 400 degrees for 18-21 minutes.

Add-Ins:
Banana: 1 cup mashed bananas
Cranberry Pecan: 1 cup chopped cranberries, 1/2 cup chopped pecans, 3 T. sugar
Cappuccino: 1 cup mini chocolate chips, 2 t. instant coffee granules
Apple Cheese: 1/2 cup shredded apple, 1/2 cup colby jack cheese
Blueberry: 1 cup blueberries
Carrot Raisin: 3/4 cup shredded carrots, 1/3 cup golden raisins

One batch yielded 18 muffins for me.

I made a banana/raw almond variation and they were fantastic! I'm sure there are other variations to be made; so I'll have to get my creative juices flowing. I was actually thinking of a dried cranberry/white chocolate chip combo. YUM! Thanks Sarah and Claire!!!!

(*)NOTE: I've updated the mix and the muffins were just as delicious and a bit better for you. For a more healthful version use the following ingredients for the mix:

ALTERNATE INGREDIENTS FOR BASE MIX:
2 cups AP flour
6 cups whole wheat flour
2 cups sugar
1 cup flax meal
3 T. baking powder
2 t. salt
2 t. cinnamon
2 t. nutmeg


January 8, 2012

Oven Hot Dogs

I didn't think that a chili dog could get much better, until we had these for dinner tonight. Seriously, the chili dog is my favorite hot dog application and I was very dubious that it could be improved upon. My friend, Claire had tried these awhile back and emailed me the recipe. Even with her glowing reviews, my skepticism put this recipe on the back burner for awhile. I finally made this dish and instantly fell in love. I should've known that Claire would not steer me wrong! I was in chili dog heaven, to say the least!!!

Oven Hot Dogs
From: In the Wabe blog via the Cooking Claire blog

Ingredients:
8 hot dogs (I used turkey dogs)
8 hot dog buns (I used whole wheat buns)
1 or 2 cans of chili with beans (we like them with a lot of chili, so I used 2 cans)
1/2 an onion, diced
shredded cheddar cheese (about a cup)
mayonnaise (I used light mayo)
mustard (I used deli style mustard)
sweet relish (I used dill relish)

Directions:
Line inside of hot dog buns with mayonnaise and sweet relish. Evenly add mustard. Fill with hot dogs and squish into a 13×9″ baking pan lined with foil.

Top hot dogs with chili, cheese, and diced onion. Cover with aluminum foil and bake at 350F for 45 minutes. Carefully remove from the pan with a spatula and serve.


The Result:
So I made some adaptations to suit our family and to lighten them up a tiny bit. These hot dogs are decadent any way you cut it, but I felt the need to ease my food induced guilt with whole wheat buns, light mayo, and turkey franks. I know it's mostly faux "healthy", but it made me feel better about our dinner. Anyway, these dogs were fantastic...just don't think about the whole nutrition thing and you will love them!

Note:
Our side dish was easy and very yummy, too. I roasted a spaghetti squash by coating it with olive oil, salt, and pepper and then baking it cut-side down at 400 degrees for 1 hour. When the squash was finished, I scraped the roasted insides into a bowl with a fork, seasoned with a little more salt and pepper, and threw in about a 1/2 cup of Parmigiano-Reggiano cheese. I then mixed it all together and served the squash on the side. YUM! I sooooo love a good veggie side dish!!!

December 21, 2011

Saltine Toffee (dubbed "Christmas Crack")

I can't believe it's been so long since I've last update my blog! I actually started this post back on December 21st, 2011 and I am now finishing it on January 8th, 2012. Yeesh! With all the parties, Christmas, my son's school concert and winter break, New Year's, two visits from the Tooth Fairy, and my husband's vacation, really cut into my "alone" computer time. While it was nice to have everyone home for a plethora of good ol' fashioned family fun, I'm actually glad to be getting back into the swing of a normal routine again.

So this past holiday season was all about survival-mode for me. I really didn't cook anything new, and I was basically trying to keep everyone fed and happy amongst the busyness. I had to look back on my camera to see if I had any recipe photos, and I only had two new ones from December since the last post. Just two...that's it!!! However, I am glad to report that what I lacked in quantity, I made up for fully with quality. The two recipes that I did try out were pretty darn great (this one included).

My friend, Claire passed this easy recipe on to me and I tweaked it a little based on what I had on hand. Here is my version of this delicious "cookie", although I guess it falls more under the heading of a toffee or bark. Either way, Claire and I decided to call it "Christmas Crack" since it is soooo freakin' awesomely addicting. I had to stop myself several times from going to the store and purchasing more ingredients for making additional batches. If you have a hankerin' for something easy to make and a little naughty, this recipe is for you!

Saltine Toffee (dubbed "Christmas Crack")
Adapted From: The Girl Who Ate Everything website

Ingredients:
1-2 sleeves of saltine crackers
2 stick (4 oz) butter
2 cup packed brown sugar
2 cups chocolate chips (I used 1 bag)
2 cups butterscotch chips (I used 1 bag)
crushed or slivered raw almonds
sea salt

Directions:

1. Preheat the oven to 350 degrees. Prepare a baking sheet by lining it with aluminum foil and spraying the foil with nonstick cooking spray.

2. Arrange the crackers in a single layer on the baking sheet so that there are no empty spaces in between them. Crush any remaining crackers into small crumbs and set aside for now.

3. Place the butter and brown sugar in a small saucepan over medium-high heat. Stir while the butter melts, and bring the mixture to a rolling boil. Once boiling, carefully pour the sugar-butter mixture over the crackers on the baking sheet in an even layer, trying to cover most of the crackers. If you miss some spots, don’t worry as the toffee will spread in the oven.

4. Bake the toffee crackers at 350 degrees for five minutes, until the toffee is bubbling all over. Carefully remove the pan from the oven and allow to cool for one minute.

5. Sprinkle the chocolate chips on top of the hot toffee, and allow them to sit for one minute to soften and melt. Once softened, use an offset spatula or knife to spread the melted chocolate over the entire surface of the toffee in an even layer. While the chocolate is still sticky, sprinkle the top with the reserved crushed crackers.

6. Refrigerate the pan to set the toffee and chocolate for about 30 minutes. Once set, break into small uneven pieces by hand, and enjoy! Store uneaten saltine toffee in an airtight container for up to a week.


The Result:
I gained a few pounds over the holiday break, and I think I owe it mostly to this toffee. I'm not exaggerating; it's that good and shockingly easy to put together.

September 19, 2011

Grilled Shrimp and Sausage Skewers with Smoky Paprika Glaze (or Not)

We are in the middle of moving and I realized--much too late--that I packed up my skewers along with some of my other kitchen stuff. EEK! I quickly had to adapt this recipe and what I got was more of a skillet stir-fry, than actual grilled skewers. I literally just tossed everything in a pan with the glaze and served it over brown rice. It was still delicious, but I would like to make this the right way someday.

Grilled Shrimp and Sausage Skewers with Smoky Paprika Glaze
Source: Bon Appetit, June 2010

Ingredients:
3/4 cup olive oil
4 large garlic cloves, pressed
2 tablespoons chopped fresh thyme
5 teaspoons smoked paprika
4 teaspoons Sherry wine vinegar
3/4 teaspoon salt
1/2 teaspoon freshly ground black pepper
1/2 teaspoon dried crushed red pepper
12 uncooked extra-large shrimp (13 to 15 per pound), peeled, deveined
12 1-inch-long pieces andouille or other fully cooked smoked sausages (such as linguiça; about 16 ounces)
12 cherry tomatoes
12 2-layer sections of red onion wedges
Nonstick vegetable oil spray

Directions:
Whisk oil, garlic, thyme, smoked paprika, Sherry wine vinegar, salt, black pepper, and crushed red pepper in medium bowl to blend for glaze. Transfer half of glaze to small bowl and reserve for serving.

Alternately thread shrimp, sausage pieces, cherry tomatoes, and sections of onion wedges on each of 6 long metal skewers. Arrange skewers on large rimmed baking sheet. DO AHEAD Can be made up to 6 hours ahead. Cover and chill skewers and bowls of glaze separately.

Coat grill rack with nonstick spray and prepare barbecue (medium-high heat). Brush skewers on both sides with glaze from 1 bowl. Grill until shrimp are opaque in center, turning and brushing occasionally with more glaze, 6 to 8 minutes.

Arrange skewers on platter. Serve with remaining bowl of glaze.


The Result:
Very yummy, but I would like to try the actual skewers. I decided to just post the actual recipe, instead of the mess that I made. (It was good, but not too visually appealing.) My way was really all about survival, man...not anything that is worth duplicating. The flavors were so tasty, and I would recommend this recipe either way. Yum!

August 25, 2011

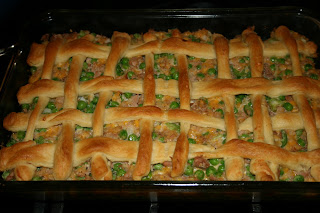
Hot Crossed Tuna Casserole

Typically, I am not a fan of Tuna Casserole. It's always seemed, well, strange to me. Maybe it's because I was scarred as a child. One of my neighborhood friend's mother always made it when I was invited to their family dinner. It was gloppy and gloopy, with an overwhelming sense of tuna-ishness. It was not good.

My friend, Claire Gertrude recently made this version of tuna casserole that she remembered from her childhood. She assured me that it was not your typical tuna casserole mess, and let me sample some. She was right! It was yummy...especially with the sauce. It totally reminded me of a deconstructed tuna melt sandwich (which I love) and the cucumber dill sauce gave it just the right balance. If you are tuna-casserole adverse, this may be the recipe to make you reconsider how you feel about them.

Hot Crossed Tuna Casserole
From: Cooking Claire blog

Ingredients:
3 or 4 cans tuna, drained
1 16 oz. package frozen peas, thawed (I put mine in frozen)
1 c. shredded cheddar cheese
1 c. celery, sliced
1/2 c. bread crumbs
1/4 c. chopped onion
1/4 tsp. salt
1/8 tsp. pepper
1 cup mayonnaise
1 tube crescent roll dough

Cucumber Sauce:
1/2 c. chopped cucumbers
1 T. chives, chopped
1 T. chopped parsley
1/4 t. salt
1/4 t. dill weed
1/2 c. mayo
1/2 c. sour cream

Directions:
Combine tuna, peas, cheese, celery, bread crumbs, onion, seasonings, and mayonnaise; mix well. Spoon into a baking dish. Separate crescent roll dough into 2 rectangles. Press perforations to seal. Cut dough into 4 long and 8 short strips. Place strips over casserole in lattice design. Bake at 350 for 35 to 40 minutes or until crust is brown. Serve with cucumber sauce.

To make sauce, combine all ingredients and mix well. Chill. Pour over top of each serving.


The Result:
Easy, comforting, and family-friendly. My kids loved this, and it was even better the next day for leftover lunch. The lattice crust makes it visually appealing, as well. I don't think "visually appealing" is an adjective used to often describe tuna casserole, so that is definitely a check in the "pro" column for this recipe. More tuna casserole...yes, please.

August 19, 2011

Cliantro Almond Pesto

This is a quick and easy "no cook" recipe that will compliment either beef, chicken, or fish. We had it last night as a condiment for grilled steaks and it was darn tasty! Once again, thanks Gertrude.

Cilantro Almond Pesto
From:
myrecipes.com via the Cooking Claire blog

Ingredients:
3/4 cup fresh cilantro
2 tablespoons slivered almonds, toasted
1 tablespoon chopped seeded jalapeno pepper
1/8 teaspoon salt
1/8 teaspoon black pepper
1 garlic clove, chopped
3 tablespoons plain fat-free yogurt
1 1/2 teaspoons fresh lime juice

Directions:
Combine first 6 ingredients in a blender; process until finely chopped (about 15 seconds). Add yogurt and juice; process until smooth.

The Result:
See???? Totally easy!!! All you need is a blender and a smile to whip up this yummy pesto topping.

June 27, 2011

Herbed Chicken Breast with Tomatillo Salsa and Queso Fresco

Wow! It seems like it's been ages since I've updated the ol' blog here. I suppose that is because we really have not had anything new and/or notable lately; with the exception of this chicken dish. We did have a couple other new dinners, but they were 'meh' and not worth the time it would take to post. We are really watching our budget, so I have been limited on the types of ingredients I can buy. Pricy foodstuffs just aren't in our plan right now. It really hasn't been a huge imposition either; I am falling back on old standards rather than new and exciting stuff. I can only be so creative on a strict spending moratorium. However, old standard recipes usually means more family-friendly dinners and getting food on the table faster...so that's an unexpected bonus. We have a big (exciting) family change coming up, so I am focusing more on life right now and not cooking as a hobby.

For now, I am posting when I feel like it and leaving it at that. I will update here and there; but probably not as frequently going forward. My blog is just going to have to be on the back-burner again for awhile. I'm okay with that.

Anyway, here is the latest new dinner we tried and really liked. This recipe is a Claire find from a Cooking Light cookbook. I didn't have Queso Fresco, so we made due with Monterrey Jack cheese. Either way, it was really yummy and post-worthy.

Chicken Breasts with Tomatillo Salsa and Queso Fresco
From: Cooking Light, January 2005 (The Best of Cooking Light Everyday Favorites cookbook)

Ingredients:
Salsa:
2 quarts water
1/2 pound tomatillos (about 10 small), husks and stems removed
1 garlic clove
1/2 to 1 serrano chile
1/2 cup chopped fresh cilantro
1/4 cup coarsely chopped onion
1 teaspoon fresh lime juice
1/4 teaspoon salt

Chicken:
3 (1-ounce) slices white bread
4 (6-ounce) skinless, boneless chicken breast halves
1/2 teaspoon salt
1/2 teaspoon ground cumin
1/4 teaspoon ground red pepper
1 large egg, lightly beaten
1 tablespoon olive oil
1/2 cup (2 ounces) crumbled queso fresco cheese
Cilantro sprigs (optional)
Lime wedges (optional)

Directions:
Preheat oven to 350°.

To prepare salsa, bring water to a boil. Add tomatillos, garlic, and chile; cook 7 minutes. Drain and rinse with cold water. Combine tomatillos, garlic, chile, chopped cilantro, onion, lime juice, and 1/4 teaspoon salt in a food processor or blender; pulse 4 to 5 times or until coarsely chopped. Set aside.

To prepare chicken, place bread in a food processor, and pulse 10 times or until coarse crumbs measure 1 1/2 cups. Arrange crumbs on a baking sheet; bake at 350° for 3 minutes or until lightly browned. Cool completely.

Place each chicken breast half between 2 sheets of heavy-duty plastic wrap; pound to 1/2-inch thickness using a meat mallet or rolling pin. Combine 1/2 teaspoon salt, cumin, and red pepper; sprinkle evenly over chicken.

Place breadcrumbs in a shallow dish. Place egg in another shallow dish. Dip chicken in egg; dredge in breadcrumbs.

Heat oil in a large nonstick skillet over medium-high heat. Add chicken; cook 4 minutes on each side or until done. Top chicken with salsa, and sprinkle with queso fresco cheese. Garnish with cilantro sprigs and lime wedges, if desired.

Nutritional Information:
Amount per serving (yield 4 servings)
Calories: 364
Calories from fat: 26%
Fat: 10.7g
Saturated fat: 3.2g
Monounsaturated fat: 4.5g
Polyunsaturated fat: 1.6g
Protein: 47.1g
Carbohydrate: 17.7g
Fiber: 2g
Cholesterol: 162mg
Iron: 3mg
Sodium: 770mg
Calcium: 169mg


The Result:
This review is kinda superfluous, since I am only posting stuff we like; but I am going to do it anyway. This was really good and my kids loved it. We has a bunch of the salsa leftover, which kept well in a sealed container in the fridge for a couple of weeks. It was the perfect condiment with chips and lunchtime bean burritos that I often make up on the fly. Great recipe!!!

June 18, 2011

Grilled Mac and Cheese with BBQ Pulled Pork Panini

(Warning: This recipe should not be considered "health food" or "healthy" in any way, shape, or form.)

This. was. decadent. Ooey-gooey, melty, saucy, sandwich-y perfection. My friend, Claire found the recipe on a website we both love called Panini Happy. She made this sandwich a week or so ago; and once she reported back on the sheer deliciousness I knew it had to be ours, too. The husband and I fed the kids first, and then oohh'ed and aaahh'ed over each bite.

Grilled Mac and Cheese with BBQ Pulled Pork Panini
From: Cooking Claire via PaniniHappy.com

Ingredients:
4 tablespoons unsalted butter, divided
4 cups prepared macaroni and cheese, warmed
2 onions, thinly sliced
Kosher salt and freshly ground pepper
1 cup barbecue sauce
2 cups prepared pulled pork
8 slices sourdough bread
12 slices sharp cheddar cheese (about 6 ounces)

Directions:
Spread the macaroni and cheese in an 8-inch-square baking dish to about 3/4 inch thick. Cover with plastic wrap and chill until firm, about 45 minutes. Cut the macaroni and cheese into squares that are slightly smaller than the bread slices.

Meanwhile, melt 2 tablespoons butter in a skillet over medium heat. Add the onions and cook, stirring, until caramelized, about 20 minutes. Season with salt and pepper.

Combine the barbecue sauce and pulled pork in a saucepan over low heat and cook until warmed through, about 5 minutes.

Preheat the panini grill to medium-high heat.

Melt the remaining 2 tablespoons butter and brush on one side of each bread slice. Flip over half of the bread slices; layer 1 slice of cheddar, 1 macaroni-and-cheese square and another slice of cheddar on each. Top each with one-quarter of the pulled pork and caramelized onions and another slice of cheddar. Top with the remaining bread slices, buttered-side up.
Working in batches, cook the sandwiches until the cheese melts and the bread is golden, about 5 minutes.


The Result:
In a word...YUM!

(PS- It may be a good idea to consult a Cardiologist before consuming this sandwich.)

June 14, 2011

Lasagna Cupcakes

This was a cheap, easy, and DELICIOUS version of lasagna that
my friend, Claire posted on her blog a week or so ago. The recipe seemed so family-friendly I knew I had to try it right away. Oh man, I am glad I did...we LOVED these fantastic lasagna cupcakes!


Lasagna Cupcakes


Source: CruftBox.com via the Cooking Claire

Ingredients:
24 won ton or gyoza wrappers
Marinara sauce
1 lb. Italian sausage or ground beef
Ricotta cheese
Mozzarella cheese

Directions:
Spray or wipe a cupcake/muffin tin with olive oil. Place one wrapper in the tin form it into a cup shape. Add a small dollop of pasta sauce then some sausage. Add a spoonful of ricotta cheese. Once you filled in the first layer, gently press another wrapper on top of the ricotta layer, forming another cup. Repeat the filling and top each with shredded mozzarella.

Bake at 375 for 20 minutes.


The Result:
As I said, these are awesome! I deviated from the instructions a little and just combined my Italian sausage and sauce together. I don't think it really made much of a difference, because our cupcakes turned out great! Yum, yum, yum!

June 12, 2011

Marinated Grilled Chicken Legs

Our local grocery store had chicken legs on sale this week. Usually, I'm kinda stumped when it comes to chicken legs, but I remembered my friend, Claire had just posted this recipe on her blog not so long ago. How fortuitous! I had something new to do with chicken legs and an inexpensive dinner idea. Score!!!

Marinated Grilled Chicken Legs
From: Cooking Light, June 2005; By: Marie Meyer

Ingredients:
1 cup fresh orange juice
2 tablespoons fresh lemon juice
4 teaspoons low-sodium soy sauce
1 tablespoon dry sherry
1 1/2 teaspoons bottled minced garlic
1 1/2 teaspoons balsamic vinegar
1 1/2 teaspoons basil oil
1 teaspoon onion powder
1 teaspoon dark sesame oil
1/2 teaspoon salt
1/4 teaspoon hot pepper sauce
8 chicken drumsticks (about 2 1/4 pounds), skinned
Cooking spray
Green onion strips (optional)

Directions:
Combine the first 11 ingredients in a large zip-top plastic bag. Add chicken to bag; seal. Marinate in refrigerator 2 hours, turning bag occasionally.

Prepare grill.

Remove chicken from bag, reserving marinade. Place reserved marinade in a small saucepan; cook over medium heat 3 minutes. Place chicken on grill coated with cooking spray; grill 30 minutes or until chicken is done, turning and basting occasionally with reserved marinade. Garnish with green onion strips, if desired.


The Result:
This marinade was fantastic! Seriously, these were probably the best chicken legs I have ever made. The marinade could be applied to other chicken pieces, I'm sure; but it was great on the legs. Admittedly, my two little chicken legs look kinda forlorn and misshapen sitting in the glass dish all by themselves. We had plated up our dinner and I almost forgot to take a photo. Rather than hold everyone up I decided to snap a quick pic of the remaining chicken legs...which were not the beauties of the bunch. They may have looked a crazy, but they tasted awesome!

May 26, 2011

Green Goddess Grilled Cheese Panini

Well, I couldn't stay away from cheese for too long. I'm starting to think that I have a co-dependent relationship with cheese. Sigh. What can I say; cheese is just darn good and I need it in my life. These sandwiches were really tasty and helped fuel my cheese addiction.

Green Goddess Grilled Cheese Panini
Source: PaniniHappy.com

Ingredients:
1 clove garlic, finely chopped
1 oil-packed anchovy, finely chopped
1 teaspoon lime zest (about 1 lime)
3 tablespoons chopped fresh Italian parsley
2 tablespoons chopped fresh tarragon
2 tablespoons chopped fresh cilantro
1 tablespoon chopped fresh basil
1 tablespoon finely chopped shallot
1/4 teaspoon Dijon mustard
2 ounces cream cheese, cut into smaller cubes
1 cup shredded mozzarella
1 cup shredded sharp cheddar
8-12 slices sourdough bread
2 tablespoons extra-virgin olive oil

Directions:
Add garlic and anchovies to a mini-prep food processor and pulse for a few seconds until it’s really finely chopped, almost like a paste (if you don’t have a food processor, you can always just chop the ingredients really well with a knife on a cutting board).

Add in the lime zest, parsley, tarragon, cilantro, basil, shallot, mustard and cream cheese and pulse again until well blended. Transfer to a medium-sized bowl and stir in the mozzarella and cheddar cheeses.

Preheat the panini grill to medium-high heat.

For each sandwich: Spread a generous amount of the cheese mixture onto one slice of bread. Close the sandwich with a second slice of bread. Brush a little olive oil on top. Grill for 5 to 6 minutes until the cheese is melted and oozy and the bread is toasted. Serve immediately and enjoy!


The Result:
I loved the flavor combo of the fresh herbs and cheeses. Yum! This is one good grilled cheese sandwich. Yes, my name is Jen B. and I am a cheese-aholic. Hello, Jen...

May 15, 2011

Pimento Cheeseburgers

Remember when I said that the SBD should be renamed the "Cheese Lovers Diet"??? I wasn't kidding. Okay, so technically this is not a SBD recipe per se, but my friend Claire modified it by nixing the bun. The husband and I put the kids to be and then savored these burgers over a quiet dinner. We were both in love with the ooey-gooeyness of these yummy patties. The only word of caution that I care to mention about these burgers (or really South Beach in general) is make sure you are eating plenty of veggies with your meat and cheese. If you get my drift. Ahem. Also, make sure everything is lower in saturated fat to cancel out all of the guilt for eating tons of meat and cheese. We used low fat cheese and very lean meat for these, and they were still very decadent. These were fantastic!

Pimento Cheeseburgers
Adapted From: The Best of America's Test Kitchen 2011: The Year's Best Recipes, Equipment Reviews, and Tastings (Best of America's Test Kitchen Cookbook: The Year's Best Recipes)

Ingredients:
6 ounces extra-sharp 2% cheddar cheese, grated fine (about 1.5 cups)
1/3 cup drained jarred pimentos, chopped fine
2 ounces low-fat cream cheese, softened
1/2 tsp dry mustard
1/8 tsp cayenne pepper
1 tbsp mayonnaise
1/4 cup whole wheat panko bread crumbs
1/8 cup whole milk
1-1/2 pounds 93% percent lean ground beef
1 tbsp Worcestershire sauce
1/2 tsp salt
1/2 tsp black pepper
2 tablespoons grapeseed or any neutral oil

Directions:
Mix cheddar cheese, pimentos, cream cheese, mustard, and cayenne in bowl until well combined. Drop four 2-tablespoon portions of pimento cheese mixture on plate and cover tightly in plastic wrap. Freeze until firm, at least 2 hours. Combine remaining pimento cheese with mayonnaise, cover with plastic, and refrigerate.

Combine beef, Worcestershire, bread crumbs, milk, salt, and pepper in large bowl and gently knead until well combined. Divide meat into 4 equal -portions. Mold half of 1 portion of meat around 1 piece of the frozen cheese, then surround this mini-patty with the remaining half portion of meat. Repeat with the remaining frozen cheese and 3 portions meat to form 4 hamburgers.

Heat oil in large nonstick skillet over medium heat until just smoking. Add patties and cook until well browned, about 6 minutes. Flip burgers, cover skillet, and continue cooking until well done, about 6 minutes.

Distribute cheese-mayonnaise mixture evenly on top of burgers, cover, and cook until mixture is slightly melted, about 1 minute. Transfer to plate, tent with foil, and let rest 5 minutes. Serve.


The Result:
These. are. awesome. I can't wait to have the leftover burger for lunch today!

May 13, 2011

South Beach Stuffed Peppers

I found this SBD recipe on my friend, Claire's blog. It was really tasty and something my whole family enjoyed. Can I say that I am so happy that low-fat cheese is not off limits on SBD, because we are cheese fiends at my house. I swear cheese makes almost everything taste better. I think SBD should be renamed the "Cheese Lovers Diet", because all the fantastic recipes that I have tried have had cheese in them. Okay,okay...maybe it's because I am just picking the recipes with cheese in them. Anyway, this is another SBD keeper!

South Beach Stuffed Peppers
From Food.com, via the Cooking Claire blog

Ingredients:
4 bell peppers
olive oil
1 lb ground turkey
1 stalk celery, chopped with top
1 -2 garlic clove, minced
1 small onion, chopped
1 tablespoon minced fresh parsley
1 tablespoon Worcestershire sauce
1 teaspoon Spike All Purpose Seasoning (for zest)
28 ounces ground peeled tomatoes
1/2 cup shredded cheese (or more)

Directions:
Wash the peppers, cut the tops off, and place in oiled glass dish. Cover and microwave the peppers for 5 minutes.

Saute the veggies and ground turkey with a dollop of olive oil. (I chop up the usable remainders of the pepper tops as well). Add the tomatoes and cook for 3-4 minutes to evaporate some of the liquid.

Stuff the peppers and top with cheese. Bake at 350 for 10 minutes or until the peppers are soft and the cheese is toasted.

Add Ins: You could add cooked rice or stir in extra cheese to the mixture before baking.


The Result:
Darn it! I forgot to put the celery in the meat mixture. Ugh. I bought it especially for this recipe, too. I hate it when I do stuff like that!

These peppers were really yummy, and easy to make. I only made three actual peppers, and just served my kids the filling with a side of green beans. They wouldn't eat the pepper anyway, so I didn't want to waste it. I didn't have Spike All Purpose Seasoning, so I just improvised and sprinkled a little Lawry's Seasoned Salt and some Tony Chachere's in it. I think you could probably substitute almost any seasoning mix and it would be fine. Again, this was a hit with my family and a great new take on stuffed peppers.