Showing posts with label grilled. Show all posts

March 26, 2013

Pork Tenderloin with Jalapeno Paste and Grilled Sweet Potatoes with Scallions


This is a two-for-one recipe that I got off the Martha Stewart website. I was looking for something different to do with a pork tenderloin and simultaneously use up some of the sweet potatoes I had purchased at Costco earlier in the week (the bag is HUGE). The Martha website paired these two recipes up as a meal, so I thought that was very fortuitous and made them as suggested. Both recipes were awesome and fairly simple to throw together. We especially loved the sweet potatoes, and the pork complimented them perfectly. YUM! Oh, and don't let the hot pepper scare you...it really was not spicy at all. The peppers are seeded/de-veined so the spice is virtually non-existent. I would say there is a modest, tiny, almost undetectable bite of spice; but I'm also guessing that it depends on how hot the pepper is that you are using. I had serranos chiles on hand, so I used two of those, actually. My kids don't like spicy food, and they ate it just fine. This was a really great dinner that we all just gobbled up.

Pork Tenderloin with Jalapeno Paste
Adapted From: Martha Stewart website

Ingredients:
1/4 cup canola oil, plus more for grill
4 cloves garlic
1 chopped jalapeno chile, with seeds and ribs removed (I used 2 Serrano chiles as a substitute)
1 teaspoon dried thyme
1/2 teaspoon salt
1/2 teaspoon ground coriander
1/4 teaspoon pepper
1/4 teaspoon ground cumin
2 whole pork tenderloins, (3/4 pounds each)

Directions:
Heat grill to high. Lightly oil grill rack. In a blender, process 1/4 cup canola oil, garlic, jalapeno, thyme, salt, coriander, pepper, and cumin until smooth, about 1 minute. Spread paste over tenderloins.
Grill tenderloins, turning them occasionally, until an instant-read thermometer inserted into the thickest part registers 155 degrees. 10 to 20 minutes.
Remove from grill; let rest 10 minutes before slicing and serving.

ALTERNATE:
I ended up browning my tenderloin in a cast iron skillet and finishing in a 350 degree oven for 10 minutes (we ran out of charcoal for our grill.) Just brown the meat in a little oil in the skillet, making sure to get all sides. Then bake in the oven until done and cooked through.


Grilled Sweet Potatoes
Adapted From: Martha Stewart website

Ingredients:
3 sweet potatoes
3 tablespoons olive oil
1 tablespoon chili powder
1 teaspoon dried thyme
1/4 teaspoon cayenne pepper
Salt and black pepper
2 tablespoons butter
2 scallions, thinly sliced

Directions:
Heat grill to medium. Peel sweet potatoes, and cut lengthwise into 1/2-inch-thick slices. Toss potatoes in a large bowl with oil, thyme,chili powder, and cayenne pepper; season with salt and black pepper.

Grill potatoes, turning frequently, until tender when pierced with the tip of a paring knife, 20 to 30 minutes.

Return grilled potatoes to bowl; add butter, and break potatoes into large pieces with the side of a spoon. Toss in scallions, and serve.

December 21, 2012

Turkey Pesto Panini


We had my son's Winter Concert at his school on Tuesday night and we needed a dinner that would get us fed and then where we needed to be...FAST. This recipe calls for leftover roasted Thanksgiving turkey, but I just used a container of good quality turkey lunch meat. As promised, these sandwiches were fast, easy, and delish!

Turkey Pesto Panini
Adapted From: Chung Ah of Damn Delicious via Naturebox website


Ingredients:
1 TBSP olive oil, plus additional for brushing on bread
1 loaf of French bread, cut into 3-4 equal pieces
1/2 cup pesto, homemade or store-bought
4-8 ounces mozzarella, sliced
2 cups sliced turkey
2 Roma tomatoes, sliced
1 avocado, sliced
salt and pepper to taste

Directions:
Heat olive oil in a grill pan over medium-high heat. Brush both sides of bread lightly with more olive oil.

Spread 2 TBSP pesto over 1 side of French bread and top with mozzarella, turkey, tomatoes, avocado and top half of bread, sprinkle with salt and pepper; repeat with remaining slices of bread.

Add sandwich to pan and grill until the bread is golden and the cheese is melted, about 2-3 minutes per side. (Use something weighted on top of the sandwich while cooking or use a panini press to get a thinner, more evenly grilled sandwich.)


August 27, 2012

Turkey Pesto Burgers


I'm always on the lookout for a new and interesting twist on a turkey burger. It's funny because there seems to be no in-between when it comes to turkey burgers. If it's bad, it's really bad. However, if it's good, it's fantastic. I find that there is no middle ground whatsoever. (The spectrum is from "flavorless cardboard" to "it's delicious and I don't miss the beef at all".) Thankfully, these Turkey Pesto Burgers were on the delicious meter. They were moist and flavorful. The pesto really added some zip to them. Also, I only had to use a wee bit of the mayo mixture on each bun, since the burgers already were seasoned with the pesto. All in all, this was one of the fantastic versions of the often unpredictable turkey burger.

Turkey Pesto Burger
Adapted From: Confessions of a Foodie Bride via Pinterest

Ingredients:
1 lb. package of extra-lean ground turkey
4 Tbsp pesto (purchased or homemade)
Salt and pepper to taste

For serving:
4 slices of fresh mozzarella
4 Burger buns (whole wheat buns or whole wheat Sandwich Thins preferred)
Pesto mayo (stir together equal parts mayo and pesto with a couple drops of Balsamic)
Tomato slices
Basil leaves
Balsamic vinegar

Directions:
Heat your grill to high.

Break apart the ground turkey into a bowl and season with salt and pepper.

Add basil pesto. If your pesto is very thin, consider using the low end of the range. If it's thick, you can add more. Lightly mix with your hands to distribute the pesto and then form 4 patties.

Cook ~4 minutes each side (to desired doneness or internal temp) and then top with slices of cheese during the last minute so it has time to melt.

Serve the turkey pesto burgers on buns with pesto mayo, fresh basil leaves, sliced tomato, and a drizzle of good balsamic vinegar.

Chicken Sausages with Eggplant Caponata (AND a Pizza Idea)


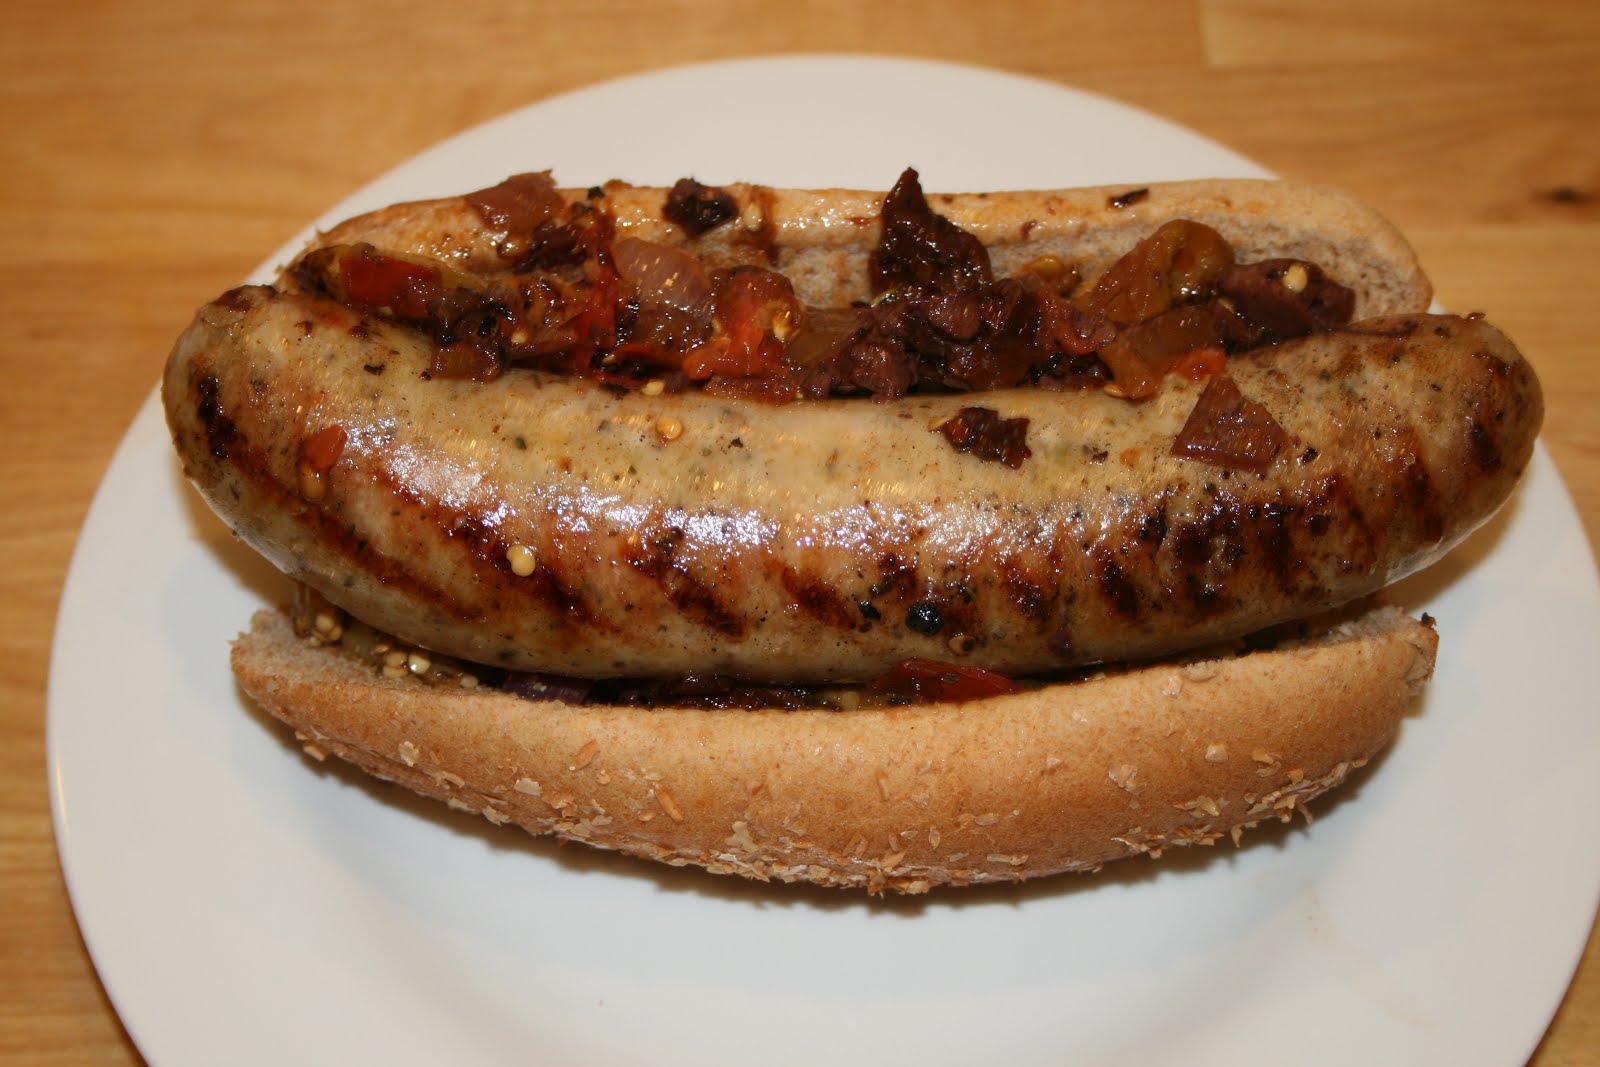
(Here is the finished product. I put our chicken sausages on whole wheat buns with a serving of the caponata. I didn't serve a side dish, as my sausage links were pretty big and I figured the caponata was a full serving of veggies.)


(My caponata after I chopped it all up. Mmmmmm....grilled veggie goodness!)


(The cooked chicken sausages hot off the grill and resting for a few minutes. This was a delicious summer all-in-one, meal-on-a-bun!)

So far, my foray into clean eating has been pretty successful. We've had really tasty, yet healthy meals and I've lost 4 pounds! Pretty fantastic, eh? I love it when weight comes off, and I don't feel like I've really made any sacrifices food-wise. I'm eating 3 solid meals and 2 snacks a day, so I'm never hungry and I've found some great recipes that are so satisfying in the flavor department. To be fair, it does take a bit more planning to eat this way; but I'm motivated to keep going! I already notice a positive difference in how I feel, too. All around, I'm loving the changes.

I adapted this recipe from Clean Eating magazine and it was fantastic. I love grilled food, so this was right up my alley. The husband worked late on Friday night, so it was the kiddos and me for dinner (don't worry...I saved him a plate). My kids were pretty indifferent about this one, but they ate it well enough. However, my husband and I both gave it a thumbs up.

Chicken Sausages with Eggplant Caponata
Adapted From: Clean Eating magazine; By: Nancy S. Hughes, June 1, 2012

Ingredients:
Olive oil cooking spray
1 medium eggplant, cut into 1/2-inch slices
1/2 large red onion, cut into 1/2-inch slices
1 tbsp extra-virgin olive oil
4 chicken sausages (I used an Italian-flavored sausage with Parm and basil)
4 whole-wheat hot dog buns
1/2 jar of sun dried tomatoes, chopped and drained of oil
2 fresh Roma tomatoes, sliced
1 (8 oz) container pitted Kalamata olives, finely chopped
2 tbsp chopped fresh basil, plus additional for garnish (I used dried basil)
2 cloves garlic, whole and peeled
2 tsp apple cider vinegar or red wine vinegar (I forgot the vinegar; but I think balsamic would work, too)
salt and pepper to taste

Directions:
Preheat an indoor grill pan to medium-high and lightly coat grill with cooking spray.

Lightly spray both sides of eggplant,fresh tomatoes,and onion with oil, then place on prepared grill. Also, place whole, peeled garlic cloves on the grill.

Cook vegetables until brown and tender, about 6 minutes per side. Transfer vegetables to a cutting board. Set aside to cool slightly.

Place sausages on the grill pan. Cook according to package directions, or until sausage is cooked thoroughly. Gently open buns, but do not split in half. Grill buns briefly on each side while sausages cook for final 2 minutes.

Roughly chop the grilled eggplant, tomatoes, garlic, and onion and place in a medium bowl with olives, basil, sun dried tomatoes and vinegar. Season with salt and pepper to taste.

To serve, place 1 sausage in each bun and spoon equal amounts of vegetable mixture over top of each. Sprinkle with additional basil, if desired.

UPDATE:
I had a lot of leftover caponata, so I decided to mix it with a half of a container of store bought pesto and turn it into a pizza topping. I bought some whole wheat pizza dough, layered a thin amount of store bought marinara over the crust, topped that with the caponata/pesto mixture, and then added my shredded mozzarella cheese. My son loves pepperoni, so we added those on top of the cheese and baked it (450 degrees for 15 minutes). It was delicious!!!! I love it when my recipes can multi-task. Definitely a good use for leftover pesto and caponata!

August 21, 2012

Grilled Halibut with Roasted Pineapple Habenero Salsa


Our family recently took a day trip up to northern Arizona for a break from the oppressive heat here in Phoenix. We went to a small local zoo and then stopped for dinner on the way home in my husband's old college town, Flagstaff. We had heard good things about a Mexican restaurant called Salsa Brava and decided to try it. Oh man, was it good! They had a unique salsa bar, and all the food that we had was pretty awesome. My favorite menu item by far was their Pineapple Habenero salsa, which blew my mind. I knew I would have to try and duplicate it, because I could not stop thinking about it. We found out when we got to the restaurant that they were featured on a Food Network show called Diners, Drive-Ins, and Dives. I did some investigating and found this recipe based on the original at the restaurant. While it's not identical to what we had at Salsa Brava, it's a pretty close facsimile. I still want to do some more tweaking to see if I can get more of a match, but in the meantime, this will work just fine!

I decided to pair my fruity-spicy salsa with this grilled fish recipe I found on the Cooking Light website. The original recipe has a peach and pepper salsa paired with the halibut, but I thought my pineapple habenero salsa would work just as well. I was right! This. was. fantastic.

Grilled Halibut with Roasted Pineapple Habenero Salsa

For the salsa:

Roasted Pineapple Habenero Salsa
Adapted From: More Diners, Drive-ins, and Dives by Guy Fieri

Ingredients:
4 Roma tomatoes
4 jalapenos, seeded and stems removed
1 habeneros, seeded and stems removed
1/2 medium red onion
1 20 oz can of pineapple tidbits, with juice.
1 cup cilantro
salt to taste

Directions:
1. broil the jalapenos and onion for 5-10 minutes on each side or until skin is blackened. When charred and caramelized on both sides then remove from the oven and let cool for 30 minutes in a bowl with a tight fitting lid.

Add all the roasted veggies, tomatoes,and raw habenero (SEE NOTE BELOW), and pineapple and pulse in the food processor. Add the cilantro and pulse. Add salt to taste. I also added a few tablespoons of olive oil. Let stand for 30 minutes before serving or store in the fridge in an airtight container for up to a week.

NOTE: The habenero pepper is extremely spicy. Start by adding a quarter or a half of the pepper and taste. If your palette can handle it, add the whole thing from there...just taste as you go!

For the fish:

Grilled Halibut
Adapted From: Cooking Light magazine, Jeanne Kelley, JUNE 2010 issue

Ingredients:
4 teaspoons fresh lemon juice $
4 teaspoons olive oil $
1/2 teaspoon paprika
1 garlic clove, minced
4 (6-ounce) skinless halibut fillets
3/8 teaspoon salt
3/8 teaspoon freshly ground black pepper
Cooking spray

Directions:
Prepare grill to medium-high heat.
To prepare fish, combine 4 teaspoons juice, oil, paprika, and 1 garlic clove in a large, shallow glass baking dish, stirring with a whisk (I just combined everything in a large, zip top bag). Add fish to juice mixture; turn to coat. Cover and let stand 15 minutes.

Remove fish from marinade; discard marinade. Sprinkle fish evenly with 3/8 teaspoon salt and black pepper. Place fish on a grill rack coated with cooking spray; grill 3 minutes on each side or until desired degree of doneness.

Serve fish with topped with desired amount of salsa.

May 7, 2012

Grilled Chile-Lime Chicken


My weight has been slowly creeping back up by a few pounds here and there. It's gotten to be about 15 lb. gain so far, and it's enough to make me say ENOUGH! I've really not been paying much attention to what or how I've been eating, so it really is understandable. Also, I've been starving since this whole swim/bike/run thing has taken over my life. Luckily, this is the last week before my triathlon and my training is officially over. I can start to focus again on building muscle/weight training and eating smaller portions. To kickstart my efforts, I worked a few low-carb, healthy meals into the rotation this week. (I can't go totally no carb, because it ends up doing more harm than good for me.) This chicken marinade recipe was really tasty and easy to put together. This is a great summertime recipe, as well--not too heavy. All in all, I would put this down in the 'win' column. This was the perfect dinner to get me headed in the right direction.

Grilled Chile-Lime Chicken
From: bettycrocker.com via Pinterest

Ingredients:
2 teaspoons grated lime peel
1/4 cup lime juice
1/4 cup olive or vegetable oil
2 tablespoons chopped fresh cilantro
1/2 teaspoon sugar
1/2 teaspoon salt
1 small jalapeño chile, seeded, finely chopped
1 clove garlic, finely chopped
4 boneless skinless chicken breasts (1 1/4 lb)

Directions:
1.To make marinade, in shallow glass or plastic dish, or resealable food-storage plastic bag, mix all ingredients except chicken.

2.Between pieces of plastic wrap or waxed paper, place each chicken breast smooth side down; gently pound with flat side of meat mallet or rolling pin until about 1/4 inch thick. Add chicken to marinade; turn to coat. Cover dish or seal bag; refrigerate at least 30 minutes but no longer than 24 hours.

3.Heat coals or gas grill for direct heat. Remove chicken from marinade; discard marinade. Cover and grill chicken over medium heat 8 to 10 minutes, turning once, until juice of chicken is clear when center of thickest part is cut (170°F).


March 30, 2012

Grilled Greek Chicken


I love it when I find an ingredient and immediately get an awesome idea about how I'm gonna use it. I found a feta, Greek olive antipasti mix (green olives and Calamata olives) at my local grocery store the other day and inspiration struck. I decided to concoct a grilled Greek marinade for some chicken breasts and top it with the olive/cheese mixture. It. was. delicious. Not to mention simple to put together and pretty fast to cook. Score!!!

(By the way...I'm not sure why this whole photo looks orange-ish??? Weird! I'll just chalk it up to my awesome camera skills. We had a Caprese salad with our meal and it was perfect.)

Grilled Greek Chicken

Ingredients:

For marinade:
1 teaspoon Dijon mustard
1 teaspoon honey
1/2 cup lemon juice
1/2 teaspoon salt
1/2 teaspoon black pepper
1 teaspoon garlic seasoning
1/2 teaspoon dried oregano
1/2 teaspoon dried thyme
1/2 cup olive oil

For chicken:
cooking spray
1 ( 1 lb.) tub of Greek olive/feta mix (the brand I used was Delallo Greek Feta Salad)
4 chicken breasts
Greek seasoning blend (I use Cavander's Greek Seasoning)
salt and pepper to taste

Directions:
Take chicken breasts out of the fridge and set aside so they can come to room temperature for a few minutes while you make the marinade.

In a large glass bowl, combine all the marinade ingredients except for the olive oil. While whisking vigorously, drizzle in the olive oil in a steady stream so the mixture can become emulsified.

Immerse your chicken breasts in the marinade and let sit for 1/2 hour minimum. (A few hours to overnight would be better.)

Prepare indoor grill pan with cooking spray and heat on medium-high heat. Remove chicken from marinade. Sprinkle Greek seasoning, salt and pepper on both sides of chicken. Place chicken on grill and pour remaining marinade over the tops of each breast. Cook chicken about 6-8 minutes per side, or until chicken is cooked through and grill marks are on both sides. Remove from grill to a large plate and let chicken rest for 5 minutes.

When ready to serve, use a slotted spoon (this is so the excess oil and moisture from the salad mix does not saturate your chicken) drain and divide the Greek olive/feta mixture equally over the chicken breasts as a topping. Enjoy!

March 7, 2012

Balsamic-Garlic Crusted Pork Tenderloin

This is a low-carb recipe that I came across on Pinterest. I don't remember when exactly we had this for our evening meal, but it was within the last week or so. Right now, everything is a little fuzzy since our family schedule bonkers. Actually, it seems that as my kids get older, our family schedule is never NOT bonkers. (Yes, I realize that was a grammatical faux-pause with the double-negative, but I'm trying to make a point.)
We are balancing t-ball practice/games for the boy, triathlon training for me, the husbands difficult work hours, some volunteer church obligations, Spring Break, various social obligations, and a bible study (again for me). Not to mention keeping the baby girls entertained and on some sort of consistent nap time regimen. Crazy is the new normal, I guess. Maybe I should just report when our schedule isn't bonkers?!?!?!

Anyway, this was a delicious pork tenderloin application. I opted for roasting over grilling, because we were out of both propane and charcoal at the time. The roasting method was delicious and worked out just fine. I'm sure grilling would be equally as good. I do remember this came together with minimal effort on my part and, as I said, yielded great results. It was a perfect healthy meal for a constantly on-the-go family like mine. Score!


Balsamic-Garlic Crusted Pork Tenderloin
From: KitchenConfidante.com

Ingredients:
4-5 garlic cloves, finely minced or crushed
2 tablespoons balsamic vinegar
2 1/2 teaspoons coarse salt
1/2 teaspoon freshly ground pepper
2 tablespoons olive oil
2 pork tenderloins (about 1¼ pounds each)
2 tablespoons canola oil (if preparing in oven)

Directions:
Stir together garlic, balsamic vinegar, salt, pepper, and olive oil in a small bowl. Rub the paste all over pork. If you like or have the time, marinate overnight. If not, no worries, it will still be great!

Grill preparation:

Sear the tenderloins on all sides, then grill for about 20-30 minutes, rotating every 10 minutes, until the internal temperature is 160 degrees. Try to let it rest before slicing.

Oven preparation:

Preheat oven to 400 degrees.

Heat canola oil in a large, heavy saute pan over medium-high heat. Working in batches if necessary, add pork, and brown all over, about 4 minutes.

Transfer pan to oven. Roast pork, turning occasionally, until the internal temperature is 160 degrees, about 20 minutes. Transfer pork to a cutting board, and try to let it rest 10 minutes before slicing.


Here are my tenderloins while they were resting, right before we sliced them. Sooooo good!

January 8, 2012

Grilled Bruschetta Chicken

I'm almost caught up on my blog posting! At least I'm up to this past Saturday's dinner.

This was a Pinterest recipe that I kept circling back to over and over again. I think I must have "pinned" it three or four times. I kept seeing it and thinking I needed to try it, but then I would get busy and forget about it. Well, the stars aligned and I found it again and decided to make it this past weekend. Also, it helped that I needed a "healthy" dinner to make since I'm back on the running/working out/eating right bandwagon. Healthy or not, this meal was pretty awesome. We all loved this chicken dish, kids included, which makes it a win in my book.

Grilled Bruschetta Chicken
Adapted From: the Kraft Foods website via The Girl Who Ate Everything

Ingredients:
4 small boneless skinless chicken breast halves
1/2 cup of Sun-Dried Tomato or Italian salad dressing, divided
1 Tablespoon of balsamic vinegar
2 tomato, finely chopped
1/2 cup shredded part-skim mozzarella cheese
1/4 cup chopped fresh basil or 1 tsp. dried basil leaves

Directions:
Place a large sheet of heavy-duty foil over half of grill grate; heat grill to medium heat. Meanwhile, place chicken in resealable plastic bag. Add 1/4 cup dressing and seal bag. Turn bag over several times to evenly coat chicken with dressing. Refrigerate 10 minutes (I marinate it all day if I remember in time). Remove chicken from bag; discard bag and dressing.

Grill chicken on uncovered side of grill for about 6 minutes. Meanwhile, combine remaining 1/4 dressing, balsamic vinegar, tomatoes, cheese, and basil.

Turn the chicken over and place cooked-side up, on foil on the grill. Top with tomato mixture. Close lid. Grill 8 minutes or until chicken is done.


The Result:
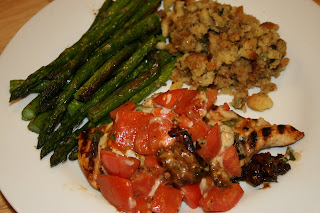
Sooooo tasty and pretty easy to make! I used an indoor grill pan with a lid and it came together perfectly. We love, love, loved this dinner!

(Note: This is South Beach Diet phase 1 friendly as long as you keep the side dishes to legit SBD approved items. I wanted to get rid of a box of prepared stuffing, so ours was not SBD friendly. However, if I would have stuck to the veggies and chicken it would have been.)

November 25, 2011

Gruyere & Caramelized Onions Panini

I've been wracking my brain for a few days now on what I was going to write about this sandwich. The beginning of the holiday season has already gotten me into a tailspin. Busy, busy, busy! I can't think of anything super-creative or any special circumstances surrounding our meal on this particular night, so I think I'll just give you the facts. This was a really delicious version of a ramped-up grilled cheese. The onions were a bit labor-intensive, but totally worth the time and effort. The combination of flavors hit the mark, especially for the adults at my house. We served our paninis with a green side salad and our meal was pretty darn satisfying. Hmmmm...I think that's about it, except to say that this grilled sandwich did not disappoint!

Gruyere & Caramelized Onions Panini
Adapted From: ‘wichcraft: Craft a sandwich into a meal–and a meal into a sandwich cookbook via the Panini Happy website

Ingredients:
4 tablespoons extra-virgin olive oil
4 medium yellow onions, halved and cut lengthwise into 1/8″ slices
2 tablespoons chopped fresh oregano, or 1 tablespoon dried Sicilian oregano
Kosher salt and freshly ground black pepper
8 oz. Gruyere cheese, grated
8 slices rye bread

Directions:
In a skillet over medium-high heat, add the olive oil and onions and stir vigorously to avoid scorching. Add the oregano and season with salt and pepper. Continue stirring until the onions have a deep brown color. Reduce the heat and continue to cook until the onions are soft, 30 to 45 minutes. Set aside.*

Preheat the panini grill to medium-high heat (375°F).

For each sandwich: Place 1/4 of the cheese on a slice of bread. Follow with a generous amount of onions. Close the sandwich and place on the panini grill. Grill for 4-5 minutes until the cheese is completely melted and the bread is toasted with golden grill marks. Serve immediately and enjoy!

(***Either use the onions immediately to make the panini or refrigerate them for up to 1 week.***)


The Result:
These were really good. I liked the melding of flavors with the rye bread, gooey cheese, and syrupy onions...it was pretty spectacular. I ended up using my surplus onions (I think I had about a cup leftover) in my Thanksgiving green bean casserole (recipe to come). Yum! They were a welcome addition to both this sandwich and our holiday veggie side dish.

October 5, 2011

Jen's Tuna Melts

Okay, this is not much of a recipe...but I feel that it's noteworthy because I often forget about it. I love a tuna melt sandwich! It's such an easy, cheap dinner that you can probably pull out of your hat with stuff that you already have on hand. This was one of the first meals that I made in the new house and everyone in my family loved it. A side of frozen, steamed mixed veggies made our dinner low-stress and complete.

Jen's Tuna Melts
bread of your choice (I used sliced wheat)
butter (1 stick, softened)
tuna salad of your choice
shredded sharp cheddar cheese

Directions:
Butter all bread slices on one side. Place one piece butter-side down in a hot, non-stick skillet. Place a scoop of tuna salad onto bread in skillet and top with a generous sprinkle of shredded cheese. Top with another slice of bread, making sure butter-side is up (not facing the inside of the sandwich). Cook as you would a grilled cheese. Flip when bottom bread is toasted and golden brown. Remove from pan when other side is cooked, toasted and golden browned. Repeat with additional sandwiches as needed.

The Result:
I use about 6 cans of tuna in water for my family. Be sure to drain the tuna first. I like to add Dijon mustard, low-fat mayo, salt & pepper, lemon juice, diced onion, and diced celery to my tuna salad. However, use whatever recipe you like best.

This is almost a non-recipe, but these sandwiches are sooooo good! You could put a fresh slice of tomato on them to jazz it up even more, but I think they are great as-is.

September 21, 2011

Bacon Pesto Grilled Cheese Sandwich

This. was. awesome. Seriously, you should try this sandwich immediately; if not sooner. Thank you. Over and out. Ten-four, good buddy.

Bacon Pesto Grilled Cheese Sandwich
Adapted From: Three Many Cooks website

Ingredients:
1/2 stick butter, softened (use more or less if needed, depending on the number of sandwiches)
sour dough bread slices
ripe tomatoes, sliced (I used heirlooms)
8-10 pieces of crispy, cooked bacon (use more or less, if needed)
jarred pesto
fresh mozzarella, sliced

Directions:
Cook bacon and set aside. On inside of bread, spread pesto on both halves. Top with cheese slices, tomato slices, and a few slices of bacon. Put top piece of bread on sandwich. Slather butter on outside of both ends of the bread. Cook in a dry skillet over medium high heat until cheese is melted and bread is crisp and golden brown. Flip and repeat on the other side. Remove sandwich to a cutting board, cut in half, and serve immediately. Repeat with additional sandwiches.


The Result:
Nom, nom, nom. (Insert lip-smacking noises here.)

September 19, 2011

Grilled Shrimp and Sausage Skewers with Smoky Paprika Glaze (or Not)

We are in the middle of moving and I realized--much too late--that I packed up my skewers along with some of my other kitchen stuff. EEK! I quickly had to adapt this recipe and what I got was more of a skillet stir-fry, than actual grilled skewers. I literally just tossed everything in a pan with the glaze and served it over brown rice. It was still delicious, but I would like to make this the right way someday.

Grilled Shrimp and Sausage Skewers with Smoky Paprika Glaze
Source: Bon Appetit, June 2010

Ingredients:
3/4 cup olive oil
4 large garlic cloves, pressed
2 tablespoons chopped fresh thyme
5 teaspoons smoked paprika
4 teaspoons Sherry wine vinegar
3/4 teaspoon salt
1/2 teaspoon freshly ground black pepper
1/2 teaspoon dried crushed red pepper
12 uncooked extra-large shrimp (13 to 15 per pound), peeled, deveined
12 1-inch-long pieces andouille or other fully cooked smoked sausages (such as linguiça; about 16 ounces)
12 cherry tomatoes
12 2-layer sections of red onion wedges
Nonstick vegetable oil spray

Directions:
Whisk oil, garlic, thyme, smoked paprika, Sherry wine vinegar, salt, black pepper, and crushed red pepper in medium bowl to blend for glaze. Transfer half of glaze to small bowl and reserve for serving.

Alternately thread shrimp, sausage pieces, cherry tomatoes, and sections of onion wedges on each of 6 long metal skewers. Arrange skewers on large rimmed baking sheet. DO AHEAD Can be made up to 6 hours ahead. Cover and chill skewers and bowls of glaze separately.

Coat grill rack with nonstick spray and prepare barbecue (medium-high heat). Brush skewers on both sides with glaze from 1 bowl. Grill until shrimp are opaque in center, turning and brushing occasionally with more glaze, 6 to 8 minutes.

Arrange skewers on platter. Serve with remaining bowl of glaze.


The Result:
Very yummy, but I would like to try the actual skewers. I decided to just post the actual recipe, instead of the mess that I made. (It was good, but not too visually appealing.) My way was really all about survival, man...not anything that is worth duplicating. The flavors were so tasty, and I would recommend this recipe either way. Yum!

August 14, 2011

Grilled Pork Chops with Asian Black Bean-Garlic Marinade

This pork chop recipe had been on my menu plan for a couple of weeks now. I originally slated it when we were doing SBD phase 1, but I kept pushing it back because I couldn't find the black bean-garlic sauce. I finally got the chance to try a different grocery store and I was able to purchase the key ingredient. All in all, this marinade was really easy to whip up and was soooo tasty. The flavor was reminiscent of the Saito Chicken marinade we love, but a little more intense (which is a good thing). There is a high sodium content in the black bean-garlic sauce which, along with the other ingredients, basically brined our pork chops. I was afraid that the sodium was going to be too much, but it wasn't. (PS-don't taste the marinade beforehand...just trust me on this.) The meat turned out to be flavorful and juicy, not overly salty. Hooray! We served our chops with some steamed green beans and broccoli mixed together and had a very yummy dinner.

Grilled Pork Chops with Asian Black Bean-Garlic Marinade
Adapted from: The Bon Appetit Cookbook: Fast Easy Fresh via the Kalyn's Kitchen website

Ingredients:
4-8 thick cut pork chops, preferably bone-in (mine were boneless)
olive oil, for oiling grill grates
3 T Black Bean Garlic Sauce
2 tsp. minced garlic
1 1/2 T soy sauce
2 tsp. sesame seed oil
3 T fresh lime juice (I used my fresh-frozen lime juice)
1 T ginger puree
3 T peanut oil

Directions:
Trim any excess fat off the pork chops (leave a little bit on, but not much). Combine marinade ingredients. Put pork chops into a Ziploc bag (or a plastic container with a snap-tight lid) and pour marinade over. Let pork marinate in the refrigerator for 4-6 hours (or longer if you're away from home all day.)

When you're ready to cook the pork chops, remove the meat from the refrigerator and let it come to room temperature. Oil the grill grates with a paper towel dipped in olive oil, then preheat gas or charcoal grill to medium-high. (You can only hold your hand there for 2-3 seconds at that heat.) Lay pork chops on the grill at a diagonal to grill grates and cook 3-4 minutes or until grill marks appear, then rotate a quarter-turn and cook 3-4 minutes more to get second set of grill marks.

Turn pork chops over and cook 6-8 minutes more, or until internal temperature is about 145F on an instant-read meat thermometer. (I use my Polder Meat Thermometer with Probe and Timer to get the temperature just right.) If you don't have a meat thermometer, the pork should feel firm but not hard to the touch. You can cut a piece open to check and it should be barely pink inside. (For years I cooked pork to 160F, but now I like it only cooked to medium; if you want it more well done, cook just slightly longer.) Serve hot.


The Result:
So good! I actually made 8 boneless pork chops for this quantity of marinade, although the original recipe suggests a serving of only 4 chops. I think the marinade recipe is flexible enough to where it worked, but I don't think I would have stretched it anymore than that. This is another grilling favorite!

August 11, 2011

Grilled Balsamic London Broil

My bff, Gertrude and I went to a local butcher shop yesterday that is aptly named The Meat Shop.

(Note: I've decided that I have a co-dependent relationship with my bff, Claire and we spend way too much time together, and I mention her way too much on my blog. I've decided to make up a new bff named Gertrude so it doesn't seem like I only have one friend and I can mention someone else on my blog besides ol' "what's her name".)

(Not that "what's her name" is ol', by the way. Claire, if you are reading this you are not ol', but young and spry. I'm just sayin'...)

Anyway, Gertrude and I stopped into this locally owned and operated butcher shop and loved it! They carried locally grown, grass-fed beef and pork; some of which they actually raise themselves. The meat possibilities were endless, and I was overwhelmed with choices. (We decided that a spur of the moment meat shopping trip was probably not the best idea; and next time we would be armed with a meat purchasing plan.)

I ended up buying a couple slabs of grass-fed London broil (that were cut right in front of my very eyes), handmade sausage (Linguisa), pork chorizo, and some ground pork/bacon burgers. Since the London broil was fresh, I decided to grill it right away for our dinner and push back my other meal plans. I wanted to make sure that we got all the benefits of the grass-fed beefy goodness at it's optimum state of freshness. I searched food.com and found this easy marinade that turned out to be really yummy. Our dinner was fantastic, and I am trying to figure out a way to purchase all of my beef and pork at The Meat Shop. Yum!

Grilled Balsamic London Broil
Adapted From: food.com, by: Ginny P; Sept. 2002, #39911

Ingredients:
1/2 lb London broil (top round steak), 1 inch thick
1 tablespoon olive oil
2 tablespoons balsamic vinegar
2 tablespoons low sodium soy sauce
1/2 teaspoon dried thyme
1/2 teaspoon garlic powder or 1 clove of minced fresh garlic
black pepper, to taste

Directions:

Put all ingredients, except meat, in a container fitted with a lid; cover and shake.

Pour the marinade over the meat in a zip top bag.

Marinate in the refrigerator for 4 hours or overnight, turning the meat occasionally.

Grill or broil until done as desired (5-7 minutes per side).

Let the meat rest for 5 minutes, slice thinly, and serve.

The Result:
We had 3 adults and 3 kids eating dinner; so I doubled the quantity of all the ingredients, including the meat. I forgot to take a photo, but this recipe was so easy and delicious. The meat was perfectly seasoned and cooked. We served our London broil with a side of baked sweet potato fries, and enjoyed every bite. Based on the success of this London Broil, I can't wait to dive into my other purchases from The Meat Shop.

August 7, 2011

Grilled Halibut with Garlic, Basil, and Lemon

The best thing about summer, in my opinion, is grilled food. Give me something from the grill, and I am a happy woman. These halibut steaks are no exception. Really, this is a tasty way to prepare any grilled white fish; but I decided to experiment with the thick, "meaty"-like texture of halibut steaks. Halibut is a firm, mild fish that holds up really well on the hot grates of a barbeque. It's one of my favorite grillin' fish around (maybe I like swordfish better, but it's in the top two). This recipe was simple and delicious. We paired our fish with a Caprese salad and a glass of white wine after our kids were in bed for the evening. (It's not that they wouldn't have enjoyed our fish dinner, it's just that we decided to feed them early so we could enjoy our fish dinner by ourselves.) Yum!

Grilled Halibut with Garlic, Basil, and Lemon
From: Kalyn's Kitchen website

Ingredients:
4-6 halibut steaks
3/4 cup olive oil
1/4 cup lemon juice
2 tsp. coarse ground black pepper
2 tsp. Spike Seasoning (optional, but good)
2 T garlic puree (or slightly less garlic powder but I think the garlic puree from a jar gives better flavor)
1 T dried basil

Directions:
Thaw the fish completely in refrigerator if frozen. Mix marinade ingredients (oil through basil). Put fish in Zip-loc bag or plastic container with a snap-tight lid, arranging it in a single layer. Pour marinade over and marinate in refrigerator for 2-3 hours. (Turn it over a few times if you're home. Don't marinate it too much longer than this or the marinade will start to "cook" the fish.)

When you're ready to cook, take the fish out of the fridge and let it come to room temperature. Oil the grill grates generously with oil poured on to a paper towel, or use a non-stick spray made for the grill. Turn grill on to high and preheat while the fish comes to room temperature.

Turn the grill to medium-high when you are ready to put the fish on (or for a charcoal grill, you can only hold your hand there for a few seconds when it's hot enough to cook fish.) To get grill marks, lay the fish diagonally across grill grates; after first grill marks appear (about 3 minutes) rotate fish so it's laying diagonally the other way. After about 6 minutes carefully turn fish over to cook the other side.

Total cooking time for grilled fish is about 10 minutes per inch of thickness, but the best way to test is by lightly pressing on the fish with your finger; it should feel firm but not hard to the touch when it's done.

This marinade would also be good on shrimp, scallops, or chicken. Chicken could be marinated quite a bit longer; I would marinate shrimp or scallops for only about 2 hours.


The Result:
This was a really light and flavorful meal. The marinade was delicious, however mine got a little watered down since my fish wasn't thawed all the way in the middle. Also, I don't think my grill was nearly hot enough. Oops! Sometimes, the grill can be a fickle beast. Even with those little snafus, this recipe was great and SBD phase 1 friendly.

August 1, 2011

Grilled Chicken Salad with Rustic Guacamole, Romaine and Queso Anejo

Why, hello there. Have you missed me? I've missed all of you. Once again, life has been hectic around these parts. We are in the middle of some major real estate juggling, and that is no easy feat with three kids in tow. Also, my son is gearing up to start kindergarten in less than a week; so in addition to moving/packing, we are in full "yikes,school is starting soon" mode. Basically, I have been doing some fly-by-the-seat-of-my-pants cooking. Nothing exciting to post...unless you want to know exactly how I manage to whip up scrambled eggs for dinner.

I started South Beach Diet Phase 1 again, too. Well, I did. I lasted a week, and then I broke down and had some carbs (and alcohol). I needed to shed a few pounds fast before my 1/2 marathon in (eek!) 5 weeks. I took off 5 of the 8 pounds I set for my goal pre-race weight. Then, I caved in to temptation. I decided from now until the race I am going to try to stick with SBD phase 1, but if I have carbs now and again no biggie. I should still be able to lose the 3 extra pounds on a low/modified carb intake.

Enough about me. Let's talk about Rick Bayless...

I heart Rick Bayless (as I've mentioned several times). Every recipe just reconfirms my adoration. Someday I hope to eat at all of his restaurants...do a food vacation centered around Rick Bayless. That may sound a little extreme, but that is how much I l-o-v-e him. This chicken salad was fantastic. My BFF Claire made it last week, and reminded me of it in the Mexican Everyday cookbook. It is SBD Phase 1 friendly and it was delicious. RB took the pedestrian chicken Caesar salad and made it sing. Rick B. rocks!

Grilled Chicken Salad with Rustic Guacamole, Romaine and Queso Anejo
From: Mexican Everyday by: Rick Bayless

Ingredients:

DRESSING:
½ cup vegetable or olive oil, plus a little more for onion
4 garlic cloves, peeled and halved
Fresh hot green chiles to taste (I like 2 serranos or 1 large jalapeno), stemmed and halved
½ cup fresh lime juice
¾ cup (loosely packed) cilantro, roughly chopped
Salt
¼ teaspoon ground black pepper

GRILLED CHICKEN SALAD:
4 medium (about 1¼ pounds total) boneless, skinless chicken breast halves
1 medium white onion, cut into ½-half-inch slices
2 ripe avocados
8 cups romaine hearts, sliced crosswise at ½-inch thick
1/3 cup grated Mexican queso anejo or other garnishing cheese (Romano or Parmesan)

Directions:
Heat oil in small skillet over medium heat. Add garlic and chiles; cook, stirring frequently, until garlic is soft and lightly browned (usually 1 to 2 minutes). Pour oil, garlic and chiles into blender jar or food processor. Add lime juice, cilantro, black pepper, and 1 scant teaspoon salt. Process garlic mixture until smooth.

Pour 1/3 of garlic mixture over chicken breasts, spreading it evenly over all sides.

Heat a grill pan or gas grill to medium to medium-high heat (or start a charcoal fire and let it burn until coals are medium hot and covered with white ash). Lightly brush or spray onion slices with oil; sprinkle with salt. Lay chicken and onion on grill pan or grill. Cook until chicken is just cooked through and onion is well browned (3 to 4 minutes on each side). Chop onion into small pieces and scoop into bowl. Set the chicken aside to cool.

Pit and peel avocados, scooping flesh into bowl with onion. Add another 1/3 of garlic mixture, then coarsely mash everything together with old-fashioned potato masher, large fork or back of spoon. Taste and season with salt (usually about ½ teaspoon).

Scoop the sliced romaine into large bowl. Drizzle on remaining 1/3 of garlic mixture and toss to combine. Divide between 4 dinner plates. Scoop a portion of guacamole into center of each plate. Cut each breast into cubes and arrange over guacamole. Sprinkle each plate with garnishing cheese. Serve.


The Result:
It. was. awesome. I followed the recipe to the letter, and it was soooooo tasty. Each component was perfectly complimented by the next. It was very filling and satisfying; and I just love the idea of the salad dressing being used for the chicken marinade and in the guacamole. Yum. Try this salad...it will make you happy.

June 12, 2011

Marinated Grilled Chicken Legs

Our local grocery store had chicken legs on sale this week. Usually, I'm kinda stumped when it comes to chicken legs, but I remembered my friend, Claire had just posted this recipe on her blog not so long ago. How fortuitous! I had something new to do with chicken legs and an inexpensive dinner idea. Score!!!

Marinated Grilled Chicken Legs
From: Cooking Light, June 2005; By: Marie Meyer

Ingredients:
1 cup fresh orange juice
2 tablespoons fresh lemon juice
4 teaspoons low-sodium soy sauce
1 tablespoon dry sherry
1 1/2 teaspoons bottled minced garlic
1 1/2 teaspoons balsamic vinegar
1 1/2 teaspoons basil oil
1 teaspoon onion powder
1 teaspoon dark sesame oil
1/2 teaspoon salt
1/4 teaspoon hot pepper sauce
8 chicken drumsticks (about 2 1/4 pounds), skinned
Cooking spray
Green onion strips (optional)

Directions:
Combine the first 11 ingredients in a large zip-top plastic bag. Add chicken to bag; seal. Marinate in refrigerator 2 hours, turning bag occasionally.

Prepare grill.

Remove chicken from bag, reserving marinade. Place reserved marinade in a small saucepan; cook over medium heat 3 minutes. Place chicken on grill coated with cooking spray; grill 30 minutes or until chicken is done, turning and basting occasionally with reserved marinade. Garnish with green onion strips, if desired.


The Result:
This marinade was fantastic! Seriously, these were probably the best chicken legs I have ever made. The marinade could be applied to other chicken pieces, I'm sure; but it was great on the legs. Admittedly, my two little chicken legs look kinda forlorn and misshapen sitting in the glass dish all by themselves. We had plated up our dinner and I almost forgot to take a photo. Rather than hold everyone up I decided to snap a quick pic of the remaining chicken legs...which were not the beauties of the bunch. They may have looked a crazy, but they tasted awesome!

May 26, 2011

Green Goddess Grilled Cheese Panini

Well, I couldn't stay away from cheese for too long. I'm starting to think that I have a co-dependent relationship with cheese. Sigh. What can I say; cheese is just darn good and I need it in my life. These sandwiches were really tasty and helped fuel my cheese addiction.

Green Goddess Grilled Cheese Panini
Source: PaniniHappy.com

Ingredients:
1 clove garlic, finely chopped
1 oil-packed anchovy, finely chopped
1 teaspoon lime zest (about 1 lime)
3 tablespoons chopped fresh Italian parsley
2 tablespoons chopped fresh tarragon
2 tablespoons chopped fresh cilantro
1 tablespoon chopped fresh basil
1 tablespoon finely chopped shallot
1/4 teaspoon Dijon mustard
2 ounces cream cheese, cut into smaller cubes
1 cup shredded mozzarella
1 cup shredded sharp cheddar
8-12 slices sourdough bread
2 tablespoons extra-virgin olive oil

Directions:
Add garlic and anchovies to a mini-prep food processor and pulse for a few seconds until it’s really finely chopped, almost like a paste (if you don’t have a food processor, you can always just chop the ingredients really well with a knife on a cutting board).

Add in the lime zest, parsley, tarragon, cilantro, basil, shallot, mustard and cream cheese and pulse again until well blended. Transfer to a medium-sized bowl and stir in the mozzarella and cheddar cheeses.

Preheat the panini grill to medium-high heat.

For each sandwich: Spread a generous amount of the cheese mixture onto one slice of bread. Close the sandwich with a second slice of bread. Brush a little olive oil on top. Grill for 5 to 6 minutes until the cheese is melted and oozy and the bread is toasted. Serve immediately and enjoy!


The Result:
I loved the flavor combo of the fresh herbs and cheeses. Yum! This is one good grilled cheese sandwich. Yes, my name is Jen B. and I am a cheese-aholic. Hello, Jen...

November 11, 2010

Grilled Sirloin Salad

I took my three kiddos to the Phoenix Zoo today, and it was a bit crazy. There were lots of people there due to the holiday, and we ended up leaving early. I just couldn't muster the stamina to wrangle my precious little beasts babies through a crowded zoo for more than an hour. Thankfully, I planned this recipe for dinner tonight; which looks healthy, easy, and delicious. Whew! Just the kind of meal I need after the decadence of yesterday, and the craziness of today's zoo trauma adventure.

Grilled Sirloin Salad
From: The Best of Cooking Light Everyday Favorites: Over 500 of Our All-Time Greatest Recipes cookbook, 2008

Ingredients:
1 tablespoon chili powder
2 teaspoons dried oregano
1 teaspoon dried thyme
1/2 teaspoon salt
1/2 teaspoon onion powder
1/2 teaspoon garlic powder
1/4 teaspoon black pepper
1 pound lean boneless sirloin steak, trimmed
8 cups spring-blend salad greens
1 1/2 cups red bell pepper strips
1 cup vertically sliced red onion
1 tablespoon chopped fresh parsley
1 tablespoon red wine vinegar
1 teaspoon olive oil
1 teaspoon fresh lemon juice
1 (8 3/4-ounce) can whole-kernel corn, drained and rinsed

Directions:
Combine first 7 ingredients; rub over both sides of steak. Heat a nonstick grill pan over medium-high heat. Add steak; cook 5 minutes on each side or until desired degree of doneness. Cut the steak across grain into thin slices.

While steak cooks, combine salad greens and remaining ingredients in a large bowl; toss well to coat. Top with steak.

Nutritional Information:
Yield: 4 Servings, (serving size: 3 ounces steak and 3 cups salad)
Calories:278 (28% from fat)
Fat:8.7g (sat 2.7g,mono 3.7g,poly 1g)
Protein:30.4g
Carbohydrate:22g
Fiber:6.1g
Cholesterol:76mg
Iron:6.1mg
Sodium:530mg
Calcium:106mg

Robyn Webb, Cooking Light, JUNE 2003


The Result:
This was really good. The steak ended up being perfectly cooked and the salad was very yummy and lightly dressed...exactly as it should have been. I love a really well-balanced meal, and this one hit all the right notes.