Showing posts with label MP101. Show all posts

May 24, 2011

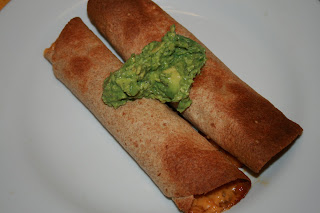
Creamy Beef Taquitos

My son started his swim lessons this week; and conveniently (not really), they are scheduled right in the middle of our usual dinner time. That makes the next two weeks a little tricky to plan our evening meal around. Luckily, I had some frozen taco meat saved from our last taco adventure, and it was easy to morph my stash into these yummy taquitos. This recipe was a crowd-pleaser and really easy to put together (especially with the meat already cooked).

Creamy Beef Taquitos
From: the Meal Planning 101 blog

Ingredients:
1 lb lean ground beef
2 tbsp taco seasoning (homemade or store-bought)
1/3 cup light cream cheese
1/4 cup salsa
1 tbsp lime juice
3 tbsp cilantro, chopped
2 tbsp green onions, chopped
1 cup grated cheese (cheddar, mozzarella or pepper jack)
12 small flour tortillas (can also use corn tortillas; I ended up using 8 medium whole wheat tortillas)

Directions:
Heat oven to 425. Line a baking sheet with foil and lightly coat with cooking spray.

In a large frying pan over medium-high heat, brown the ground beef and break it up into crumbles as it cooks. Add the taco seasoning and cook the beef about 8 minutes until cooked through.

Heat cream cheese in the microwave for about 20-30 seconds so it's soft and easy to stir. Add salsa, lime juice, cilantro and green onions and stir to combine. Once the beef is browned, add the beef and cheese and combine well. You can prepare up to this step ahead of time. Just keep the mixture in the fridge.

Place 2-3 tbsp of beef mixture on the lower third of a tortilla, keeping it about 1/2 inch from the edges. Roll it up as tight as you can. If your tortillas are cracking or breaking, you can microwave them for 10-20 seconds with a damp paper towel over top. Once rolled, place seam side down on the baking sheet. Lay all of the taquitos on the baking sheet and make sure they are not touching each other. Spray the tops lightly with cooking spray or brush with a bit of oil and sprinkle some kosher salt on top. Place pan in oven and bake for 15-20 minutes or until crisp and the ends start to get golden brown.


The Result:
I swear I have never had a bad recipe from the Meal Planning 101 blog. Her meals are always spot-on delicious, and these taquitos were no exception. We all gobbled 'em up!

November 18, 2010

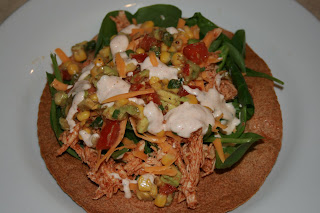
BBQ Ranch Chicken Tostadas with Avocado Corn Salsa

I am a little brain-dead this morning, so I think I will just post this recipe and leave it at that. My baby girls have been battling teething and sinus infections, so it has been a little hectic at my house. Hopefully, they will feel better soon. In the meantime, here is our dinner from two night's ago...this was DELICIOUS!

BBQ Ranch Chicken Tostadas with Avocado Corn Salsa
Adapted From: the Meal Planning 101 blog (originally adapted from Kraft What's Cooking Summer '10)

Ingredients:
4 boneless, skinless chicken breasts (or 4 cups cooked shredded chicken)
1/2 cup BBQ Sauce
8 whole wheat tortillas
1 tsp taco seasoning
fresh baby spinach
1 cup cheddar or jack cheese, shredded
3 tbsp ranch dressing
1 tsp chipotle adobo sauce (or BBQ sauce for a less spicy version)
cooking spray

Avocado Corn Salsa:
1 cup frozen corn, thawed
1 medium tomato, diced
1 avocado, diced
1/4 cup green onion, chopped
1/4 cup cilantro, chopped
1 tbsp lime juice
salt and pepper
1 tsp taco seasoning
1 (14.5 oz.) can of drained black beans (optional)

Directions:
Preheat oven to 375 degrees. Place chicken in 9x13 baking dish and season with salt and pepper and pour over BBQ sauce. Bake for 25 minutes, then shred. This can be done one or two days beforehand. Alternatively, you could use leftover shredded chicken heated up with BBQ sauce mixed in.

Take your wheat tortillas and place on a baking sheet. Spray both sides with cooking spray and spread on with a pastry brush. To give the tostadas added flavor, sprinkle with a little bit of taco seasoning. Bake at 350 degrees for 8-10 minutes, turning halfway through until the tortillas are golden brown and crispy.

While the tostadas are baking make the avocado corn salsa by mixing together all salsa ingredients.

Make the sauce by mixing together the ranch dressing and chipotle adobo sauce.

To serve, put a tostada shell on the plate and top with shredded chicken, shredded cheese, spinach and some avocado corn salsa. Drizzle over BBQ ranch sauce for added flavor.


The Result:
This recipe is probably my favorite variation on tostadas that I have had, so far. We really loved them!!! I just loved the combo of flavors, and the avocado corn salsa was awesome.

October 14, 2010

Shredded Chicken Flautas

I originally bookmarked this recipe a year ago, off of one of my favorite blogs Meal Planning 101. I thought this recipe would be a great choice for one of our "Friday Family Fun Night" meals; but for unknown reasons, I completely forgot about it. Then, it suddenly popped back into my head yesterday. Weird, I know! Thankfully, I did eventually remember it...because it was really great!!!

Shredded Chicken Flautas
Adapted From: the Meal Planning 101 website

Ingredients:
2 cups cooked shredded chicken (see notes)
1/2 cup chicken broth (see notes)
1 tsp cumin
1/2 tsp garlic powder
1/2 tsp chili powder
1/4 tsp oregano
1/4 tsp onion powder
Salt and pepper to taste
2 cups shredded cheddar
8 whole wheat tortillas
cooking spray
salsa, sour cream, or guacamole (for toppings, if desired)

Directions:
Preheat oven to 425 degrees.

In a medium saucepan over medium heat add the chicken, water, cumin, garlic powder, onion powder, oregano, onion powder and salt. Let this cook down for a few minutes until the sauce thickens and the chicken is heated through. Most of the water will evaporate and you will be left with a nicely coated saucy chicken. Remove from heat and set aside.

In the middle of a tortilla place 1/4 cup shredded cheddar. You want the cheddar to be in a line down the middle of the tortilla leaving about 2 inches from the edge on either side. Place 1/4 cup of the shredded chicken mixture over top of the cheddar. Fold in the two edges where you stopped 2 inches with the mixture. Tightly roll the bottom of the tortilla over the mixture and roll until you have a long, tight, burrito tube. Place seam side down on a baking sheet. Continue with the rest of the tortillas and filling.

Spray the tops of the flautas with cooking spray, and place in the oven. Bake for 8-12 minutes, flip them over and bake another 8-12 minutes. If necessary, turn on the broiler to get them extra crispy! Serve with salsa, sour cream and guacamole.

Jen's Notes:
I didn't have any precooked shredded chicken lying around, so I made my own during nap time yesterday. I took two chicken breasts and covered them with a chicken stock/water mixture in a pot (enough liquid to cover). Then, I partially covered the pot with a lid and boiled the chicken until cooked...about 10 minutes. I reserved the cooking liquid to use in the recipe; but just plain old water will work too, and was noted in the original recipe. After the chicken was cooked & somewhat cooled, I shredded the meat with two forks and stored until I was ready to cook dinner.

I didn't fold my flautas into little burrito shapes, but instead left the sides open...similar to taquitos. It worked out just fine, and I didn't lose any filling. One last note, I forgot to flip mine and cook for another 8-12 minutes. Instead, I cooked them for 12 minutes, and then turned on the broiler for a couple of minutes. Again, my change worked out fine...and it shaved some of the cook time off of this dish. (I guess not reading the directions thoroughly does pay off once in awhile.)


The Result:
Easy and delicious! I love the crispy texture that these flautas had, without frying. Ummmm...so good! This recipe is a keeper!

January 19, 2010

Chicken Oreganato

I am avoiding the grocery store like the plague, so I decided to switch around my meal plan so we could eat stuff we already have on hand tonight. This recipe looks yummy and simple. I am not sure what I will serve with it, probably some sort of starch component and a green veggie. This promises to be easy and delicious.

Chicken Oreganato
From: Meal Planning 101
*Original Recipe from Teresa @ Allrecipes.com

Ingredients:
8 chicken thighs
2 teaspoons dried oregano
salt and pepper to taste
1/4 cup olive oil
1/2 lemon, juiced
Zest of lemon

Directions:
Preheat the oven to 450 degrees. Rinse the chicken thighs and then pat dry. Season both sides of the chicken with salt and pepper and place skin side down in a greased 9x13 baking dish. In a resealable glass jar or container, add the olive oil, lemon zest and lemon juice, close tightly and shake well. Pour half the lemon oil over the chicken. Sprinkle the chicken thighs with 1 tsp of oregano and place in the oven.

Once they have baked for 15 minutes, flip the chicken over, drizzle with the remaining lemon oil and sprinkle on the remaining tsp of oregano. Place back in the oven for 15-20 minutes. To get a nice golden color on the skin, broil for a couple minutes at the end of the baking time.

Serve with wedges of lemon to squeeze more delicious lemony goodness on them at the table.


The Result:
This is the type of recipe that I just L-O-V-E! It was super-simple to put together, and it turned out really, really, really good. The chicken had great flavor, the texture of the meat was juicy, and the skin was perfectly crisp. Yum! I think the whole dish took less than 10 minutes to put together, and 1/2 hour total cook time. I did end up turning on the broiler for a few minutes to crisp up the skin (probably about 3-4 minutes tops), and it worked beautifully. We served this chicken with a side of whole wheat couscous and some steamed green beans. Lastly, we spooned some of the pan juices over both the chicken and the couscous. It was sooooo tasty! This dish will become a go-to favorite that we will make again and again!!!

April 17, 2009

Cashew Chicken

Tonight we are having an early dinner, and then we are headed out to the mall. I need to pick up a couple "special order" photos I had taken of my son, for his 3rd birthday pics. I decided on this Cashew Chicken because it comes together quickly, and it is really delicious. Plus, I have all the ingredients on hand to make it. Score! I think I will have it all ready, so when my husband gets home at his usual time, we can eat soon after. Then, it's off to the mall for us.

Here is the link to my original post:

Cashew Chicken

This is a "can't-miss" healthy and well balanced meal!!!

March 31, 2009

Salmon Burgers with Scallion Cream Cheese

I was drooling when I saw these burgers on a blog I follow called Meal Planning 101. I am always trying to work more fish into our diet; so when I see a yummy fish recipe, I pounce on it! Salmon is one of our favorite seafood choices, and I love salmon burgers. Usually, if I see a salmon burger on a menu I will order it. Needless to say, I haven't had one of these babies in quite a while since we rarely eat dinner out. It is kinda strange that it never occurred to me to make a salmon burger from scratch myself. This recipe looks darn tasty and pretty easy to put together. I think this will be a good way to ease myself into the realm of making salmon burgers at home. Here is the link to the recipe on the Meal Planning 101 blog:

Salmon Burgers with Scallion Cream Cheese


I think I will serve these beauties on my Whole Wheat Hamburger Buns. I just need to defrost a few of them by the time dinner time rolls around. Also, I am going to pair this with a new potato recipe from the Barefoot Contessa (see separate post), and some steamed green beans. I am really excited to try this recipe! I will let you know how it all turns out.


The Result:
These were amazing. The scallion cream cheese totally rocked, and the burgers turned out perfect! So totally delicious. The burgers were so tall they were kinda hard to eat (and photograph), but it was totally worth it. I really piled on the lettuce, tomato, onions, and sauce. The recipe actually made 6 burgers total, so I have plenty leftover for lunch. Hooray! This recipe is a total keeper!!!! We loved it!

February 9, 2009

Cashew Chicken

This dish is a spin on another recipe that I found on one of my new favorite blogs, Meal Planning 101. I really like Asian food, but I don't often prepare it at home. What is more puzzling is that I don't know why?!?! I think I just forget about it...which is pretty hard to do, considering it is a whole huge, all-encompassing, region of flavors, textures, and possibilities. I know...I should turn to more Asian inspired recipes!

Anyway, I don't have some of the exact ingredients on hand for this dish...and I have a couple things to add, as well. I will just amend the original recipe to include my take on it. I think I will serve this dish with some brown rice, which I love. I crave brown rice...I can't get enough of the texture and nutty flavor that brown rice has and white rice does not. For me, it is just more interesting.

On another note, I need to discuss something very disturbing that goes on at my house, whenever there are nuts in the pantry (focus...keep your mind out of the gutter). I have had the cashews for this dish for over a week now, but I keep noticing that the level in the container gets lower and lower every few days. The husband keeps eyeballing them greedily. Any type of nut that I have on hand evaporates mysteriously. If I tell the hubs that I need the nuts for a recipe, I notice that they disappear more slowly. If I don't tell him that I have a specific purpose in mind for them, they are gone before I can blink! Strange, isn't it??? I wonder how that happens???? I will just come out and say it...I think there is a direct correlation between the missing nuts and my husbands love of all things cashew-related. So, that forces me to use the nuts sooner than planned. I need to use the cashews that I bought before I don't have any left for the dish itself. I just can't chance another few days of them sitting in the pantry. As it is, I hope I have enough for this recipe, since SOMEONE keeps eating them! (AHEM!!!!...I'm talkin' to YOU, sir...you know who you are, mister....or should I call you 'cashew thief'....I am on to you, big time...the jig is up...you better watch it....no more missing cashews on my watch!)

Anyway, enough silliness...here is the link to the original post from Meal Planner 101; Cashew Chicken. Below is the modified recipe with my changes. Thanks again, Kindra for all the inspiration!!!!


Cashew Chicken

Ingredients:
canola oil
2-3 chicken breasts or 4-5 chicken thighs, chopped up
3-4 tbsp cornstarch
8 green onions, chopped OR 1 diced yellow onion
3 cloves of garlic
3 tbsp hoisin sauce
2 tbsp rice vinegar
¼ cup water
1 cup raw cashews, toasted
salt and pepper to taste
1 small bag frozen Asian vegetable blend
low sodium soy sauce to taste
cooked brown rice


Directions:
Cut chicken into bite-sized pieces and season with salt and pepper. Toss the chicken in a bowl with the cornstarch until the chicken is nicely coated. Heat a wok or frying pan with a tablespoon or two of canola oil over medium-high heat. Once the pan is hot, add half of the chicken and fry until browned and crispy. Remove from the pan. Add another tablespoon or so of oil and stir-fry the rest of the chicken until crispy. Remove from the pan and set aside.

In a separate small skillet, dry toast the cashews until fragrant and slightly deeper in color. This goes pretty fast and should only take a couple of minutes. The cashews burn easily, so watch them closely. When ready, remove cashews to a plate and set aside.

Add the onion (if using green onions, use the white parts) and stir-fry about for 1-3minutes, then add garlic for another minute or so. Be careful not to burn the garlic. Add the rice vinegar. Let the vinegar evaporate (about 30 seconds) then add the chicken back to the pan, along with the hoisin sauce and water. Cook for about a minute or so until the sauce is thick and the chicken is coated. Add the toasted cashews and stir to incorporate. Remove to a plate and top with more onion (if using green onions, top with the green part).

Add an another small amount of oil into wok and stir fry veggies until warmed through but still crisp. Add some soy sauce. To serve, place chicken and veggies over a bed of brown rice. Add more hoisin or soy sauce if needed. Enjoy!


The Result:
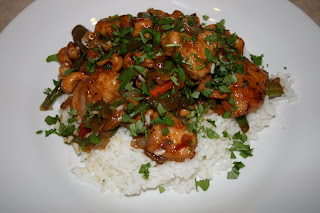
This was so fan-freakin'-tastically yummy!!! Awesome...a definite keeper. All of us had seconds, including my toddler. He kept saying "um chicken, um cashews, um chicken, um cashews"...you get the picture. Speaking of pictures, you may have noticed that the brown rice that I waxed poetic about in my earlier commentary is noticeably missing. Yeah. There was an incident. Let's just leave it at that, and move on. Instead, the part of 'brown rice' has been played by it's quick-cooking understudy 'instant white rice'. After the incident, I had to think fast and come up with some other rice. Thankfully, I had some instant in the back of my pantry. Whew! Don't get me wrong, I actually like instant white rice...it reminds me of childhood since that is all my mom made. However, I try not to make it since it is basically void of nutrition and processed like crazy. Oh well, sometimes you gotta do what you gotta do.

Since I am a cilantro freak, I garnished it with a little chopped, fresh cilantro. I didn't have green onions on hand, but I still wanted something verdant and bright to go on top. Plus, cilantro is probably my favorite herb. I just love the flavor...and I know that is controversial because there are a lot of cilantro-haters out there. Either way, I thought it was the perfect garnish.

Overall, this is probably one of the easiest, most satisfying Asian meals that I have ever made at home (even with the instant rice...I can't wait to try it again with my beloved brown rice). We really loved it and I highly recommend it!!!

January 18, 2009

Pork Katsu Donburi

This is another recipe from the Meal Planning 101 blog that I often read. I love that the author of this blog focuses on economical, yet healthy meals. I am really making an effort to stay within our food budget this year, but not compromise the quality of our food. I am trying; but it is a lot more difficult than I expected...considering I have an expensive cheese addiction! I have noticed that by sticking with a meal plan, it has made the process easier. I think the hardest part is keeping to what is only on my shopping list (especially if I see something on sale that is not on my list). There is definitely less room for impulse purchases. So, I am working on it. In doing so, I am beginning to see where we need to tweak our spending habits. I started a spread sheet to chart the cost of our weekly shopping trip and compare that to our budget ideal. Actually, I am in better shape that I thought...but I am certainly not perfect. I am still going over budget...but less over budget than I was prior to the start of my meal planning/tracking. Progress is being made!

During this whole shift, I have really started gathering info on frugal living and budget-trimming. My goal is to find a balance between healthy foods (which are typically more expensive)and thriftiness. This blog is a pretty good resource for tips and techniques on food budgeting. It is nice to find that other people are concerned with nutrition, and at the same time, needing to shop within a budget. It is encouraging to know that it can be done!

Okay, on to my recipe. I need to tweak this dish, as usual. I don't have everything I need on hand, but I do have some acceptable substitutes. I will just adapt the ingredients/directions based on what I do have. I typically don't cook a whole lot of Asian foods, and I am not sure why. I guess I just don't think of it. This recipe seems easy enough to make, and it looks more interesting than your typical stir fry. I am excited to try this dish, and I will let you know how it all turns out.

Pork Katsu Donburi

Ingredients:
2-4 pork loin chops
2 eggs, beaten
1 cup flour
1 1/2 cup Panko breadcrumbs (try not to substitute or the result will not be the same)
1 tbsp canola or vegetable oil
1/2 onion, thinly sliced
1 cup chicken broth
6 shitake mushrooms, sliced into strips (you can substitute regular button mushrooms)
1 carrot, julienned (I am using a frozen Asian Veggie Blend with carrots instead)
2 tbsp white sugar
4 tbsp soy sauce
1/2 tsp salt
1/2 cup chopped green onions
4 eggs, beaten
2 cups cooked rice

Directions:
Preheat the oven to 450 degrees.

Cover the pieces of pork in plastic wrap and using a meat tenderizer, bash the meat until the piece is about 1/4 inch thick. Make sure you flip it over and do the other side as well. Do this to all your pieces. Then cut pork into cutlet sized portions, if needed. Now that your pieces of pork are cut and tenderized, season both sides with salt and pepper. In three separate bowls put flour in the first, beaten eggs in the second and Panko breadcrumbs in the third. Dredge each piece of pork in flour, then egg, then breadcrumbs, and place on a baking sheet with a baking rack on it. Drizzle lightly with oil and place in the oven for 10 minutes. After 10 minutes, flip the pork, drizzle the other side lightly with oil and then place back in the oven for another 10 minutes.

While pork is cooking chop veggies (or follow stir fry directions for cooking frozen veggies). In a large frying pan set to medium-high heat saute the onion in oil for 3-5 minutes. Add the mushrooms and carrot and stir-fry a couple more minutes. Stir in the chicken broth, sugar, soy sauce and salt and let simmer for 3-5 minutes. Sprinkle in half of the green onions, stirring gently.

When pork comes out of the oven, cut into strips.

Turn the heat down to medium-low for the veggies and pour beaten eggs over the mixture, stirring a bit to incorporate the sauce and egg. Gently add the pork over the top and let simmer for about 10 minutes or until the eggs are cooked. You may need to add a lid for part of the cooking time to get the eggs to cook through on top.

To serve, scoop rice into four bowls. Divide pork and veggie mixture into four, and place on top of rice. Garnish with a little more chopped green onion. Serve immediately!


The Result:
This was excellent! We all really liked it a lot. There were a couple of other changes I made to the recipe, while I was cooking. First, I put some hot chili paste (Sambal Oelek) into my egg wash, during the breading process. It gave the pork a tiny little bite that it normally would not have had. Then, at the end I garnished the whole dish with toasted seasame seeds and chopped green onions. I loved the added element of texture and flavor of the toasted seeds. The last thing I did differently was that I did not put the pork back into the pan, once it was sliced. The pork turned out so crispy and perfectly cooked, I was afraid that putting it back in the pan with the veggies and sauce would have made it soggy. It was completely delicious as it was. I would recommend just slicing it and setting it aside; that will ensure that the meat will keep it's awesome crisp texture. Yum!

This dish is a definite keeper, but I do wish it was a little saucier. However, the fact that it was short on sauce was totally my fault. I let it reduce down too much. I think if I would have left more liquid in the pan, it would have been perfect. The flavors were great, and it was super-filling. You really do not need that much rice to make this dish stick to your ribs. I think the eggs mixed in with the veggies make this dish pretty substantial. Overall, we will definitely make this meal again.

January 17, 2009

Slow Cooker Minestrone Soup

I just got home from an awesome baby shower for my friend Jen A., in which I was sad to see end. I seriously could have stayed and ate and hung out for the rest of the afternoon! My other friend, Claire put together quite a nice brunch shin-dig, and I had a great time talking, laughing, and eating at Jen's party. I knew that I would want to have a lazy afternoon/evening after getting all gussied up (not really) and socializing with my buddies all morning without a kid-in-tow. It always seems like a vacation day whenever I go somewhere and/or do something fun by myself. Especially, if the activity involves other moms. It almost feels like I'm ditching school or something. The only issue is that the rest of my day is shot, because I still have a "I am on vacation" mentality. Therefore, any cooking/cleaning/productive activity is out the window. At least I know I tend to do this, so I plan ahead for it.

This recipe comes to me from a blog I read called Meal Planning 101. I was looking for some new vegetarian dinner ideas, and this looked great because it is super-cheap and easy to put together. Also, I love using the slow cooker. The whole 'throw it in and forget about it' thing totally appeals to me. Really, this recipe fits the bill for a day like today.

Slow Cooker Minestrone Soup

Ingredients:
1 onion, chopped
2 stalks celery, chopped
3 Carrots, chopped
3 cloves chopped garlic
4-6 cups of Vegetable Broth or Chicken Stock
1 can diced Tomatoes
1 can of Red Kidney Beans
1 can of Great Northern Beans
2 tbsp tomato Paste
2 tsp Italian Seasoning (or 1tsp oregano, 1tsp basil)
Salt and Pepper to taste
1/4 cup grated Parmesan cheese (or combo of cheese and Parm-Reg rinds--see notes)
1/2 cup basil pesto (premade or fresh)
1/2 jar leftover marinara sauce
1 cup macaroni (cooked)


Directions:
Finely chop onion and slice carrots and onion and add them to your slow cooker. Chop garlic and add. Gradually add stock, tomatoes, mixed beans, tomato paste, spices, Parmesan cheese and pesto.

Turn on low heat for 6-8 hours.

After cook time is complete:
Fill a large stove-top pot with water and season with salt and bring to a boil. When boiling add macaroni and simmer according to package directions. When macaroni is done, drain and set aside. Scoop macaroni into bowls and ladle soup over top. Serve immediately.

Jen's Notes:
I ended up setting mine to cook on high for 4 hours. I simply did not have enough time to cook it for 6-8 hours on low, since I did not get home from the shower until early afternoon.
I tried to stick to the ingredients, but I ended up making a few other recipe deviations. I changed some of the quantities, based on what I had on hand. I used different beans and added some leftover marinara sauce that I needed to use up. Also, I added only about 1/8 of a cup of Parmesan cheese. Then, I put 2 wedges of Parmigiano-Reggiano cheese rind (about 1 inch pieces) into the soup. The long slow simmering will melt all the cheese off the waxy rind and perfume the soup with cheesy, yummy, goodness. After the cook time is over, I will just fish the spent rind pieces out and toss 'em. I always keep a bag of rinds in my freezer, and whenever I finish off a hunk o' cheese I pop it into my 'save' bag. That type of cheese is so expensive, I want to make sure I suck every last drop I can get out of it!

One more note...The original directions recommend serving this soup with fresh garlic bread. While I am sure that is an excellent accompaniment, I did not plan for it. Sigh...next time, hopefully. Instead, I think I will serve it with regular sliced bread and butter. Certainly not as fun as fresh garlic bread, but it will do the trick.


The Result:
Oh man! This was excellent! Fan-freakin'-tastic! This was easy and delicious...so full of flavor and satisfying, we hardly noticed that it was a vegetarian dish at all. I love it when a vegetarian recipe is so tasty that you do not even care that it does not have any meat in it. This soup is that type of recipe...and then some. I would say that it is a definite keeper! Everyone at my house loved it, and I am glad that we have a bunch leftover for future lunches. If you are looking for a great winter soup recipe, this one delivers on all levels.