Showing posts with label sauce. Show all posts

March 26, 2013

GG's Lasagna


My friend, Claire has been telling me about her grandma's lasagna for years now. I've always wanted to try it, but alas, she has never posted the recipe until recently. It's always good to have a couple of good lasagna recipes in your back pocket, and until this one, I've always just stuck with my mom's recipe. Well, once Claire updated her blog with GG's recipe, I knew lasagna was going to be on our table posthaste. Let me tell you, GG did not disappoint. It. was. fantastic. My kids loved it, and my husband said that it was one of his favorites (Secretly, I think he liked GG's lasagna better than my mom's version, but he knew better than to say that out loud.) The best news is that I now have a second lasagna recipe to alternate between my mom's. If you are in the market to try an awesome lasagna, this one is highly recommended!!!

GG's Lasagna
From: Claire's grandma GG (as posted on Cooking Claire blog)

Sauce:
1-1/2 lb. ground beef
1 small onion, chopped
2 cloves garlic, minced
2 8-ounce cans tomato sauce
1 cup water
1 T. dried parsley
1 t. oregano
3/4 t. salt
1/4 t. thyme
1 bay leaf

Simmer. Remove bay leaf before using sauce.

Other ingredients:
1 cup sour cream
8 ounces cream cheese
8 ounces lasagna noodles, cooked
2 cups shredded mozzarella cheese

Mix together sour cream and cream cheese.

Assemble in a flat baking dish and layer:
1/3 cup sauce, noodles, cream cheese and sour cream, mozzarella. Keep layering until mozzarella cheese is on top.

Bake 45 minutes at 350.

Hot Beef Sandwiches


My MIL took my girls for the day to play with their visiting cousins, so I am home alone! It is a rare treat, but I feel like I'm wasting it with necessary tasks. So far, I've just been catching up on stuff that I've needed to get done but been putting off for the last month. I can think of a hundred things I *could* be doing for alone time and I'm doing chores instead. ::SIGH:: I hate being responsible. Anyway, blog updating is on my list of things to get done, so I'm gonna get my three (short) posts completed and go take a nap. Chores be damned!

I don't remember when we had these sandwiches, but the hubs and I LOVED them. We had to do rock/paper/scissors for the leftovers the next day, because they were highly coveted.

I made a modified version for the kids with just meat and cheese sauce, because I knew they would balk at anything "spicy" like a horseradish sauce. They ate their sammies and did not complain, so I check that off as a 'win'. I opted to go the homemade route with the cheese sauce and did not do cheese slices. Also, I used delectable pastrami instead of roast beef. Fan-freakin'-tastic!

Hot Beef Sandwiches
Adapted From: The Pioneer Woman website

Ingredients:
8 pretzel slider rolls or regular dinner rolls
1 pound thinly Shaved Roast Beef or Pastrami (I used Pastrami)
1/4 cup Mayonnaise
3 Tablespoons Grated Onion (or 1 Tbsp Dried Onion Flakes))
1 Tablespoon Poppy Seeds
1 Tablespoon Spicy/grainy Mustard (mine had a touch of honey in it)
1 Tablespoon prepared Horseradish
Dash Of Worcestershire
homemade cheese sauce (For homemade see below. You could also just use store-bought.) or sliced cheese

Directions:
Slice rolls in half. Mix together mayo, grated onion, poppy seeds, spicy mustard, horseradish, and Worcestershire. Taste it and adjust ingredients however you wish.

To assemble, spread dressing on top and bottom buns. Lay on roast beef or pastrami, then one or two slices of cheese (I cut them to fit the small buns.) If you're using cheese sauce, spread a layer on the top bun.

Wrap each sandwich in a foil square, and either keep in the fridge or bake right away. To bake the sandwiches, put them on a baking sheet in a 350 degree oven for 15 to 20 minutes. The buns should be slightly crusty and the cheese should be melted.

Homemade Cheese Sauce

Ingredients:
flour
butter
milk, water, or chicken broth
1-2 cups cheddar cheese, shredded
salt and pepper to taste
pinch of ground mustard
pinch of cayenne pepper
few dashes of Worcestershire sauce

Directions:
(Sorry, no measurements on this one.)

Add a couple of tablespoons of butter to a sauce pan and melt over medium-high. Add in double amount of flour (4 tablespoons in this case). Whisk and let flour and butter clump and combine. Cook for a minute or so, until flour mixture starts to turn pale tan in color. Add milk (about a cup or so) while whisking continuously. Bring to a simmer while still whisking. Sauce should be thickening. When desired consistency is reached, remove from heat and add in cheese. Whisk to combine, season with remaining ingredients to taste, and serve.

(If the mixture is too thick add some more water, chicken broth, or milk to thin while whisking over medium-low heat until desired consistency is reached again.)

February 15, 2013

Bacon-Wrapped Filet Mignon with Red Wine Sauce


My thoughtful and caring husband made sure I had a fantastic Valentine's Day by surprising me with a new set of stainless steel cookware (along with some beautiful orchids, too)! I've been itching for new cookware for awhile and I finally settled on the set that I wanted before Christmas. For one reason or another, I didn't pull the trigger and purchase it for myself though. I'm actually really glad that I didn't, because it was so much better to have the hubs unexpectedly gift it to me instead. Let me tell you, I couldn't wait to cook the special Valentine's Day dinner we had planned with my new loot. We fed the kiddos early and then I made a dinner of this steak and sauce, roasted asparagus, dill fingerling potatoes,a really nice Bordeaux wine, and white/dark chocolate strawberries for dessert. It was so nice to get dressed up, cue up the candles and romantic music, have some adult conversation, and relax with each other at home. It was easily one of the best Valentine's Day we have ever spent together in the 10+ years we've been a couple. Thanks cupid!

As for the food, it was the best meal we've had in recent memory. Seriously, restaurant quality. The husband said it was easily the best steak he has ever had...including a really expensive steak dinner we had at an upscale restaurant the first year we were married. (That steak had always held the number one spot until last night!) I splurged and bought really great quality meat and bacon, so I'm sure that a lot to do with it. The technique itself was easy and the whole dinner came together within 45 minutes. Not too shabby!


Bacon-Wrapped Filet Mignon
From: The Pioneer Woman via Food Network

Ingredients:
Kosher salt and freshly ground black pepper
1 beef filet steak, 8 to 10 ounces, 2 inches thick
1 piece thin bacon
1 tablespoon butter, more if needed
1 tablespoon olive oil

Directions:
Preheat the oven to 450 degrees F.

Generously salt and pepper both sides of the steak. Wrap the steak with the bacon and secure with a toothpick.

Heat an ovenproof skillet over medium-high heat. Add the butter and olive oil. When melted, add the steak to the skillet and sear on both sides until a really nice color, about 1 minute per side.

Remove the skillet from the stovetop and place into the oven to finish cooking. Cook until medium rare, 7 to 10 minutes. Remove from the oven and allow to rest for 5 minutes before serving.

NOTE: Obviously, I doubled the steak recipe so we had two portions.

***************************************

Red Wine Sauce
Adapted From: Epicurious.com

Ingredients:
1 tablespoon of canola oil
2 garlic cloves, finely chopped
3/4 cup dry red wine
1/4 cup water
1 1/2 teaspoons soy sauce
3 tablespoons unsalted butter, cut into 3 pieces
1 tablespoon chopped flat-leaf parsley

Directions:
Once steak(s) are cooked and resting, pour off fat from the skillet. Sauté garlic in remaining tablespoon oil over medium-high heat until pale golden, about 30 seconds. Add wine and boil, stirring and scraping up brown bits, until reduced by half, 2 to 3 minutes. Add water, soy sauce, and any meat juices from resting plate and boil until reduced by half, 3 to 4 minutes.

Reduce heat to medium-low and whisk in butter, 1 piece at a time, until slightly thickened. Stir in parsley and pour sauce over steaks. Serve and enjoy!

(I forgot to take a photo of the sauce...oops!)

January 26, 2013

Quesadilla Casserole


This is the last of my new recipe updates! Hooray!!! That means I'm caught up, since this was our dinner for last night.

I had to adapt the quantities of this recipe and add a couple things to accommodate my larger family, but I am happy to report that this meal turned out great! We loved it, and once again, it was a crowd-pleaser. Before I was a mom, I never would have cared if my dinners were suitable for kids. Obviously, I didn't have kids, so it never occured to me that was something that people had to consider at mealtimes. Now days, I pretty much base my recipe selection on that factor alone. One of first questions I ask myself about a potential dinner idea is this: "are the kids gonna like this one?" (Also, I ask myself: "Is it healthy, tasty, and is the husband gonna like it?" I must admit, the kid question does come first though.)

I am happy to report this was kid-approved; and the adults loved it, too!

Quesadilla Casserole
Adapted From: Clean Eating Magazine website

Ingredients:
cooking spray or olive oil
3 large boneless, skinless chicken breasts
2 whole-wheat tortillas, cut into 1/2-inch strips
2 cups frozen corn, thawed
1 15-oz can black beans, drained and rinsed well
1 15-oz can of pinto beans, drained and rinsed well
1/2 cup low-sodium, all-natural barbecue sauce (no more than 7 to 10 g carbs and 1 g fat per 2-tbsp serving)
1 cup shredded low-fat cheese (I used part-skim mozzarella), divided

Directions:
Preheat oven to broiler.

Coat chicken with cooking spray (or a small quantity of olive oil) and garlic powder, onion powder, salt and pepper. Broil until cooked through, about 7-10 minutes depending on the thickness of your chicken breasts. You may need to flip them once during the cooking process, halfway through. Once chicken is cooked, removed from oven to cool (enough to handle) and set aside. Reset oven to 425 degrees.

Meanwhile, place tortilla strips on a large baking sheet. Coat with cooking spray, toss and spread in a single layer. Bake for 10-15 minutes at 425 degrees, until crispy, tossing halfway through; set aside to cool.

Go back to the chicken, and cut into a large dice or cube. Remove to a large rectangular casserole dish; including any juices from the cutting board.

Reduce oven temperature to 350°F.

In the same casserole dish, combine chicken, corn, beans and barbecue sauce. Spread mixture in an even layer. Transfer dish to oven and bake for 15 minutes. Remove from oven, top with 1/2 cup of cheese, tortilla strips and then the other 1/2 cup of cheese. Bake for 5 to 10 more minutes until brown and bubbly and cheese is melted. Serve immediately.

January 13, 2013

Chicken with Mustard Cream Sauce


This is the other PW recipe I mentioned in my last post. While I was looking for potato recipes, I stumbled upon this yummy, easy chicken dish. At first glance, I was nervous about the amount of mustard that it took to make the sauce. I like mustard, but if it was overly-mustardy, I knew I would hear some grumbling from the husband and kiddos. Luckily, the grainy mustard I bought had a touch of sweetness to it, so the sauce was perfectly balanced and not too mustard-ish at all. Everyone loved the sauce (and chicken, as well) and there were no complaints. Best of all, this dish really was not complicated or time-consuming. I was expecting it to be a lot more involved than it was, but instead, it came together very quickly. I served our chicken and sauce with roasted cauliflower and a green salad. I had guilt that the sauce was kinda decadent, so I doubled up on the veggie side dishes to even out the nutritional value some.

Chicken with Mustard Cream Sauce
From: The Pioneer Woman Cooks! website

Ingredients:
4 whole Boneless, Skinless Chicken Breasts
2 Tablespoons Olive Oil
2 Tablespoons Butter
3 whole Garlic Cloves, Minced
1 cup Brandy (or White Wine If Preferred)
1 Tablespoon (heaping) Dijon Mustard
1 Tablespoon (heaping) Grainy Mustard
1/4 cup (to 1/2) Heavy Cream
1/4 cup (to 1/2) Chicken Broth
Salt And Pepper, to taste

Directions:

*Amount of cream and broth has slightly decreased; add more as needed.

Cut the chicken breasts in half lengthwise so that you have eight smaller, thinner chicken cutlets. Salt and pepper both sides.

Heat oil and butter in a large skillet over medium-high heat. Cook cutlets on both sides until nice and golden brown and cooked through. Remove chicken from the skillet and keep on a plate.

Reduce the heat to medium. Add the garlic to the pan and saute it for a minute, stirring to make sure it won't burn. Next pour in the brandy (or wine if using) being careful if cooking over an open flame. Then just let the booze bubble up and cook until it's reduced by half.

Throw in the mustards and stir to combine, then pour in the cream. Stir in chicken broth, adding more if the sauce seems too thick. Taste sauce and adjust whatever you think it needs. Add chicken breasts back to the pan, nestling them into the sauce. Allow sauce to cook for another few minutes, shaking the pan if needed to move things around.

Serve chicken with a green salad, spooning the sauce over the top.

November 26, 2012

Chicken Alfredo Roll Ups


My friend, Claire recently made this dinner and said it was delicious. Well, Claire has an excellent track record with recommending recipes, so I was totally on board. She included the caveat that the homemade sauce recipe had to be made, since it was freakin' fantastic. Of course, I trust Claire--especially when food is involved--so I made both the roll ups and the accompanying sauce. Let me tell you, the sauce was drinkable. Seriously, sooooo fantastic! Really, make the sauce. It would be a crime to skip it for a store-bought version. (Yes, it is THAT good!) The Alfredo rolls were also quite awesome, but the sauce really took it to the next level of yum.

Chicken Alfredo Roll Ups
Adapted from: The Recipe Critic blog

Ingredients:


9-12 lasagna noodles (I used whole wheat)
2 ½ cups Alfredo sauce (RECOMMENDED: homemade recipe below)
2 cups cooked, shredded chicken
oregano
garlic salt
3 cups shredded Mozzarella, or cheese of your choice

Directions:
Spray an 8x8 pan with non-stick spray and pour ½ cup alfredo sauce, or just enough to cover the bottom of the pan. Boil 8-10 cups water in a large pan, cook lasagne noodles until al dente. (I usually cook 1 or 2 extra just because lasagna noodles always seem to break on me when I am stirring them.)
Now this is the important part! Drain and rinse the noodles with cold water to prevent them from sticking to each other. Then, lay out each noodle individually and blot dry with a paper towel.

Spread about 2 Tbs. Alfredo sauce over each noodle. (if there is too much sauce you will have a big mess on your hands!) Sprinkle oregano and garlic salt on top of sauce. Take 1/9 of the shredded chicken and spread it out evenly over each noodle. Add approx. 3 Tbs. cheese. To roll up, start at one end and roll the noodle over the toppings. You will need to lift the noodle a little to prevent squishing out the inside ingredients while rolling.

Place the roll-ups in the pan, one by one, seam-side down so they don't come undone. Once they are all in the pan, pour the remaining Alfredo sauce over the top. Top with remaining cheese. Bake at 350 degrees for about 30 minutes, or until the cheese is completely melted on top.

Serves 3, 3 roll-ups each

****************************

The Best Garlic Alfredo Sauce

Ingredients:
½ cup butter
2 ounces cream cheese
2 cups heavy cream (or substitute half and half)
2 teaspoon garlic powder
½ tsp. fresh minced garlic
salt and freshly ground black pepper
½ tsp dried oregano
⅔ cup Parmesan cheese

Directions:
In a medium to large saucepan melt the butter over medium heat. Add fresh minced garlic and cook for 1 minute, or until fragrant. Add the cream cheese and whisk to smooth and melted. Whisk in the heavy cream.
Season with the garlic powder, salt and pepper. Bring to a simmer and whisk frequently until sauce thickens, around 15 minutes. Stir in the cheese and when melted, remove from heat and serve.

Makes 2 1/2 cups

June 4, 2012

Chimichurri

I have several posts to update, but I thought I'd pop on here and give you an easy recipe. I need some uninterrupted time with my laptop, so I can get everything updated; but alas, I'm the mother of three small children and I hardly ever get a block of time where I can do that. (Okay here is an amendment: if I do get some time I'm usually cleaning/picking up the house/controlling chaos/napping/rocking back in forth in a fetal position.)

For right now, here is an easy Chimichurri recipe that I used as topping for some grilled steaks we had recently. I'm going to Maui in October for a wedding and I want to be bikini-ready...or at least tankini-ready. I'm doing a modified low-carb diet until then; it's actually a macro-nutrient cycling diet from the book Crack the Fat Loss Code by Wendy Chant. Anyway, I'm in the first week which is low-carb. This chimichurri (which if you don't know what that is, it's similar to a pesto sauce) was easy to whip up and would go well with any protein (chicken, fish, steak, etc.) main ingredient. It fits the low-carb profile and was really, really tasty. Even if you are not doing a low-carb diet, I would recommend this topping for a twist on grilled meats/poultry/fish. YUM!

Chimichurri
Adapted From: food.com, recipe #21151

Ingredients:
1 bunch of parsley (flat leaf or curly is fine)
1/2 bunch of cilantro
8 cloves garlic, smashed & peeled
3/4 cup extra virgin olive oil
1/4 cup red wine vinegar
1-2 Tablespoons lemon juice
1 tablespoon diced onion
1 teaspoon black pepper
1/2 teaspoon salt

Directions:
Pulse parsley and cilantro in a food processor to chop. Add remaining ingredients and blend. Separate sauce into equal parts.
(Use half for basting or marinade and use other half for table service).

April 9, 2012

Slow Cooker Three-Envelope Pot Roast Sliders

I have a couple of blog updates, but sadly, no photos. I know, I know...the camera and I don't always make it to the same place at the same time. I feel mildly guilty about no pics, but at least the recipe(s) I've been meaning to update will get posted. Phew! That made me feel a little better...

Anyway, this was a really great recipe for doing something a little different with pot roast. My family loved these sandwiches and everything came together easily (thanks to the slow cooker). The sauce in the original recipe is called a "chipotle" sauce, but that totally bothers me! There are not any actual chipotle flavors and/or peppers in the sauce, so I needed to rename it. It just makes more sense to me to call it something else. (Okay, so I'm a little anal that way.) Other than the name change on the sauce, I followed this recipe to the letter and these sammies turned out fabulously. I think we just had a side salad to go with them and that was it. Filling and delicious...we gobbled 'em up!

Slow Cooker Three-Envelope Pot Roast Sliders
Adapted From: Six Sisters' Stuff blog

Ingredients:

Roast:
1 3-4 lb beef roast
1 cup water
1 cup salsa
1 envelope onion soup mix
1 envelope Italian dressing mix
1 envelope Au Jus mix

Sliders:
Three Envelope Pot Roast recipe (above), shredded
1 pkg. King's Hawaiian Rolls or plain dinner rolls
Sliced Swiss cheese (1 slice per slider)
Creamy-Spicy Horseradish Sauce (recipe below)

Creamy-Spicy Horseradish Sauce:
1/4 cup sour cream
2 Tbsp chili sauce
2 tsp creamy horseradish sauce

Directions:

For Roast:
Whisk together water, salsa and seasoning packets. Place roast in slow cooker. Pour seasoning mixture over roast. Cook on low for 8-10 hours, or high for 4-5 hours.

For Sliders:
Cut each roll in half and place on a baking sheet. Place a slice of Swiss cheese on the bottom half of each roll. Place baking sheet in oven with broiler on low. Broil for 1-2 minutes or until edges of the rolls are golden and cheese has melted (be sure to watch them closely so they don't burn!). Remove baking sheet from oven.

Place a spoonful of shredded beef on top of each roll with Swiss cheese on it. Spread Creamy-Spicy Horseradish Sauce on the top half of each roll. Assemble each slider by placing the top half of the roll on top of the bottom.

April 3, 2012

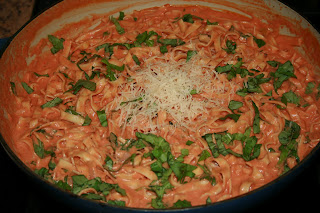
Pasta with Tomato Cream Sauce


I used to plan a lot more vegetarian meals, and I'm not sure why I got away from it. After all, vegetarian-focused dinners are usually quick, cheap, and healthy. (Well, assuming they are not doused in heavy cream, cheese, and/or butter--ahem.) This PW pasta recipe was a good reminder for getting me to go back to more vegetarian fare. After thinking about how much our family likes meatless meals, I decided to proactively incorporate more veg. dinners, and try to plan at least a couple a week. I can say that this pasta was not only tasty; but it also helped me remember the joy of vegetarian cooking (and eating). Thanks, P-Dub!

Pasta with Tomato Cream Sauce
From: The Pioneer Woman's Food From My Frontier cookbook, by Ree Drummond

Ingredients:
2 Tablespoons Olive Oil
2 Tablespoons Butter
1 whole Medium Onion, Finely Diced
4 cloves Garlic, Minced
2 cans (15 Ounce Each) Tomato Sauce Or Marinara Sauce
Salt And Pepper, to taste
Dash Of Sugar (more To Taste)
1 cup Heavy Cream
Grated Parmesan Or Romano Cheese, To Taste
Fresh Basil, Chopped
1-1/2 pound Fettuccine

Directions:
Cook pasta according to package directions. Drain, reserving 1 cup of pasta water.

Heat butter and oil over medium heat. Add onions and garlic and saute for a minute or so. Pour in tomato sauce and add salt, pepper, and sugar to taste. Stir and cook over low heat for 25 to 30 minutes, stirring occasionally.

Remove from heat and stir in cream. Add cheese to taste, then check seasonings. Stir in pasta and chopped basil and serve immediately. (Thin with pasta water before adding basil if needed.)

February 15, 2012

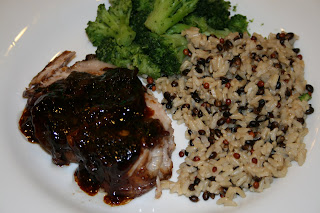
Brown Sugar and Balsamic Glazed Pork Loin


Do you like the new blog digs??? I wanted to give this place a facelift of sorts; make it a little more fresh and professional looking. Why??? I don't know. Just because, I guess. Anyway, I'm not sure about this particular template yet. I'll be playing around with some new looks until I settle on one I really love. This one, I like. Not love, but like. I guess you could say that I'm only dating this template. I'll let you know if I decide to marry it or not.

This recipe came to me off of Pinterest; which has now become my first go-to recipe resource. I'm happy to say that so far I think everything I've tried from that site has worked out and been really tasty! Also, I love finding new food blogs to peruse through my various recipe pins, such as this one called C+C Marriage Factory. This pork loin was no exception. The glaze on this pork was to die for; actually, it was more of a thick sauce than a glaze I would say. I didn't have time to go the slow cooker route, so I cooked mine in the oven (see below for adaptation). The pork was tender and juicy, and the reduced sauce/glaze was drinkable. Hooray Pinterest recipes!!!


Brown Sugar and Balsamic Glazed Pork Loin
Adapted From: C+C Marriage Factory website via Pinterest

Ingredients:
1 (2-3 pound) boneless pork pork loin
1 teaspoon salt
1/2 teaspoon pepper
3 clove garlic, crushed
1 teaspoon garlic powder
1/2 cup water

For Glaze:
1/2 cup brown sugar
1 tablespoon cornstarch
1/4 cup balsamic vinegar
1/2 cup water
2 tablespoons soy sauce

Directions:
Combine salt, pepper and garlic powder. Rub over roast. Place in slow cooker with 1/2 cup water. Cook on low for 6-8 hours. ***OR USE OVEN BAKING METHOD BELOW***

About 1 hour before roast is done, combine ingredients for glaze in small sauce pan. Heat and stir until mixture thickens. Brush roast with glaze 2 or 3 times during the last hour of cooking. Serve with remaining glaze on the side.

***Oven Baking Method:***
Cook for 2-3 hours in a 325 oven in a covered baking pan or dutch oven.

Notes:
I ended up pouring all my glaze on the roast toward the end of cooking. I wanted the flavors to be well combined, and it worked out pretty well for me.

January 25, 2012

Flax & Parmesan Pizza

Hello, post-moving/post-going to the gym sporadically/post-holiday/post-eating free-for-all/post-2011 butt jiggle. I am not happy to see you. This is a warning: you are not my friend, trunk-junk...so don't get too comfy back there. We will not be having a long-term relationship.

That was my oh-so-humorous attempt at letting you know I've gained 10 lbs. in the past few months. (Insert sad face here.) Well, I didn't have enough motivation to get rid of it before Christmas; but after a miserable half marathon performance by yours truly, I AM motivated to get rid of it now. Enter, South Beach Diet-Phase 1. Yes, I've flirted with SBD before. Yes, I had mixed feelings about it. This time, I just wanted to kick start the scale to move in the correct direction (i.e. down!). SBD is a healthy, fairly easy way to cut back on carbs and make the weight numbers get smaller.

Thankfully, Pinterest is around. There are tons of low carb food choices available on that website. We love pizza around here, and I was thrilled to find a low (net) carb version that was high in fiber. We topped our pizza with some sauteed veggies and a wee bit of bacon, but I'll get to that in a minute down in the 'ingredients' section. This was a great alternative to traditional pizza crust and one that I will make again when I need to take it easy on the carbs.

Flax & Parmesan Pizza
From: the I Breathe...I'm Hungry... blog via Pinterest

Ingredients:
1 cup flax meal (ground flax seeds)
2 eggs
1/2 cup finely grated Parmesan cheese
pinch of salt

Toppings:
pizza sauce (marinara)
mozzarella cheese, shredded
provolone cheese, shredded
sauteed onions, mushrooms, red bell peppers, and zucchini
5 slices of thick cut bacon, chopped up
grated Parmesan cheese for topping

Directions:
Mix all ingredients in a medium bowl. Press onto greased cookie sheet about 1/3 inch thick in a circle. Bake in a preheated 350 degree (F) oven for 8 minutes. Remove. Add toppings of your choice (see above for mine). Bake for another 15 minutes at 350. Remove from oven, cool, and eat.


The Result:
The husband and I loved this pizza, but not so much for my kiddos. I think the dark crust appearance threw them for a loop, and they poo-poo'd it a bit. Which is really just too dang bad; because kids or no kids, we (adults) really dug this version of low carb pizza and I am sure I will make it again.

January 8, 2012

One Pot Penne with Turkey-Feta Meatballs

We normally have a big, Italian food feast on Christmas Eve, but this year was more low-key and we almost skipped our Italian dinner all together. Most of our family was out of town, so it was basically my immediate brood and my mom visiting for Christmas. I thought I would miss the crowd, but as great as it is to have everyone over, I really liked the small intimate, informal group this year. It was so relaxing to just have us. Anyway, I almost decided not to do any type of Italian meal and then changed my mind at the last minute. I found this recipe in a brand new, never-used cookbook from Pam Anderson (NO, not THAT Pam Anderson!) and decided to try it. I was even more pleased when I discovered that I had everything on hand for it, and I didn't have to make another trip to the store on Christmas Eve!!! As it turned out, my little family loved this dinner and it satisfied our Christmas Eve Italian food criteria. The recipe itself was a bit involved; but since it was a holiday, I really didn't mind so much. (Also, I've made it since and it get's easier to put together with practice.) I can't wait to explore more recipes in this cookbook, that's for sure!

One Pot Penne with Turkey-Feta Meatballs
From: Pam Anderson's Perfect One-Dish Dinners: All You Need For Easy Get-Togethers cookbook

Ingredients:
8 garlic cloves, peeled, 3 left whole, 5 minced
1 1/2 pounds ground turkey (94 percent lean)
3/4 cup crumbled feta cheese, plus more for topping
1/2 cup crumbled saltine crackers (about 12 crackers)
1/2 teaspoon dried oregano
1 3/4 teaspoons salt, divided
1 large egg
1 tablespoon tomato paste
1/4 cup olive oil
4 thin slices prosciutto (about 2 ounces), minced
1 cup dry red wine
2 cans (28 ounces each) crushed tomatoes
1 pound penne pasta (I used whole wheat penne)

Directions:
Heat a small skillet over medium-high heat. Add 3 whole garlic cloves and toast until spotty brown, about 5 minutes. Remove garlic from skillet, smash and mince.

Meanwhile, break up ground turkey into a medium bowl. With a fork, mix in feta, cracker crumbs, oregano and ¾ teaspoon salt. Mix egg, minced toasted garlic and tomato paste together; stir into turkey mixture with fork until thoroughly combined. Using a 2-tablespoon measure, such as a coffee scoop, form mixture into about 36 cylindrical drum shapes.

Heat oil over low heat in a large heavy roasting pan set over two burners. A couple of minutes before frying meatballs, increase heat to medium-high. Add meatballs and cook, turning once, until browned on both sides, about 5 minutes total. Transfer to a plate.

Add remaining 5 minced garlic cloves, along with prosciutto, to roasting pan and cook, stirring, until garlic is golden. Add wine and simmer to reduce by half, about a minute. Add tomatoes and enough water to make a sauce-like consistency. Bring to a simmer, add meatballs and cook, loosely covered with heavy-duty foil, to blend flavors, 10 to 15 minutes.

Still on medium-high heat, add 6 cups water and remaining 1 teaspoon salt to pan and return to a simmer. Add penne, cover loosely with foil and cook, stirring gently and frequently, until pasta is tender, about 15 minutes. Remove foil and continue to simmer until sauce is thickened to your liking. Once cooking is completed, spoon pasta and meatballs into serving bowls, sprinkle each portion with feta cheese, and enjoy.


The Result:
No one in my family seemed to mind that this wasn't our typical traditional Christmas Eve Italian feast. As I said above, I've actually made the meatballs a few times since we originally tried this dish (for spaghetti and meatballs) and they are a hit without exception. I love that this preparation makes the ground turkey so flavorful and delicious. This is a keeper!

November 14, 2011

Sour Cream Chicken Enchiladas

I have 15 minutes to myself (WOO HOO!), so I decided to hop on and update the recipe blog. I found this recipe on Food.com when I did a general search and sort for sour cream enchiladas with high reviews/ratings. I did change a few things up a bit, but not on purpose. I got distracted while making dinner and ended up cooking my onion and green chile mixture a bit longer than planned. Luckily, they ended up being nice and caramelized and not burnt. With a couple of other devised modifications, dinner was on the table for the best version of sour cream enchiladas that we've had at home. How fortuitous!!!

Sour Cream Chicken Enchiladas
Adapted From: food.com; By: Deb's Recipes; Added July 15, 2005 | Recipe #129926


Ingredients:
2 large chicken breasts, sliced
1 tablespoon Lawry's Seasoned Salt
1 tablespoon of AP Flour
2 tablespoons of olive oil
3 small cans of green chiles, mild (divided)
1 onion, diced
2 garlic cloves, minced
2 cups grated Monterrey jack cheese or sharp cheddar cheese, divided
1/4 cup butter
1/4 cup flour
1 (15 ounce) can chicken broth
1 cup sour cream
8 whole wheat tortillas
salt and pepper to taste

Directions:
Place chicken in a medium sized bowl. Sprinkle the raw chicken pieces with Lawry's Seasoned Salt and flour.

In a skillet, cook the onions and 1 can of green chiles together in oil over medium-high heat until they start to soften. Add chicken slices on top of onion mixture. Let cook for 5-10 minutes, flipping the chicken about halfway through. Cook until the onions and green chiles on the bottom of the pan are caramelized and the chicken is cooked through and browned on both sides.

Divide cooked chicken and onion mixture evenly between the wheat tortillas; add some grated cheese to each tortilla (using a total of 1 cup of the shredded cheese).

Roll enchiladas and place seam-side down in 9x13 baking dish that has been lightly sprayed with no-stick cooking spray.

Melt butter in a medium saucepan, add garlic and cook for 1 minute. Stir in flour to make a roux; Stir and cook for 2-4 minutes, or until flour is starting to turn a light tan color. Gradually whisk in chicken broth then bring to boiling, stirring frequently.

Remove from heat; stir in sour cream and other 2 cans of green chiles. Season with salt and pepper to taste, then pour sauce evenly over enchiladas.

Top with remaining 1 cup of shredded cheese (baking dish may be double-wrapped and frozen at this point) and bake at 400° F for 15-20 minutes or until cheese is melted and sauce near edges of the baking dish is bubbly.

The Result:
These. were. awesome. I was actually jealous that the husband got to take the leftovers to work for lunch. I can not say enough good things about this recipe!

October 5, 2011

Broiled Tilapia with Parmesan and Herbs

Hi! How are you??? I'm fine, thanks for asking. Um, you may have noticed I've been a little absentee on the blog lately. Yeah, sorry about that. I do have a perfectly legitimate excuse(s), though. We moved. We didn't have the Internet. We were living in total chaos for about two and a half weeks. That's it...but I'm back now. I didn't cook for almost all of the two-ish weeks we were moving. I had packed up my kitchen stuff early on, so we got a lot of take out and fast food for our evening meals during the moving mayhem. Yuck. Can I tell you how tired I am of take-out and fast food???? Soooo unbelievably burnt out!

I couldn't wait to get my new kitchen settled and start cooking healthy meals again. Thankfully, I got the new kitchen put together rather quickly, and I am now getting back into a regular dinner routine. The only downside is that I can't find my camera, so meal photos are out until I get to the moving box with my precious SLR. You will just have to imagine how our dinner looks until I locate it.

I can only remember two new recipes so far, but I feel like I may be forgetting something. Hopefully, whatever I'm forgetting will be on the camera and I can jog my memory when I find it. Yeesh. Here is an easy tilapia recipe that I found on the Whole Foods Market app for iphone (it's also on the website). I seem to remember having a dish similar to this one at one point, but I'm not sure when/where/why/how. The flavors were very familiar to me. Although this tilapia meal is not super-original, it was darn tasty and I had all the ingredients on hand. Overall, I would say this fish recipe was a crowd-pleaser!

Broiled Tilapia with Parmesan and Herbs
From: Whole Foods Market website and app for iphone, recipe #2243

Ingredients:
1/2 cup freshly grated Parmesan cheese, divided
2 tablespoons low fat mayonnaise
2 tablespoons Greek-style yogurt or sour cream
2 tablespoons melted unsalted butter
Juice and zest of one small lemon (about 2 tablespoons juice)
1/2 teaspoon dried basil
1/2 teaspoon dried tarragon
1/8 teaspoon onion powder
Sea salt and freshly ground black pepper
4 (6 to 8 ounce) farm-raised tilapia fillets

Directions:
Combine 1/4 cup Parmesan cheese with remaining ingredients (except fish). Coat fillets with mixture and place in baking dish or shallow platter and let marinate for 15 to 20 minutes. Preheat broiler. Transfer fillets to a foil-lined broiler pan. Spoon a few tablespoons marinade on top and sprinkle with remaining Parmesan. Broil 4 to 6 inches from heat until topping is lightly browned and fish flakes easily with a fork, 5 to 8 minutes.

The Result:
As I said before, I don't have a proper photo. This was a really satisfying version of this dish...mild white fish in a creamy sauce. I think the hint of tarragon made the dish especially unique. We served our fish and sauce with brown rice pilaf and a side salad. It was quite a tasty dinner!

September 21, 2011

Browned Butter Ravioli with Chicken, Toasted Walnuts, and Crispy Sage

I should've had your attention at the mention of browned butter. At least, that's my hope anyway. I feel comfortable telling you that I think all food should be smothered in some version of browned butter. I know it sounds a little crazy, but browned butter is just that magical. It made this quick and easy recipe really special with not a lot of effort. Hooray browned butter!

Browned Butter Ravioli with Chicken,Toasted Walnuts, and Crispy Sage
From: kevinandamanda.com via Pinterest

Ingredients:
1 lb chicken breast with rib meat
1 tsp kosher salt
1 tsp pepper
1 tsp paprika
1 tsp onion powder
1 tsp garlic powder
1 tsp dried thyme
1 tbsp vegetable oil
9 oz fresh mini ravioli
2 oz (1/2 cup) walnuts
4 tbsp butter
1/3 cup fresh sage leaves

Directions:
Preheat oven to 350 degrees F. Combine salt, pepper, paprika, onion powder, garlic powder, and thyme and rub over both sides of the chicken. In a dutch oven or large, oven-safe pot, heat oil over medium-high heat. Add the chicken, skin side down, and cook for 2 minutes until golden brown. Flip and cook for two more minutes. Move the pot to the oven and continue cooking for 25-30 minutes. Allow the chicken to cool for 5 minutes, then chop into bite-sized pieces.

Boil and drain the ravioli according the to package directions. Set aside.

Place the walnuts in a large skillet over medium heat and toast for 5-7 minutes, stirring frequently. Remove and chop. Wipe the skillet clean, and melt 4 tablespoons of butter in the same skillet over medium heat. When the butter just starts to turn brown, add the sage and stir constantly for one minute. Immediately add the ravioli and stir to combine. Add the chicken and most of the chopped walnuts and stir. Plate the pasta and top with remaining walnuts.


The Result:
I did some adapting for my family. First, I couldn't find fresh sage so I used ground...probably about a teaspoon. Then, my chicken was already cooked from last night (I made extra...how smart of me, I know!) so I skipped the chicken cooking step entirely. I basically boiled the ravioli, cut the chicken into bite-sized pieces, toasted the walnuts, and made the sauce. I combined everything in the same pan and--BOOM!--dinner was ready. This ended up coming together very quickly...SCORE!

On another note, I used a whole stick of butter for the sauce, closer to a cup of walnuts, and three packages of spinach/cheese ravioli. We needed to feed five people and have enough for two lunches the next day. I cook for a big family, so I always adjusted the quantities accordingly.

Another note on top of the previous note, This would be a fabulous vegetarian dinner, by omitting the chicken. Honestly, the chicken just added bulk and not much else. I would have been happy with just the ravioli, walnuts and browned butter sauce. Either version gets a solid thumbs up from me!

August 25, 2011

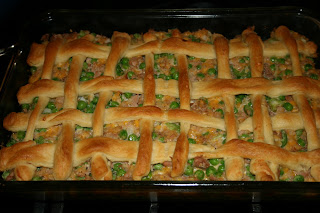
Hot Crossed Tuna Casserole

Typically, I am not a fan of Tuna Casserole. It's always seemed, well, strange to me. Maybe it's because I was scarred as a child. One of my neighborhood friend's mother always made it when I was invited to their family dinner. It was gloppy and gloopy, with an overwhelming sense of tuna-ishness. It was not good.

My friend, Claire Gertrude recently made this version of tuna casserole that she remembered from her childhood. She assured me that it was not your typical tuna casserole mess, and let me sample some. She was right! It was yummy...especially with the sauce. It totally reminded me of a deconstructed tuna melt sandwich (which I love) and the cucumber dill sauce gave it just the right balance. If you are tuna-casserole adverse, this may be the recipe to make you reconsider how you feel about them.

Hot Crossed Tuna Casserole
From: Cooking Claire blog

Ingredients:
3 or 4 cans tuna, drained
1 16 oz. package frozen peas, thawed (I put mine in frozen)
1 c. shredded cheddar cheese
1 c. celery, sliced
1/2 c. bread crumbs
1/4 c. chopped onion
1/4 tsp. salt
1/8 tsp. pepper
1 cup mayonnaise
1 tube crescent roll dough

Cucumber Sauce:
1/2 c. chopped cucumbers
1 T. chives, chopped
1 T. chopped parsley
1/4 t. salt
1/4 t. dill weed
1/2 c. mayo
1/2 c. sour cream

Directions:
Combine tuna, peas, cheese, celery, bread crumbs, onion, seasonings, and mayonnaise; mix well. Spoon into a baking dish. Separate crescent roll dough into 2 rectangles. Press perforations to seal. Cut dough into 4 long and 8 short strips. Place strips over casserole in lattice design. Bake at 350 for 35 to 40 minutes or until crust is brown. Serve with cucumber sauce.

To make sauce, combine all ingredients and mix well. Chill. Pour over top of each serving.


The Result:
Easy, comforting, and family-friendly. My kids loved this, and it was even better the next day for leftover lunch. The lattice crust makes it visually appealing, as well. I don't think "visually appealing" is an adjective used to often describe tuna casserole, so that is definitely a check in the "pro" column for this recipe. More tuna casserole...yes, please.

August 15, 2011

Sesame Tofu Noodle Bowl with Peanut Sauce

I don't like tofu. Well, let me amend that...I didn't like tofu before this recipe. I thought that the flavor and texture were--in a word--yucky. (I know, I know...not very mature.) On a whim, I decided to give tofu one more shot before chalking it off forever. Aggie from Aggie's Kitchen admitted her own aversion to tofu that sounded similar to mine. Then, she recommended this dish. Since Aggie is a trusted recipe source, I went for it. Oh man, I'm glad I did. This was really, really good. I LIKED the tofu in this recipe. I'm talkin' LIKE liked. Yeah, crazy right???? This may be the start of a beautiful friendship between tofu and me. Only time will tell...

Sesame Tofu Noodle Bowl with Peanut Sauce
From: Family Kitchen on babble.com By:Aggie's Kitchen (via Eat, Live, Run)

Ingredients:

For tofu:
1 package of extra firm tofu (see below for instructions on how to drain properly)
1 tablespoon sesame oil
a couple splashes soy sauce
2 tablespoons sesame seeds
1 tablespoons canola oil

For sauce:
1/2 cup peanut butter
2 tablespoons rice vinegar
1/3 cup low sodium soy sauce
1/3 cup warm water
2 teaspoons sesame oil
2 teaspoons honey or agave
pinch of red pepper flakes
2 tablespoons minced ginger

For noodles:
1 package soba noodles
2 large red bell peppers, sliced thin
1 large bok choy, sliced thin (I used 3 baby bok choy)
handful of chopped fresh cilantro, for serving

Directions:

TO PROPERLY DRAIN TOFU:
Take tofu out of package and place on a plate lined with paper towel. Place additional paper towels on top of the tofu. Add another plate to sandwich the tofu. Place a heavy weight (like a heavy skillet, heavy can, etc.; I used the top of my cast iron panini press) on the top plate to press the tofu. Let the tofu drain for 1/2 hour, then change the paper towels, flip the tofu over, and let it drain for an additional half hour (1 hour of total draining time).

Once draining process is complete, pat tofu to dry well. Slice longways into rectangles, about 1/2 inch thick, then smaller into cubes. Place in a bowl and gently toss with sesame oil, soy sauce and sesame seeds.

Heat canola oil up a large non stick skillet over medium-high heat. Add tofu to pan and cook until bottom sides are browned. Flip over and continue to cook till all sides are browned and crisp, about 5-7 minutes. Set aside.

While tofu is cooking, make peanut sauce by adding all the ingredients to a blender and combining until smooth, about 30 seconds.

In the meantime, bring pot of salted water to a boil and add soba noodles. Cook according to instructions.

Place red pepper strips and bok choy in a colander. When noodles are ready, pour over vegetables in colander and drain water, while rinsing with cold water at the same time. Doing this blanches the veggies quickly and easily. Transfer noodles and veggies to a large bowl and add peanut sauce. Gently toss and combine together. Add tofu and cilantro and serve into bowls.


The Result:
Dealing with the tofu was a bit of a pain. However, I must say, it was worth it. I really enjoyed this recipe...AND the tofu was pretty darn yummy. (I honestly thought that I would never say that about tofu.) I think the more I prepare tofu, the easier it will get (i.e. I will become more efficient at dealing with it). The key is to properly drain the tofu. Eureka!!!! What a revelation!!! Tofu can actually be delicious!

All in all, this is a great one to try if you are apprehensive about tofu. I think this recipe can be served as a gateway tofu dish...good for those of us who think that they are tofu-adverse. (A tofu ambassador, if you please.) The texture and flavor of all the components worked really well together. My kids even ate it without complaint. Hooray! I now have a "go-to" tofu recipe.

June 6, 2011

Turkey Reuben Burger with Jen's Thousand Island Dressing

This is a Cooking Light recipe that was supposed to be a meatball sub of sorts. I decided to morph their sandwich into a burger, since I forgot to buy hoagie rolls during my weekly grocery shop. Thankfully, I did have some sandwich thins on hand and I find a burger is easier for my kids to eat anyway. Win-win!

Turkey Reuben Burger
Adapted From: Cooking Light, December 2010; Alyson Haynes

Ingredients:
2 teaspoons paprika, divided
1 1/2 teaspoons ground coriander
1 teaspoon garlic powder
3/4 teaspoon black pepper
1/2 teaspoon sugar
1/4 teaspoon salt
1/4 teaspoon ground red pepper
1.25 lbs. ground turkey
Cooking spray
4 whole wheat hamburger buns
1 1/3 cups packaged coleslaw
1/4 cup reduced-fat Thousand Island dressing (I made my own--see below. Adjust the quantity based on how saucy you like it.)
4 slices of Swiss cheese

Directions:
Preheat broiler.

Combine 1 1/2 teaspoons paprika, coriander, and next 6 ingredients (through turkey). Shape into 4 hamburger patties. Place burgers on a broiler pan coated with cooking spray, and broil for 6 minutes on each side, or until done.

While the burgers cook, combine the coleslaw, dressing, and remaining 1/2 teaspoon paprika in a separate bowl. Set aside.

Arrange the cooked burger on a bun with 1 cheese slice (leave the top of the bun face up). Place the sandwiches on broiler pan, and broil for 1 minute or until cheese melts and bread is toasty. Divide coleslaw mixture among the sandwiches for topping and finish with the toasted bun lid.

***************************************************

Here is my recipe for the dressing/sauce:

Jen's Thousand Island Dressing

Ingredients:
1/2 cup of light mayo
1/4 cup of dill relish
1/3 cup of ketchup
1/4 cup of diced onions
1 or 2 tablespoons of chili sauce (Adjust the amount based on how spicy you like it; I used an Asian chili sauce.)
1 teaspoon of paprika
a pinch of cayenne pepper (optional)
salt and pepper to taste

Directions:
Combine all ingredients in a bowl and refrigerate. This dressing should keep for about a month in a sealed container in the fridge.


The Result:
These burgers were fantastic!!! I really love a good Reuben sandwich, and this recipe totally satisfied my Reuben fix. I had to substitute chopped Napa cabbage for the coleslaw mix, so I did some tinkering. I used the cabbage like lettuce, and just used our dressing as a condiment. These burgers were pretty darn perfect.

May 29, 2011

Catfish Po'boy with Hoisin-Peanut Sauce

Here is an unusual take on a Southern standard. Catfish is one of my favorites; but not so much for my husband. This recipe seemed to be a nice compromise on the hotly debated "catfish issue" at my house, since we both really liked this unique version of a classic Po'boy. This is certainly a yummy Asian-inspired twist on these sandwiches.

Catfish Po'boy with Hoisin-Peanut Sauce
From: Cooking Light, David Bonom,JULY 2002

Ingredients:
Sauce:
1 teaspoon dark sesame oil
2 tablespoons chopped onion
1 teaspoon minced peeled fresh ginger
3 tablespoons hoisin sauce
1 tablespoon creamy peanut butter
1 tablespoon fresh lime juice
1/4 teaspoon sugar

Catfish:
1/4 cup Thai chile sauce
2 garlic cloves, minced
4 (6-ounce) farm-raised catfish fillets
Cooking spray
Remaining ingredients:
4 (2 1/2-ounce) hoagie rolls, split and lightly toasted
2 cups shredded napa (Chinese) cabbage

Directions:
To prepare sauce, heat oil in a small saucepan over medium heat. Add onion and ginger; cook 2 minutes, stirring frequently. Reduce heat to low. Add hoisin sauce, peanut butter, lime juice, and sugar; cook 3 minutes, stirring frequently. Remove from heat; set aside.

Prepare grill or broiler.

To prepare catfish, combine chile sauce and garlic in a large zip-top plastic bag. Add catfish; seal and marinate in refrigerator 30 minutes, turning bag occasionally.

Remove fish from marinade; discard marinade. Place fish on a grill rack or broiler pan coated with cooking spray. Cook 10 minutes or until fish flakes easily when tested with a fork.

Spread 1 tablespoon sauce over bottom half of each hoagie roll; top each serving with 1/2 cup cabbage, 1 catfish fillet, and top half of roll. Serve immediately.


The Result:
These were tasty, but a bit too spicy for my little ones. We gave the kids some fish sticks and the husband and I enjoyed these sandwiches by ourselves. We both had seconds, so I would say we really liked these tasty fish sandwiches.

May 8, 2011

Souffle Stuffed Chicken

When my friend, Claire told me about this recipe I was really skeptical. I think I told her it was going to suck, actually. I can't remember why I was so against it, but I think my negativity had something to do with the fact that it used prepared, frozen souffle for the chicken filling. Claire ended up giving it really good reviews, so I thought I would give it a shot. I am happy to report that I was totally wrong!!! This chicken rocked my world. Okay, maybe that is overstating things a bit, but it was super-good. I now recommend this chicken, too!


Souffle Stuffed Chicken

From: The South Beach Diet Cookbook by Arthur Agatson

Ingredients:
4 boneless skinless chicken breasts, pounded to 1/4 inch thickness
1 (12 ounce) package Stouffer's frozen spinach souffle, not thawed
2 tablespoons extra virgin olive oil
2 garlic cloves, sliced
1 cup chicken broth
2 tablespoons lemon juice
1 teaspoon Dijon mustard
salt and pepper
chopped fresh parsley (to garnish)
lemon slice (to garnish)

Directions:
Preheat oven to 350 degrees F.

Using a serrated knife, cut the frozen spinach souffle crosswise into 4 equal pieces. Top half of each whole breast with one of the pieces of souffle. Fold half of the chicken over the filling and fasten edges with wooden picks.

Heat the oil in large skillet over medium heat. Add garlic and cook for 3 minutes or until golden. Add chicken breasts and cook for 7 minutes per side or until well browned.

Remove chicken to an oven-proof dish. Bake for 30 minutes or until a thermometer registers 170 degrees F when inserted into the thickest portion.

While the chicken is baking, add broth, lemon juice, mustard, salt and pepper to the large skillet. Heat to boiling then reduce to low. Cover and simmer for 20 minutes or until the sauce is reduced to 1/2.

To serve, remove and discard wooden picks. Arrange chicken on a warm serving platter and spoon sauce over the chicken. Garnish with freshly chopped parsley and lemon slices.


The Result:
The kids, husband, and I all give this recipe a thumbs-up. If you try it, make sure you make both the sauce and chicken...the sauce was the star, I think. Although, my husband would disagree and say that the garlic chips beat out the sauce for the favorite component. Either way, the whole combination of flavors was tasty. We had a green side salad and dinner was done. This is something that I will make again!

(Note: My photo does not include the sauce. I took the pic and then remembered the sauce...oops.)